
Smart Home First Experience - Apple HomeKit & Xiaomi Mijia
Mi Home Security Camera and Mi Home Smart Desk Lamp, HomeKit Setup Guide
[2020/04/20] Advanced Guide Released : Experienced users please go directly here >> Demo using Raspberry Pi as HomeBridge server to connect all Mijia appliances to HomeKit
Miscellaneous:
Recently, I just moved; unlike my previous place with office-style ceiling lights that were so bright I had to unplug some tubes to make my eyes comfortable, the new place has decorative reflection lights. The brightness is a bit low for using the computer and reading, and after two weeks, my eyes feel drier and more uncomfortable. I initially planned to shop at IKEA, but considering light color and eye protection, I compared cost-performance and finally chose the Xiaomi desk lamp (plus I already had a Xiaomi smart camera, both are from the Mi Home series).
This Article:
Actually, I didn’t pay much attention to whether the devices supported Apple HomeKit when I was shopping. As an iOS developer, that’s really unprofessional of me because I never expected Xiaomi to support it.
This article will introduce Using Apple HomeKit, How to connect non-HomeKit smart devices to HomeKit via third-party tools, and How to build a smart home using the Mi Home app (with IFTTT).
You can skip around based on your device needs.
Purchase:
I bought two desk lamps in total: one (Pro) for my computer desk, and the other for bedside reading.
Mi Smart Desk Lamp Pro :
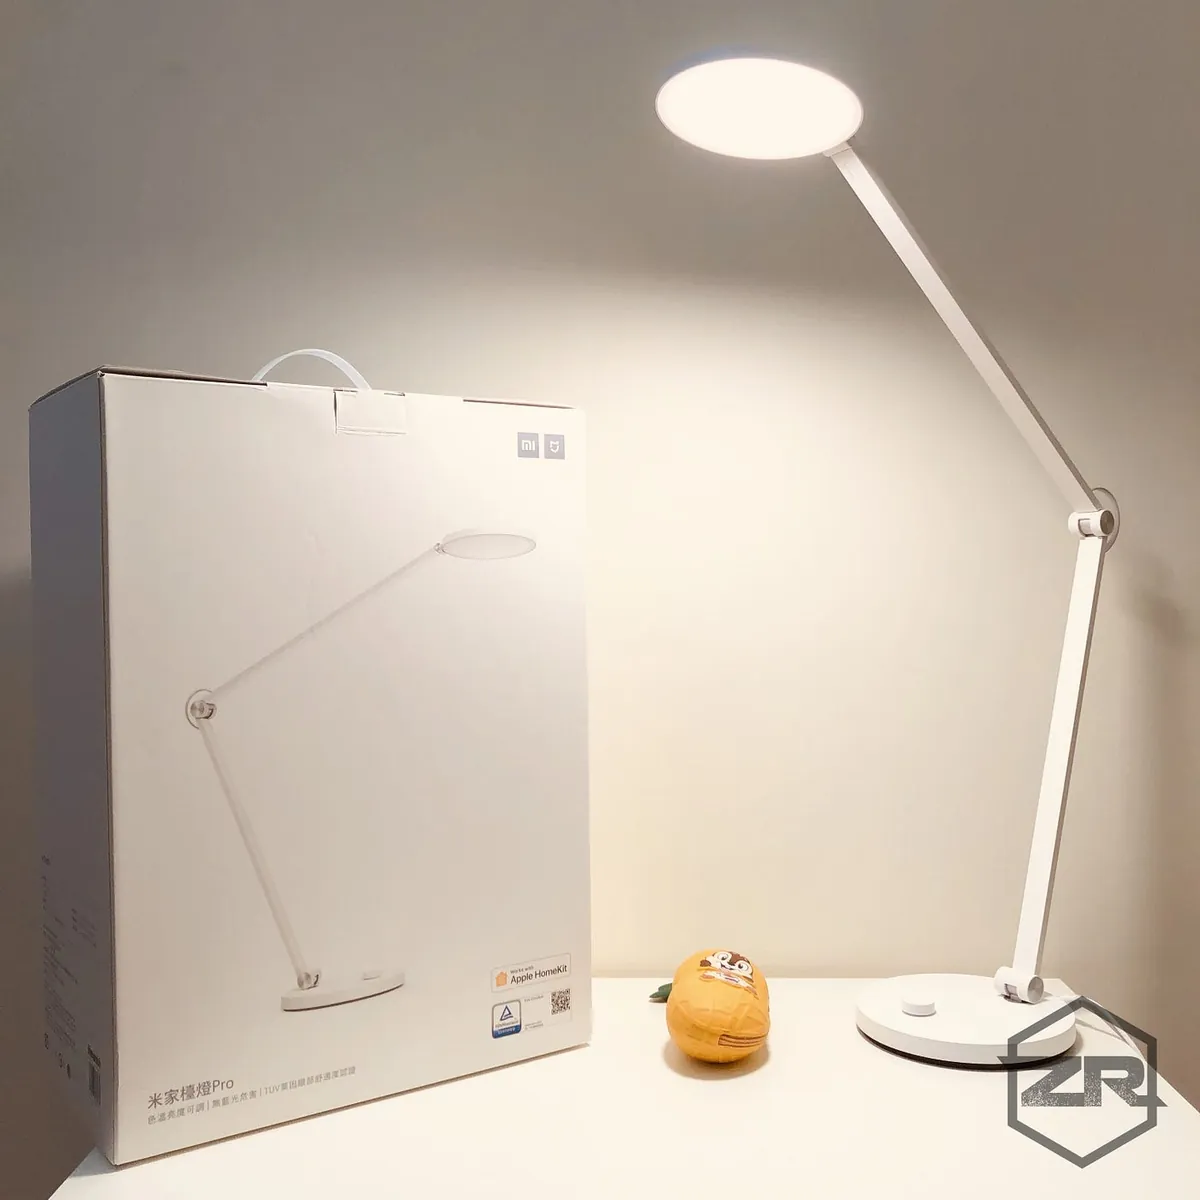
NT$ 1,795 Supports Mi Home and Apple HomeKit
Mi LED Smart Desk Lamp :
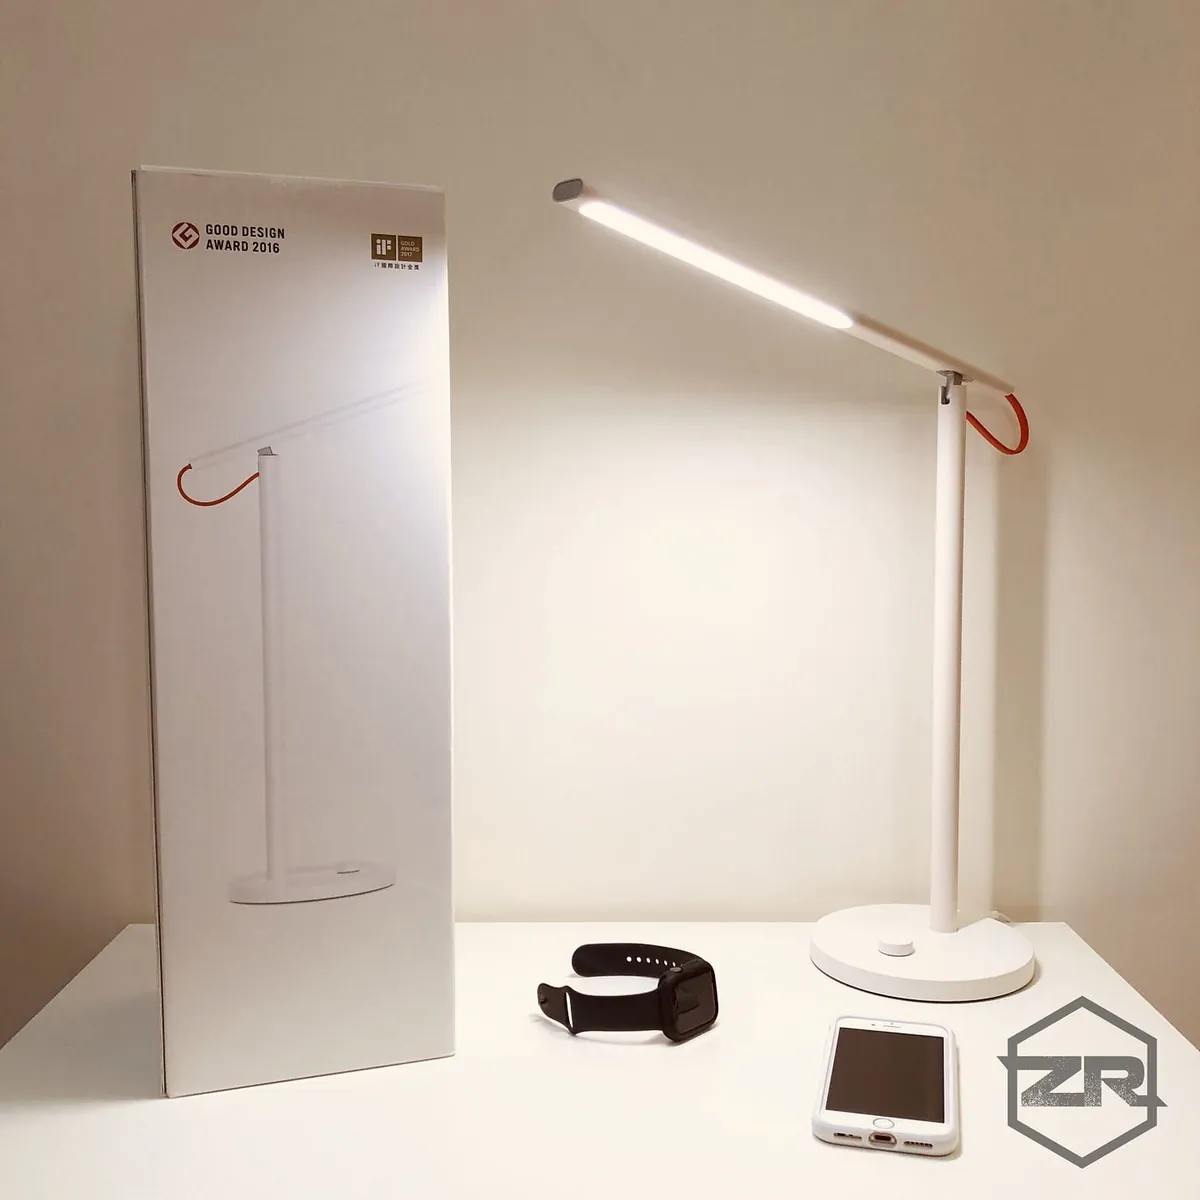
NT$ 995 Supports only Mi Home app
For detailed information, please refer to the official website. Both lamps support smart control, color changing, brightness adjustment, and eye protection. The Pro version supports Apple HomeKit and three-level angle adjustment. Based on current use, the functionality of a single lamp is quite satisfactory. The only drawback is that the Pro version’s angle adjustment only allows the base to rotate horizontally; the lamp itself cannot, so the light angle cannot be adjusted!
Ideal Smart Home Goals:
Devices currently available:
-
Mijia Smart Camera PTZ Version 1080P (Supported: Mijia)
-
Mi Home Desk Lamp Pro (Supports: Apple HomeKit, Mi Home)
-
Mi Home LED Smart Desk Lamp (Supported by: Mi Home)
Ideal Goal:
When arriving home: Automatically turn off the camera (for privacy and to prevent accidental alarm triggers; the Mi Home app has a bug where the alarm cannot be turned on/off according to the set time), and turn on the Pro lamp on the desk (to avoid fumbling in the dark).
When leaving home: Automatically turn on the camera (default to enable alarm mode) and turn off all lights.
Final Achievements of This Article:
Send push notifications when leaving or arriving home, and trigger actions with a tap on the phone (existing devices cannot achieve the ideal automation).
The Path to Smart Home Setup:
Using Apple HomeKit
*Only for Mi Home Desk Lamp Pro! Mi Home Desk Lamp Pro! Mi Home Desk Lamp Pro!
This is the simplest part because it uses native features.
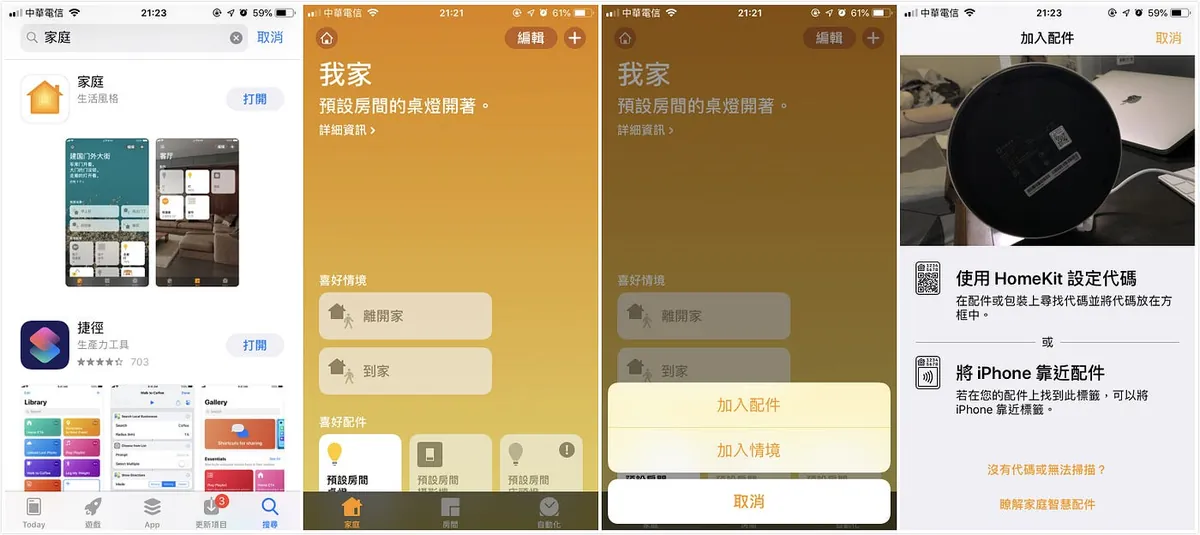
Only Four Steps
-
Find the Home app (if not installed, search for “Home” in the App Store and install it)
-
Open the Home app
-
Tap the “+” icon at the top right to add a nearby device
-
Scan the HomeKit QR code on the bottom of the Pro lamp to add the accessory!
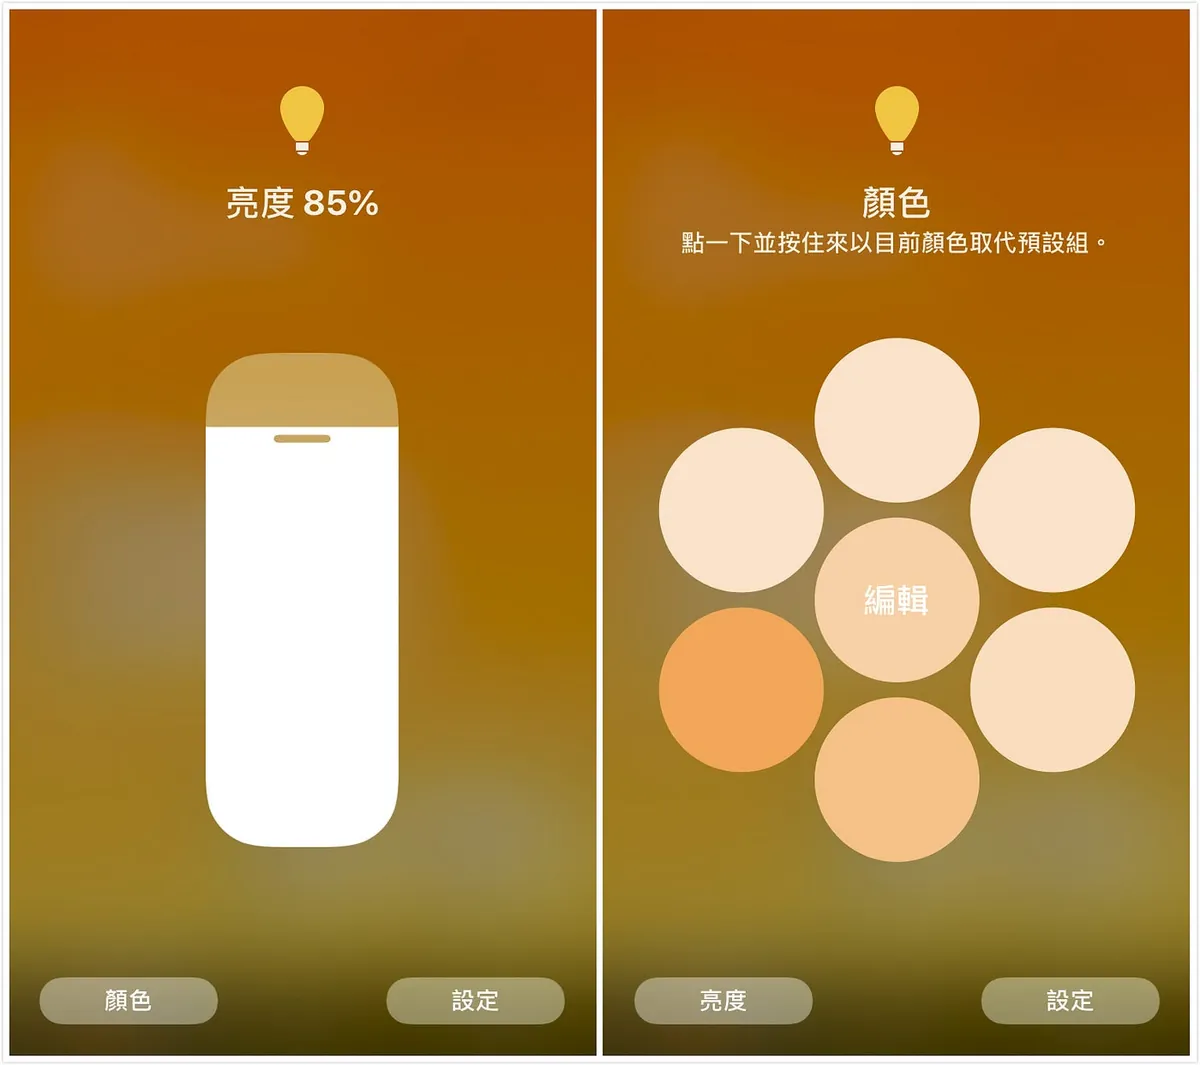
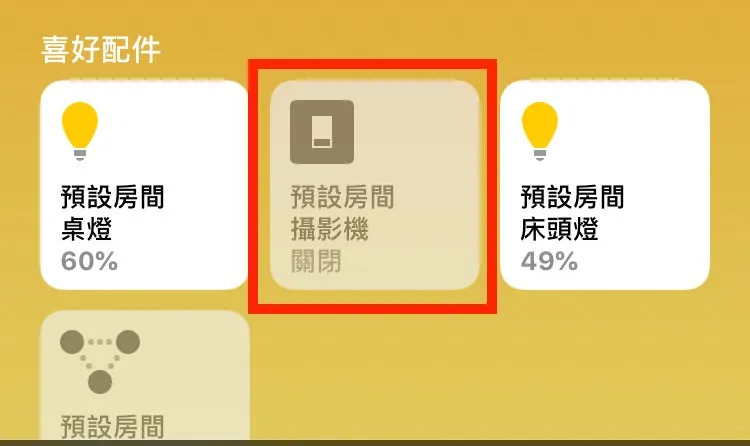
After successfully adding the accessory, press firmly (3D TOUCH) or long press on the accessory to adjust brightness and color.
How to Use Third-Party Integration for Smart Home Devices That Do NOT Support Apple HomeKit?
Besides the smart devices that natively support Apple HomeKit, does that mean devices without HomeKit support cannot be controlled through the Home app at all?
This section will guide you step-by-step on how to add unsupported devices (camera, standard desk lamp) into the Home app!
Mac ONLY, Windows users please skip directly to the Xiaomi section
My devices are MacOS 10.14 / iOS 12
Using HomeBridge:
HomeBridge uses a Mac computer as a bridge to simulate unsupported devices as HomeKit accessories, allowing them to be added to the “Home” app.
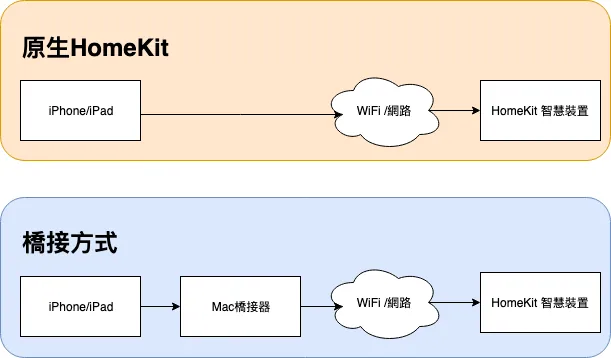
Operation Comparison
One key point is you need to keep a Mac computer powered on to maintain a smooth bridge connection; if the computer is shut down or in sleep mode, you won’t be able to control those HomeKit devices.
Of course, there are experts online who buy a Raspberry Pi to use as a bridge; however, this involves too much technical detail and will not be covered in this article.
If you still want to try it after knowing the drawbacks, you can continue reading below or skip to the next chapter that directly uses Xiaomi’s app.
Step 1:
Install node.js: Click here to download and install.
Step 2:
Open “Terminal” and enter
sudo npm -v
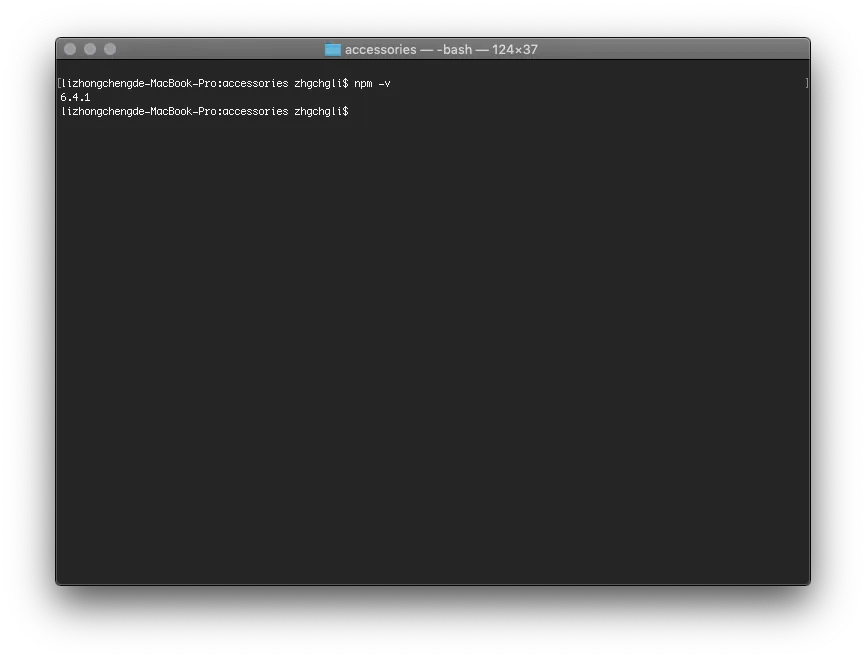
Check if the node.js npm package manager is installed successfully: displaying the version number means success!
Step 3:
Install the HomeBridge package via npm:
sudo npm -g install homebridge --unsafe-perm
After waiting for the installation to complete… the HomeBridge tool is now installed!
Earlier, it was mentioned that “HomeBridge uses a Mac computer as a bridge to simulate unsupported devices as HomeKit devices.” In fact, HomeBridge is just a platform, and each device requires additional HomeBridge plugins to be added.
They are easy to find by googling or searching on GitHub for “mija product English name homebridge”; here are resources for two devices I use:
1. Mijia Camera PTZ Version Resources: MijiaCamera
The camera is a more tricky device. I spent some time researching and organizing the information; hope this helps those in need!
First, use the Terminal to run the command to install the MijiaCamera npm package.
sudo npm install -g homebridge-mijia-camera
After installation, we need to obtain two pieces of information for the camera’s network: the IP address and the Token.
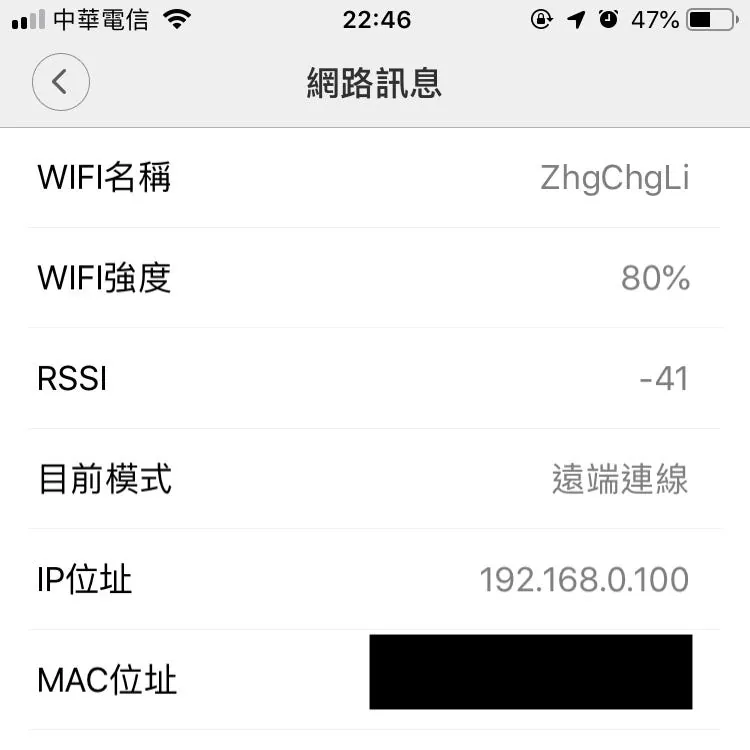
Open the Mi Home app → Camera → Top right “…” → Settings → Network Info to get the IP address!
Token information is more complicated; you need to connect your phone to the Mac:
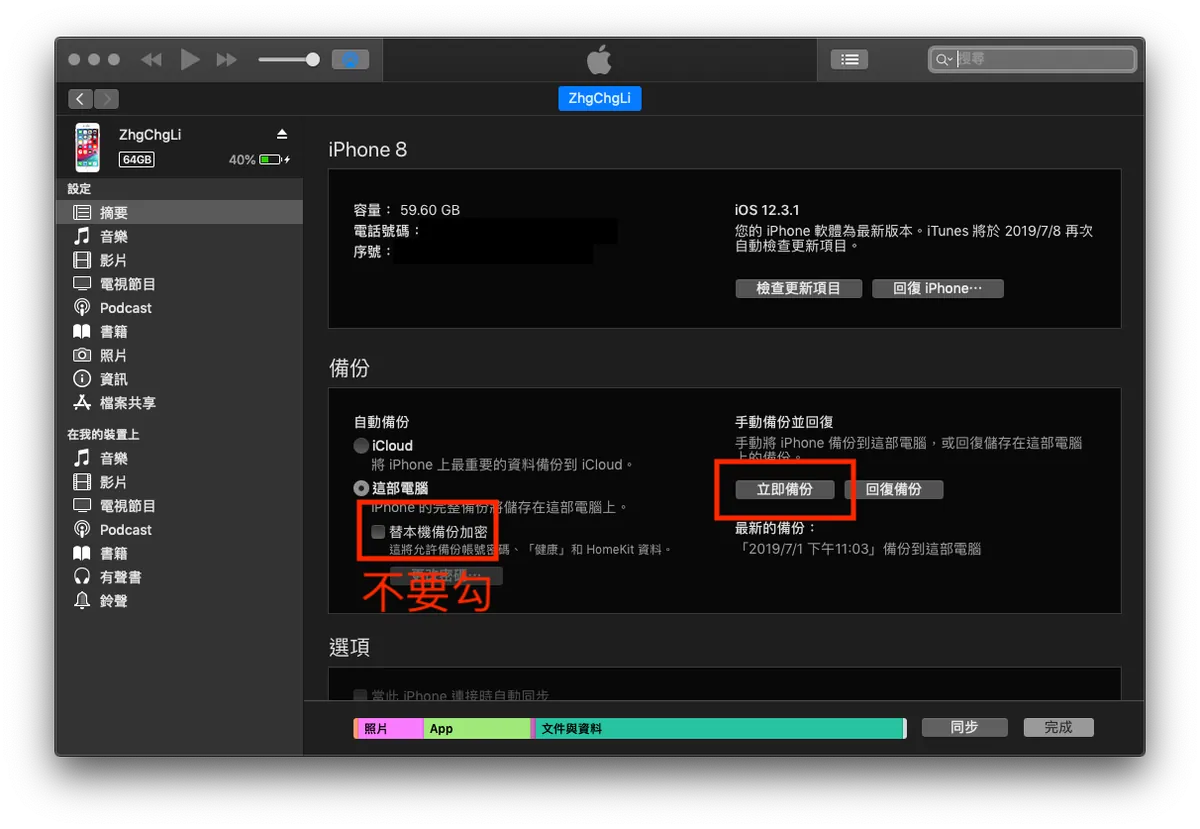
Open the iTunes interface
Select backup Do NOT check Encrypt local backup, then click “Back Up Now”
After completing the backup, download and install the backup viewer software: iBackupViewer
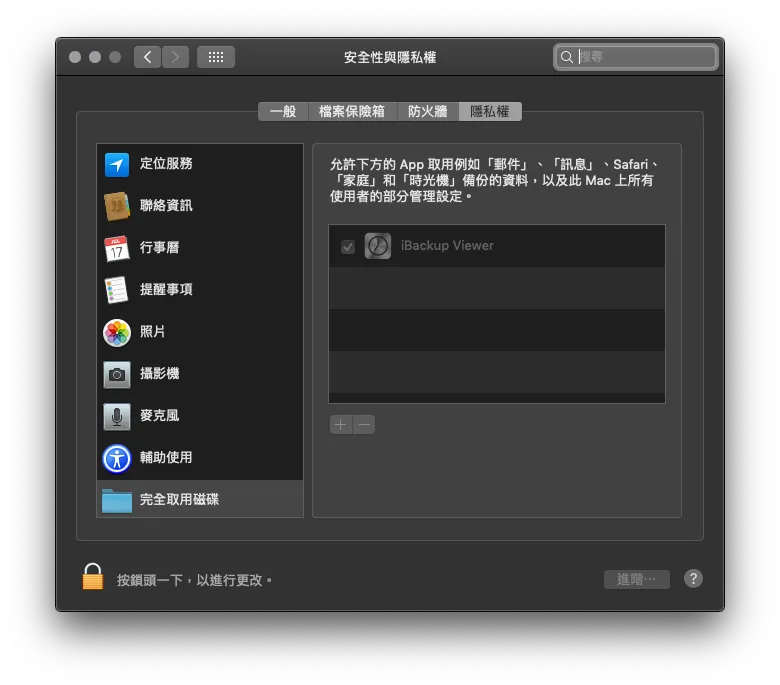
Open “iBackupViewer.” On first launch, it will prompt you to go to Mac “System Preferences” - “Security & Privacy” - “Privacy” - “+” - add “iBackupViewer.”
**If you have privacy concerns, you can disable network access for this software and remove it after use*
After reopening “iBackupViewer” and successfully loading the backup file, click the top right corner to switch to “Tree View” mode.
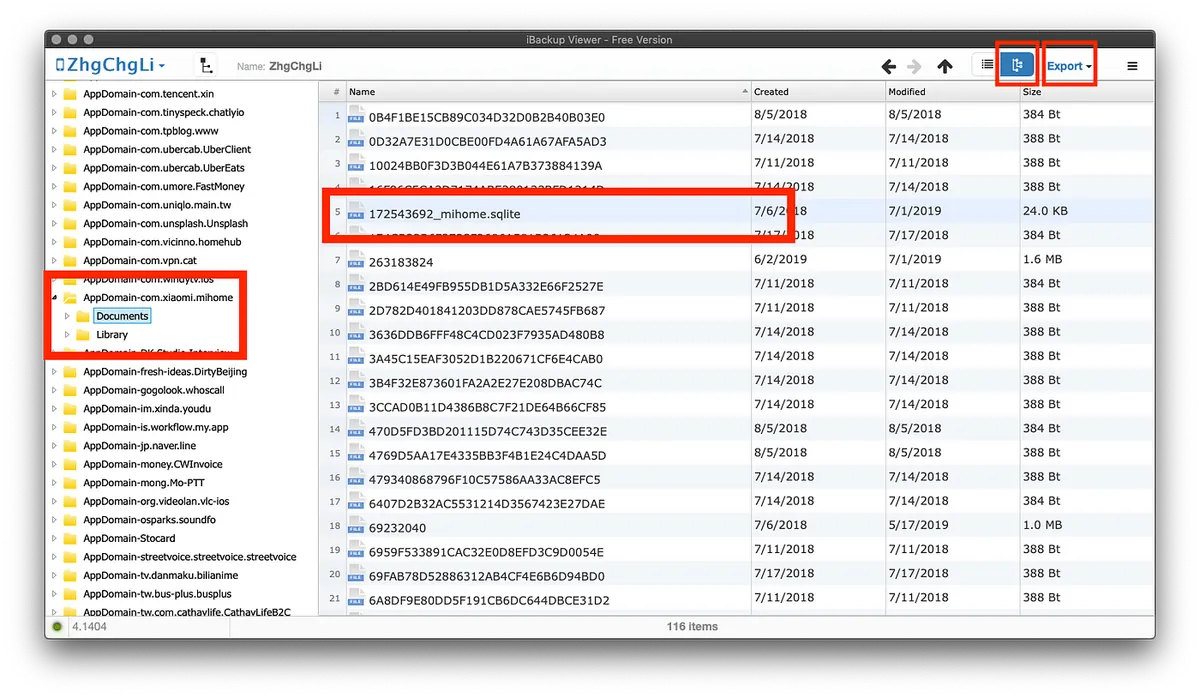
The left side will display all your installed apps. Find the Mi Home app “AppDomain-com.xiaomi.mihome” -> “Documents”
Find and select the file “number_mihome.sqlite” in the document list on the right side.
Click the top right “Export” -> “Selected”
Upload the exported SQLite file to https://inloop.github.io/sqlite-viewer/ to view its contents.

You can see all device information fields in the Mi Home app. Scroll to the far right and find the ZTOKEN field, then double-click to edit, select all, and copy.
Finally, open the website http://aes.online-domain-tools.com/ to convert the ZTOKEN into the final Token.

- Paste the copied ZTOKEN into “Input Text” and select “Hex”.
- Enter the key as “00000000000000000000000000000000” (32 zeros), also select “Hex”.
- Then press “Decrypt!” to convert.
- Select all, copy the text in the blue box at the bottom right, and remove spaces to get the desired Token.
Here, I tried using “miio” to sniff the token directly, but it seems the Xiaomi camera firmware has been updated, making this method no longer a quick and easy way to get the token!
Back to HomeBridge! Editing the config.json file
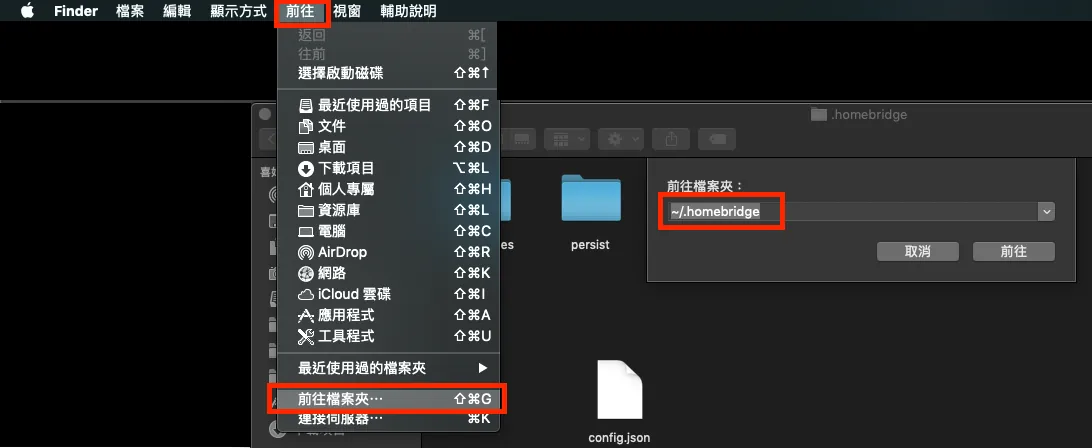
Use “Finder” -> “Go” -> “Go to Folder” -> enter “~/.homebridge” to navigate there.
Open “config.json” with a text editor. If the file does not exist, please create one yourself or click here to download and place it directly inside.
{
   "bridge":{
      "name":"Homebridge",
      "username":"CC:22:3D:E3:CE:30",
      "port":51826,
      "pin":"123-45-568"
   },
   "accessories":[
      {
         "accessory":"MijiaCamera",
         "name":"Mi Camera",
         "ip":"",
         "token":""
      }
   ]
}
Add the above content into config.json, replacing the IP and Token sections with the information obtained earlier.
At this point, return to the “Terminal” and run the following command to start HomeBridge.
sudo homebridge start
If you have already started and then changed the content of config.json, you can modify it as follows:
sudo homebridge restart
(註解已無需翻譯,程式碼保持不變)
Restart
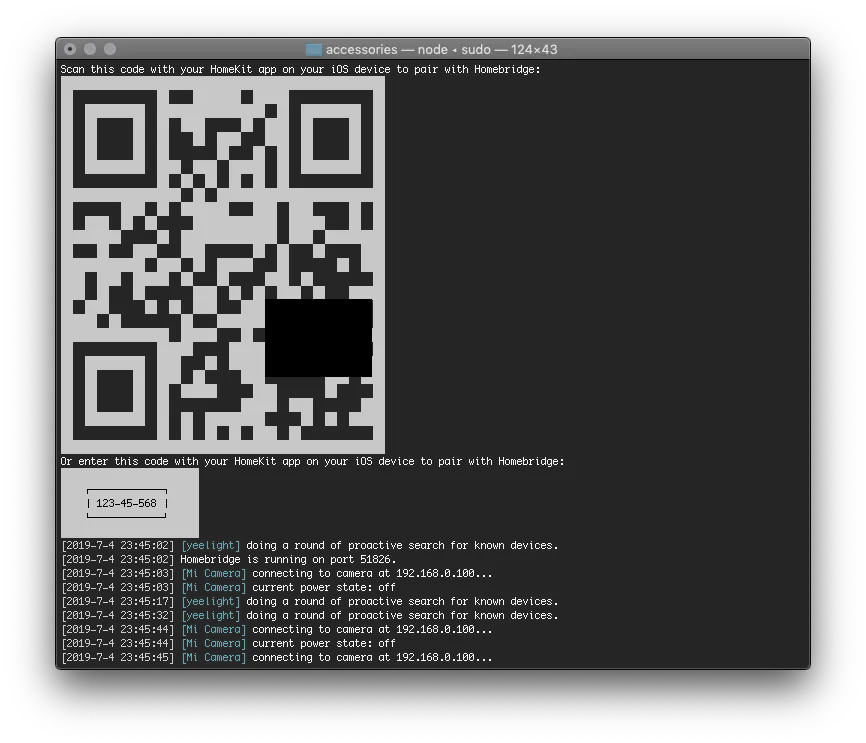
At this point, a HomeKit QR Code will appear for you to scan and add the accessory (the steps are as mentioned above for adding Apple HomeKit devices).
Status messages will also appear below: [2019–7–4 23:45:03] [Mi Camera] connecting to camera at 192.168.0.100… [2019–7–4 23:45:03] [Mi Camera] current power state: off
If these appear and no error messages show up, it means the setup was successful!
A common error is an incorrect Token. Just double-check if any steps in the above process were missed.
Now you can turn the Xiaomi smart camera on and off directly from the Home app!
2. Xiaomi LED Smart Desk Lamp HomeBridge Resource: homebridge-yeelight-wifi
Next is the Mi LED Smart Desk Lamp. Since it doesn’t support Apple HomeKit like the Pro version, we still need to add it using the HomeBridge method. Although the steps do not require the complicated process of obtaining IP and Token, making it simpler than the camera, the lamp has its own quirks. You need to pair it with another Yeelight APP and enable the local network control setting:
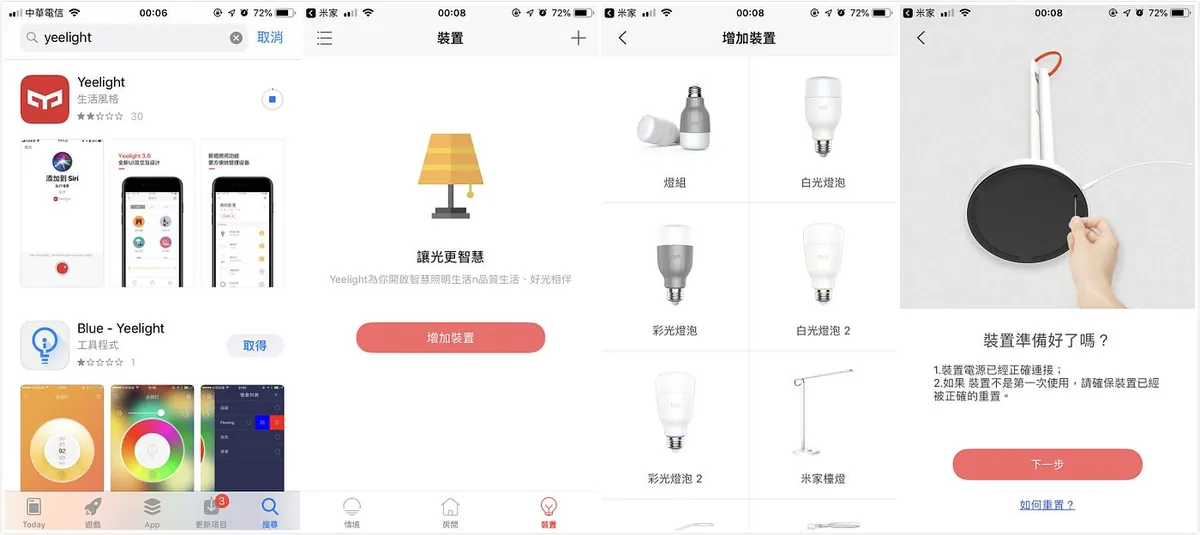
I have to complain about this poor integration. The native Mi Home app cannot perform this setting; so please search for the “Yeelight” app in the App Store to download & install.
Open the app -> Log in directly with your Mi Home account -> Add device -> Mi Home desk lamp -> Follow the instructions to rebind the lamp to the Yeelight app
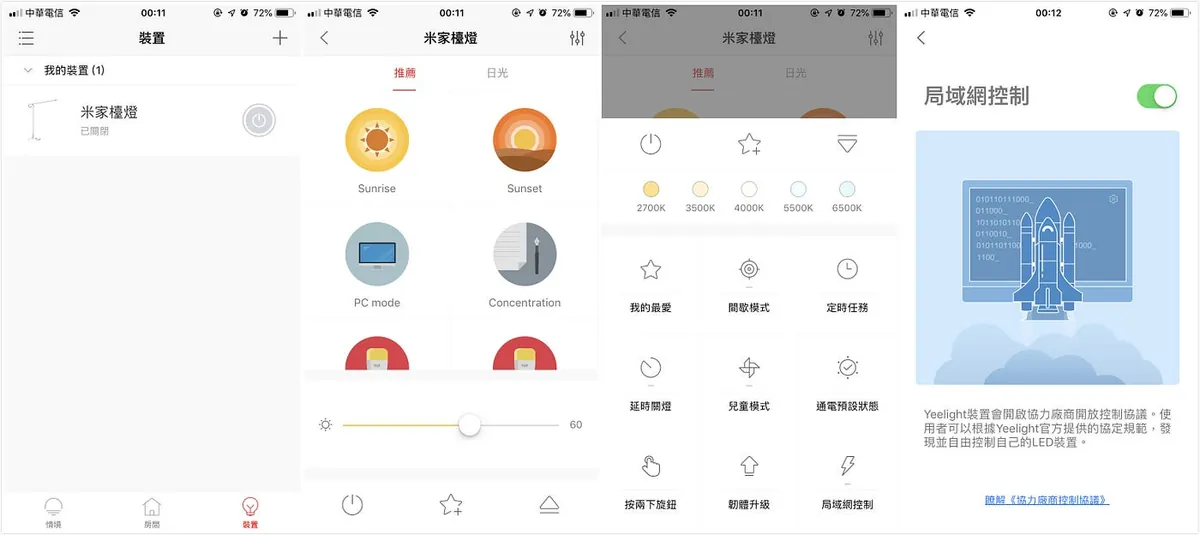
After binding the device, go back to the “Devices” page -> tap “Mi Home Desk Lamp” to enter -> tap the “△” tab at the bottom right -> tap “LAN Control” to enter settings -> turn on the switch to allow LAN (local network) control
The desk lamp setup is complete here. You can keep using this app to control the lamp or rebind it back to the Mi Home app.
Next is the HomeBridge setup; first, open the “Terminal” and run the command to install the homebridge-yeelight-wifi npm package
sudo npm install -g homebridge-yeelight-wifi
After installation, follow the same steps as the camera and go to the ~/.homebridge folder to create or edit the config.json file. This time, just add the following inside the last }
"platforms": [
   {
         "platform" : "yeelight",
         "name" : "yeelight"
   }
 ]
Done!
Finally, the combined config.json file for the above cameras is as follows:
{
 "bridge": {
  "name": "Homebridge",
  "username": "CC:22:3D:E3:CE:30",
  "port": 51826,
  "pin": "123-45-568"
 },

 "accessories": [
  {
   "accessory": "MijiaCamera",
   "name": "Mi Camera",
   "ip": "",
   "token": ""
  }
 ],

 "platforms": [
   {
         "platform" : "yeelight",
         "name" : "yeelight"
   }
 ]
}
Then, return to the “Terminal”:
sudo homebridge start
or
sudo homebridge restart
(註解已無需翻譯,程式碼保持不變)
You can now see the originally unsupported Mi LED Smart Desk Lamp added to the HomeKit “Home” app!
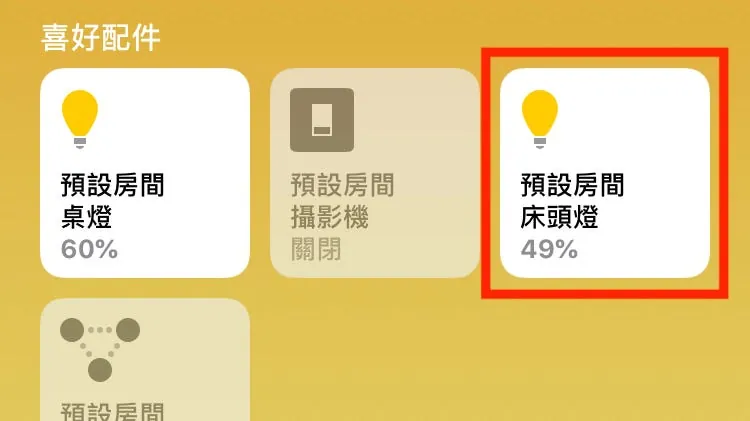
And it also supports color and brightness adjustment!
All HomeKit accessories are added, how to make them smart?
After adding everything and completing the bridging, open the “Home” app as usual.
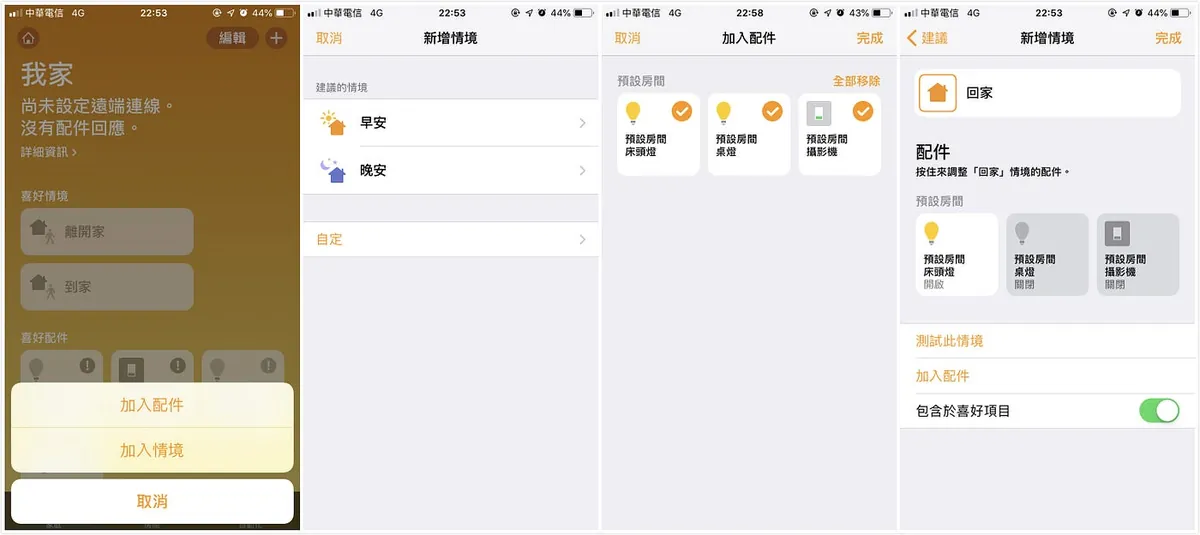
Add a new scene step by step, using “Coming Home” as an example:
Tap the “+” at the top right -> Add Scene -> Custom -> Enter a name for the scene (e.g., Home) -> Tap “Add Accessories” below -> Select the connected HomeKit accessories -> Set the accessory status for this scene (Camera: Off / Desk Lamp: On) -> You can tap “Test Scene” to try it out -> Tap “Done” at the top right!
The scene is now set! At the homepage, tap Scenes to execute all the settings for the accessories inside!
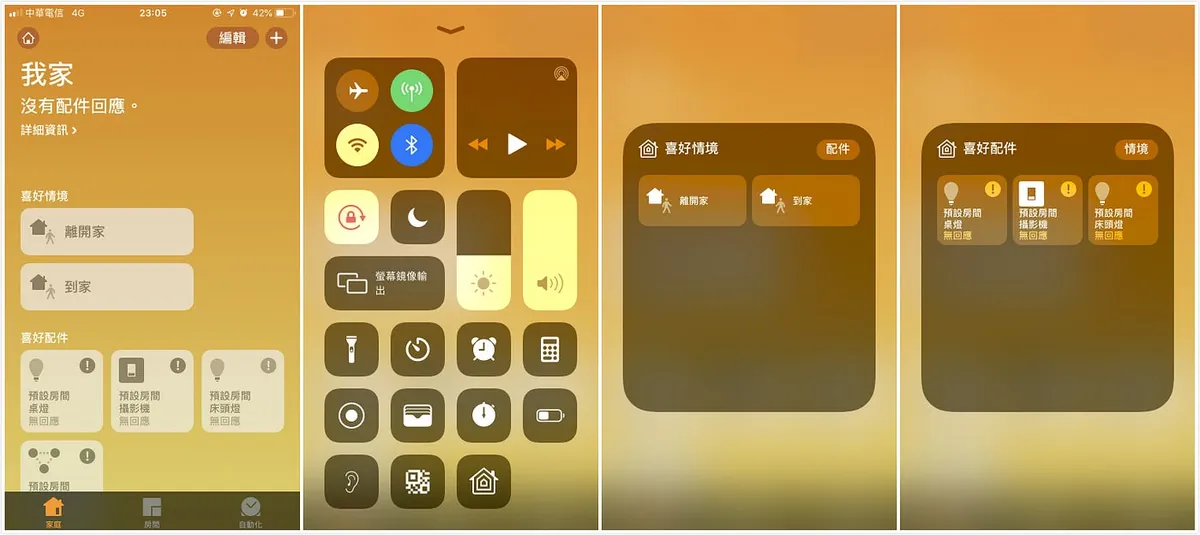
One handy shortcut is to swipe up the control center and tap the house-shaped button to quickly control HomeKit/execute scenes (mode can be switched at the top right)!
You have smart devices, so how to automate them?
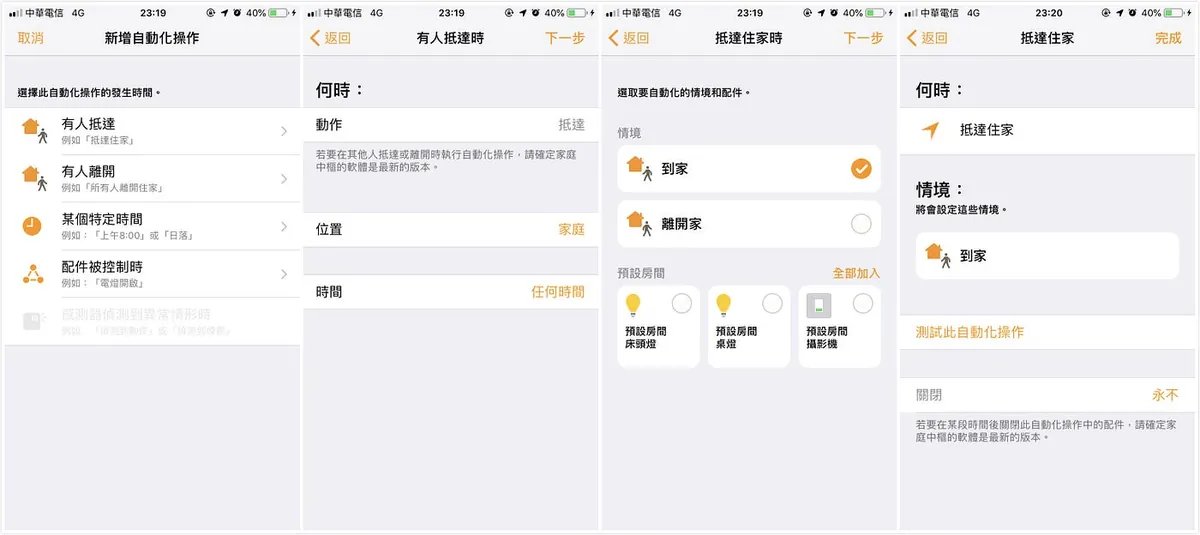
The smart devices are set up, and now I want to achieve the ultimate goal: automatically turn off the camera and turn on the lights when I get home; automatically turn on the camera and turn off the lights when I leave.
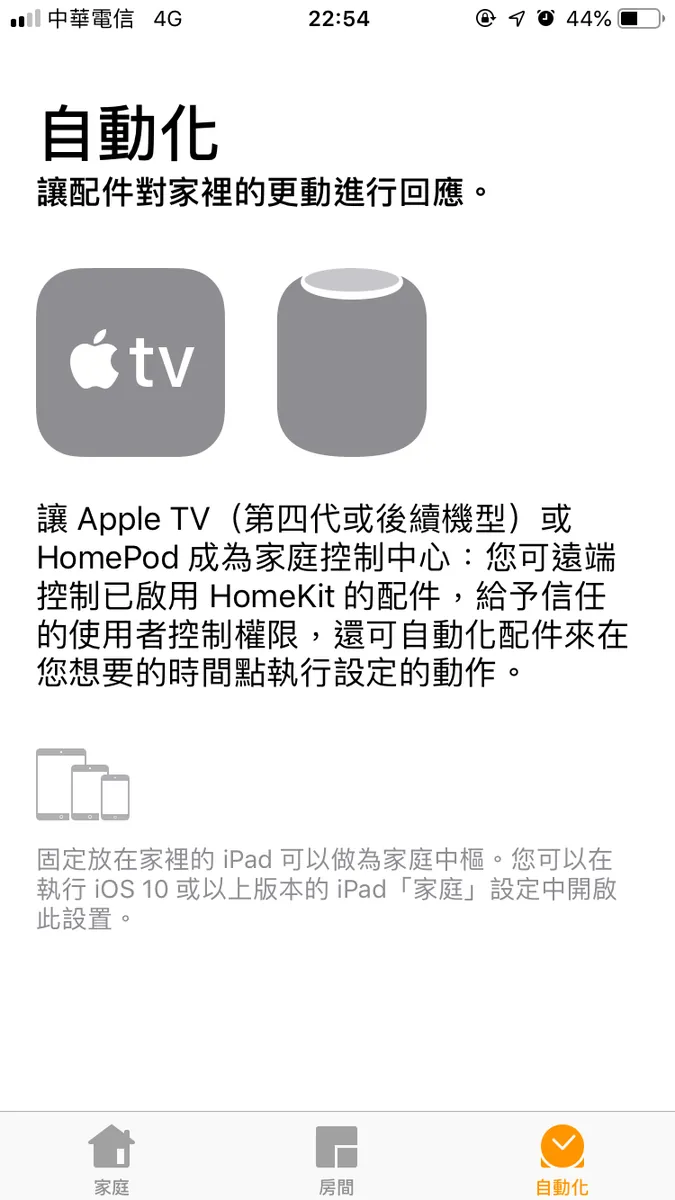
Switch to the third tab “Automation” to set it up. Sorry, I don’t have any of the mentioned devices (iPad/Apple TV/HomePod) to act as a ” Home Hub ”, so I didn’t explore this part.
The principle seems to be that when you arrive home, the “home hub” detects your phone/watch and triggers precisely!
Here I found a tricky method: (Using GPS sensing)
Using third-party apps to connect with “Home” and add automation settings allows you to bypass restrictions on using the “Automation” tab by leveraging your phone’s GPS location for automation.
p.s GPS has an error margin of about 100 meters
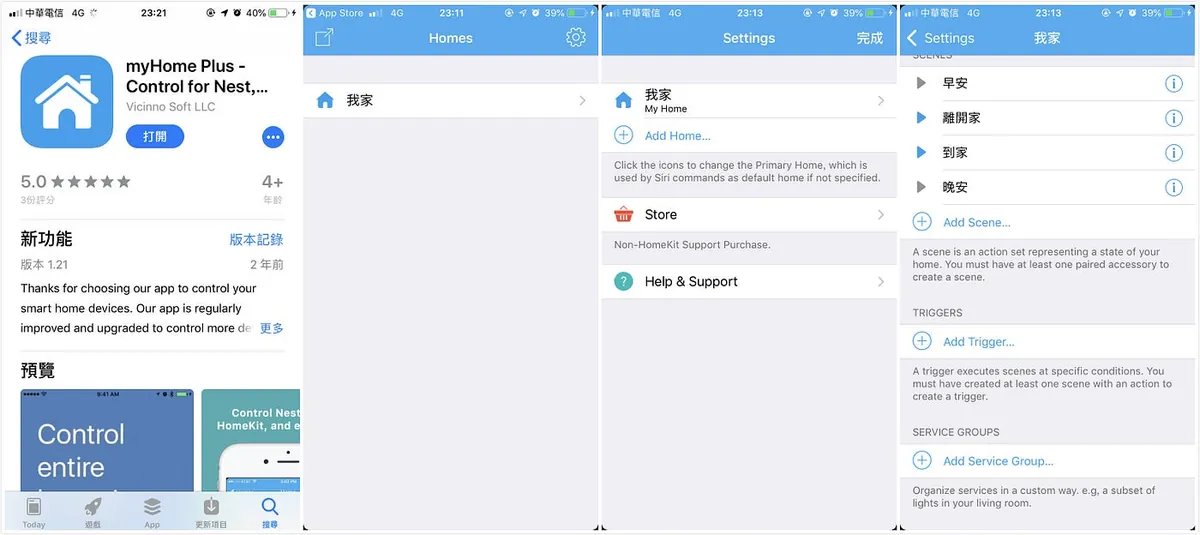
Here, the third-party integration app I used is: myHome Plus
After downloading and installing the app, open it -> Allow access to “Home Data” -> You will see the “Home” data setup -> Tap the “Settings” button at the top right -> Tap “My Home” to enter
-> Scroll down to the “Triggers” section -> Tap “Add Trigger”
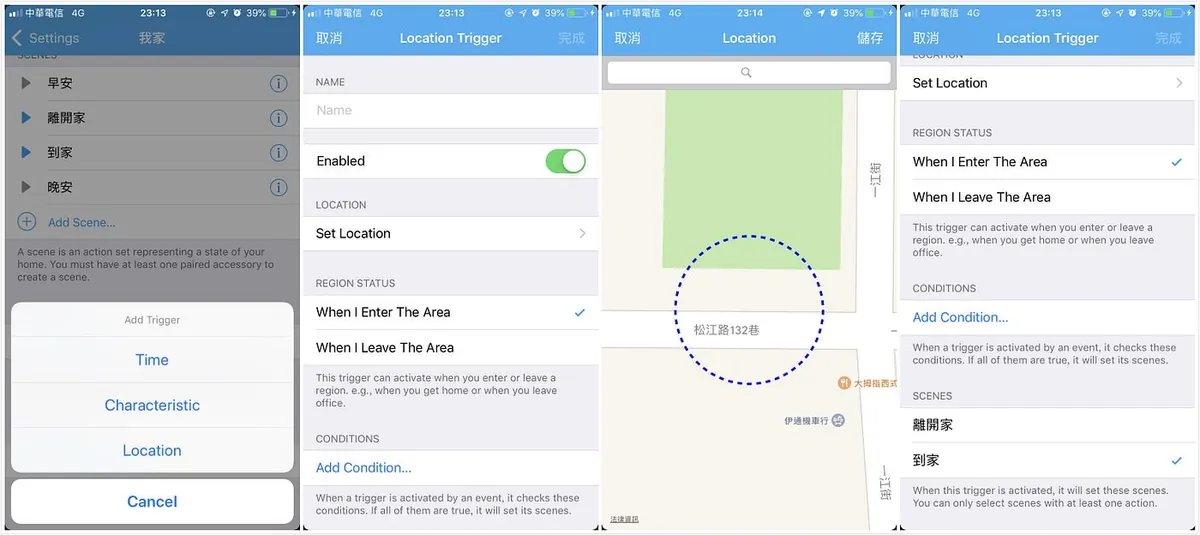
For the trigger type, select “Location” -> Enter a name (e.g., Home) in the Name field -> Click “Set Location” to set the location area -> Next, in REGION STATUS, choose whether it triggers when entering or leaving the area -> Finally, in SCENES, select the corresponding “scene” to execute (created above)
After tapping “Done” in the top right corner to save, go back to the “Home” app, and you will see the “Automation” tab is now enabled and ready to use!

At this point, you can choose the “+” button in the top right corner to directly add automation scripts using the “Home” app!!
The steps are similar to third-party apps, but with better integration! After setting up automation using the native “Home” app, you can also swipe to delete the automations created with third-party apps.
!! Just make sure to keep at least one item; otherwise, the Tab will revert to its original locked state!!
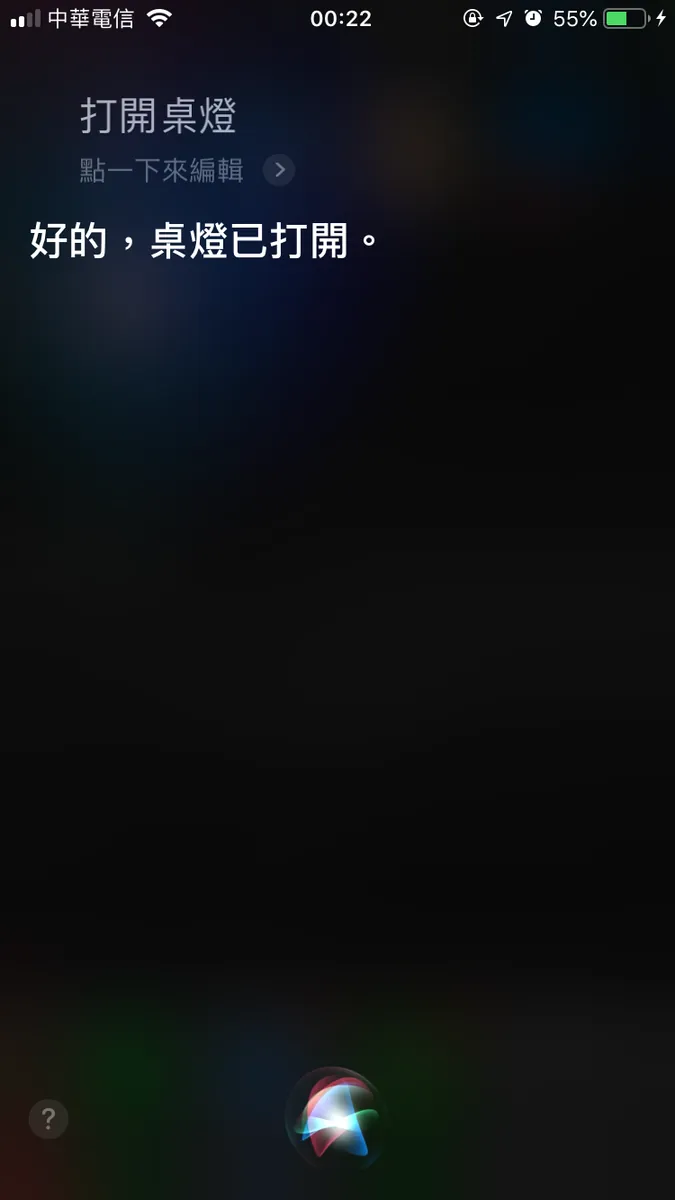
Siri Voice Control:
Compared to the Mi Home described below, HomeKit offers much higher integration. You can directly use voice control to operate configured accessories and execute scenes without any extra setup.
The introduction to HomeKit setup ends here. Next, let’s explain how to use the native Mi Home smart system.
Using the Mi Home App to Build a Smart Home:
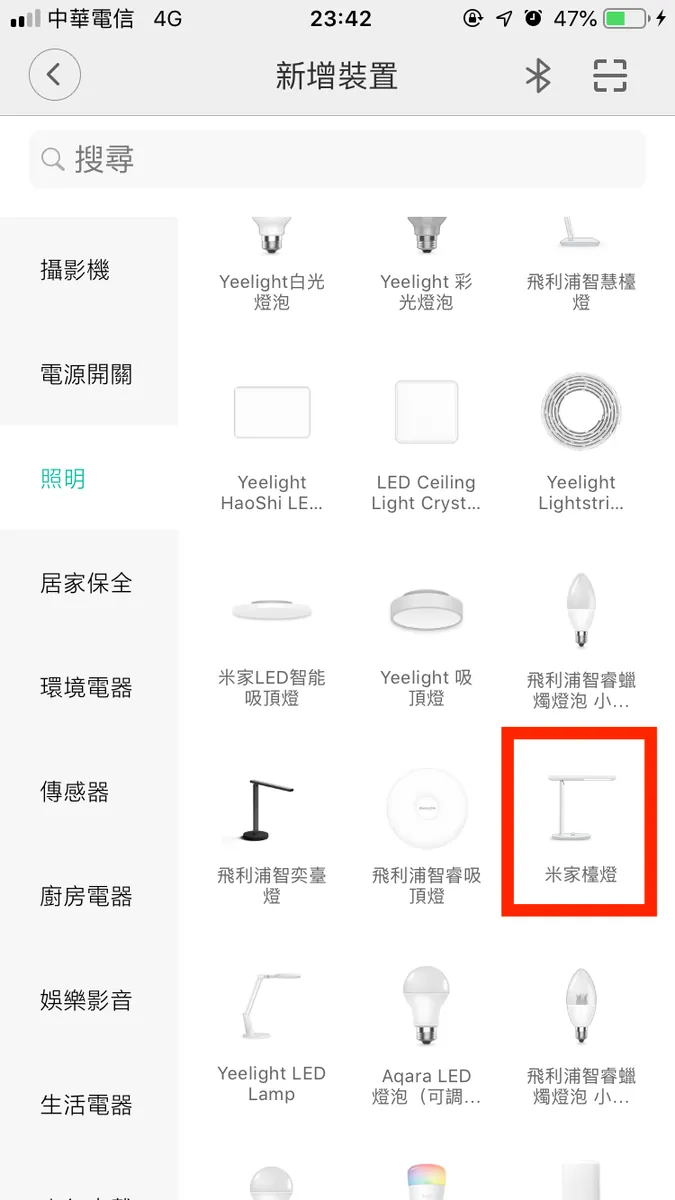
Here I encountered a confusion: I couldn’t find the identical Xiaomi desk lamp in the Mi Home app when adding a new device. The answer is:
Just read the text, this is it.
Other devices: For the camera and Pro lamp, just follow the official instructions to set them up and add them, no need to elaborate here.
Scenario Setting:
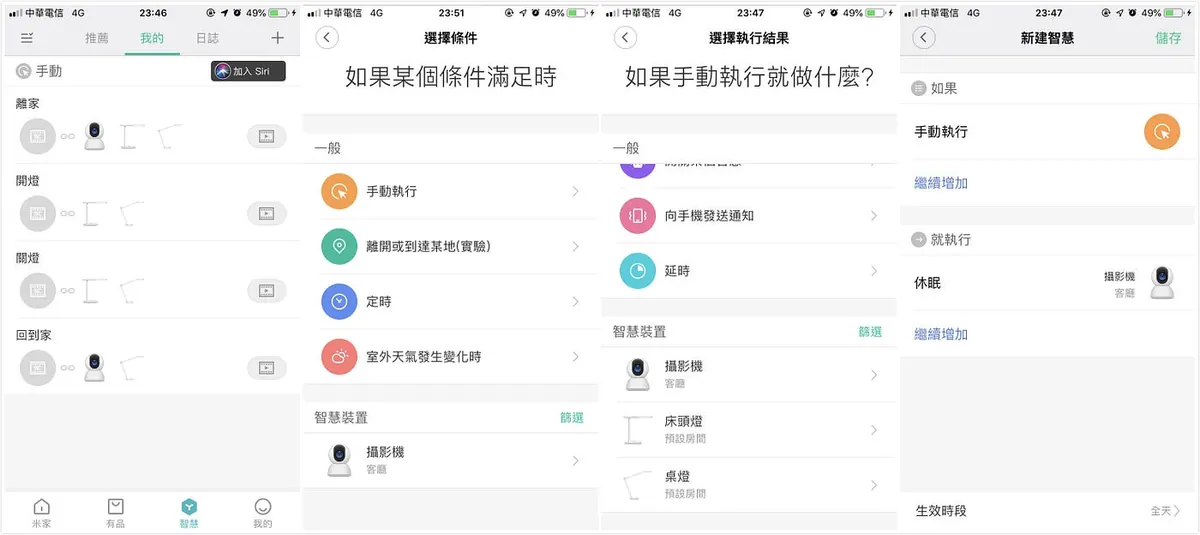
Same as “Home Settings” -> Switch to the “Automation” Tab -> Select “Run Manually” -> Choose device actions below (more options available due to native support) -> Continue adding other devices (lamp) -> “Save” to complete!
Some may ask why not directly choose “Leave or Arrive at a Location”? Because this feature is basically useless. The app is not optimized for GPS in Taiwan, and its location can only be set on landmarks. If your position matches that, you can use this feature directly. You can skip the rest of the article!
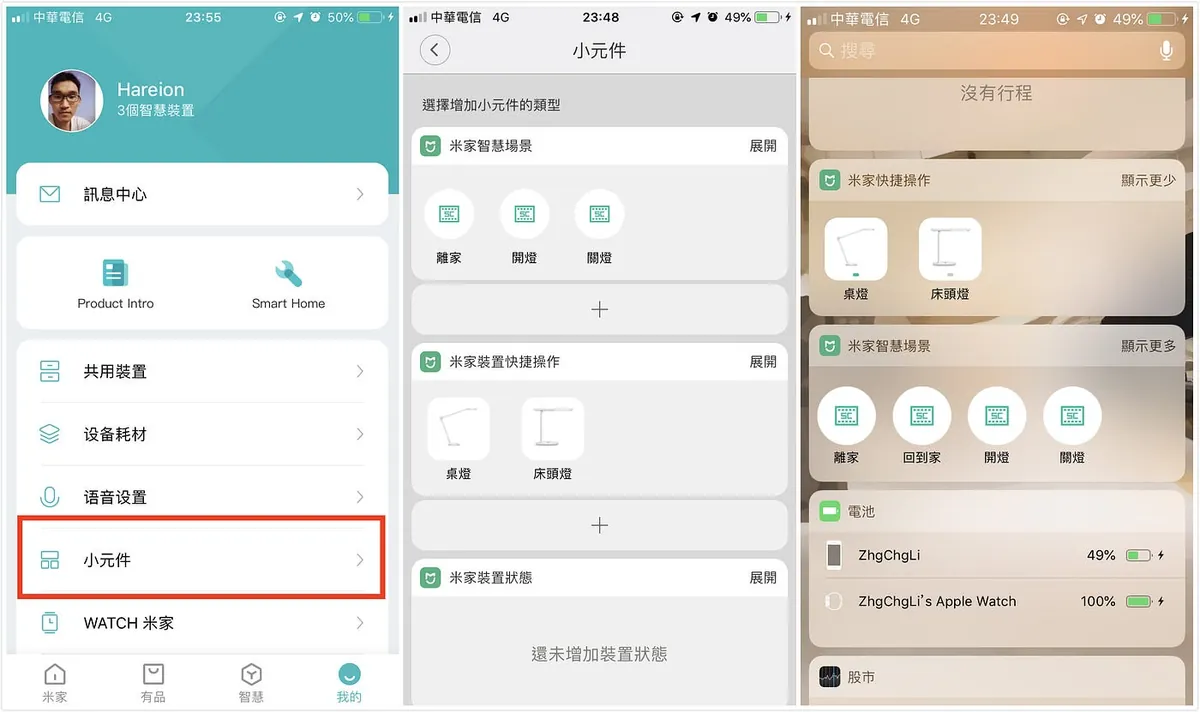
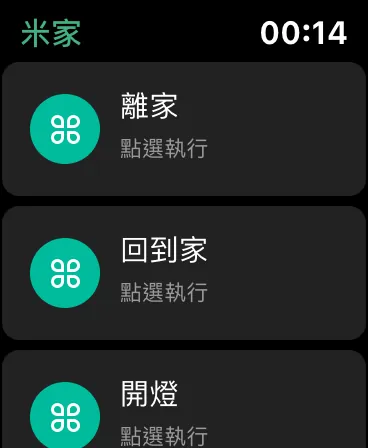
For quick toggles, you can set up widget components from “Me” -> “Widgets”!
This allows you to quickly execute scenes and devices from the Notification Center!
You can also control devices from the Apple Watch! If the watch app keeps showing a blank screen, please delete and reinstall the watch or phone app, as this app has quite a few bugs.
You have smart devices, so how to automate them?
Here, the GPS sensing method is also required. If the scene you added above uses “Leaving or Arriving at a Location,” you can skip the following setup!
[2019/09/26] Update for iOS ≥ 13: Achieve Automation Using Only the Built-in Shortcuts App:
iOS ≥ 12, iOS < 13 Only :
Using the Built-in Shortcuts App with IFTTT
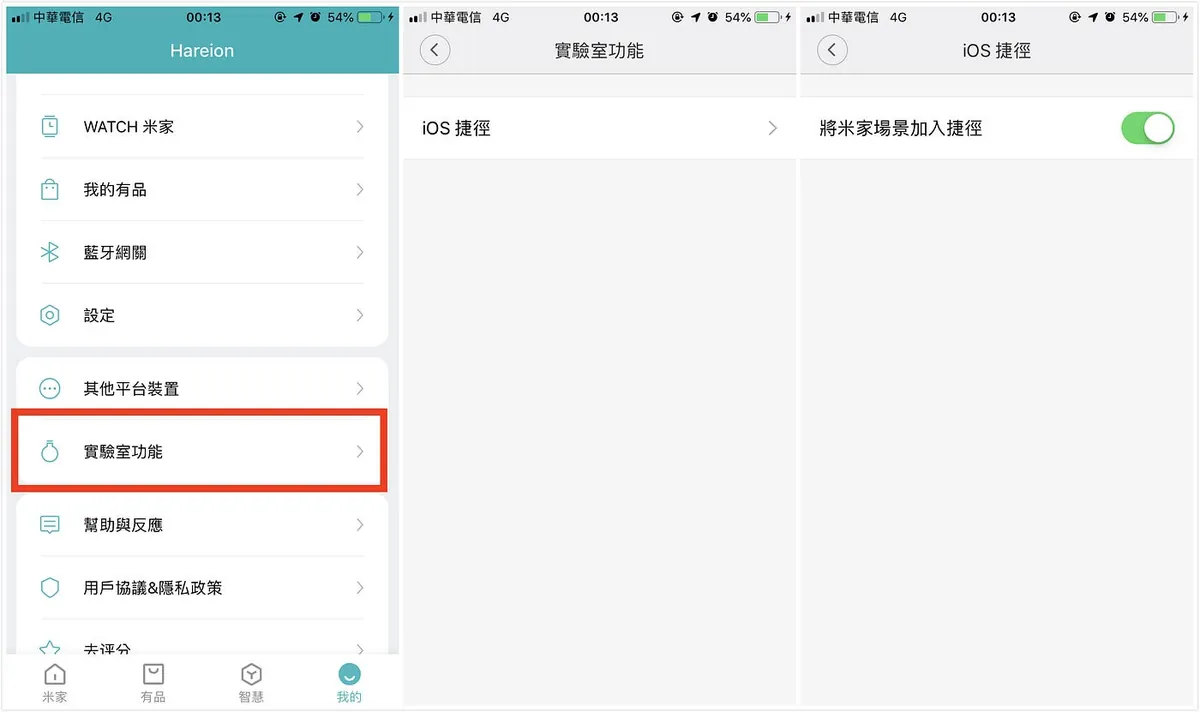
First go to “Me” -> “Lab Features” -> “iOS Shortcuts” -> “Add Mi Home Scenes to Shortcuts”
Open the built-in “ Shortcuts “ app (if you can’t find it, please search and download it from the App Store).
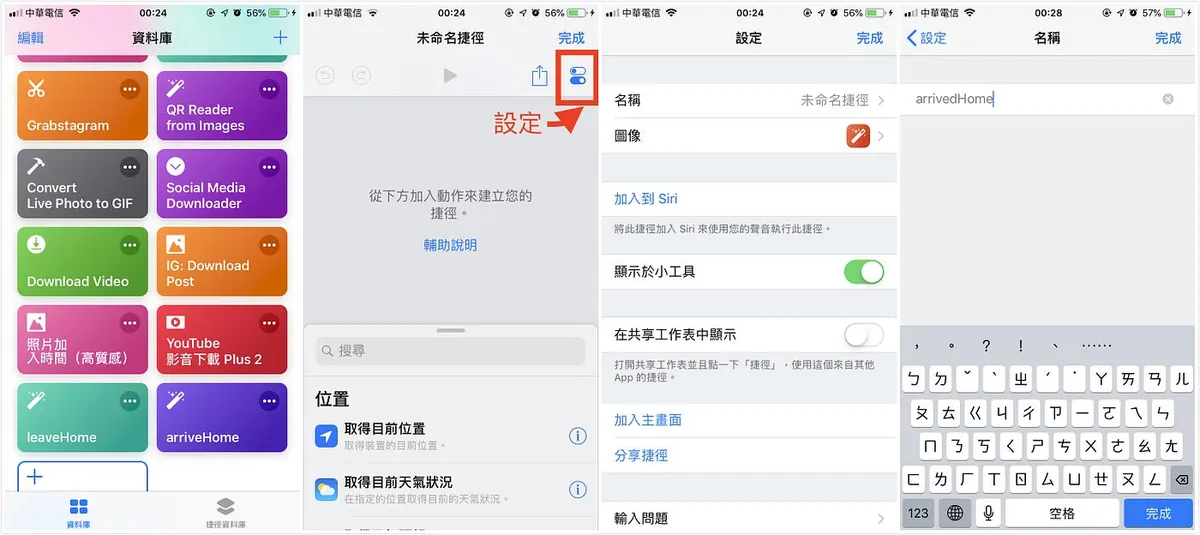
Click the “+” button at the top right to create a shortcut -> Click the “Done” button at the top right after setting below -> Name -> Enter a name (English is recommended, as it will be used later)
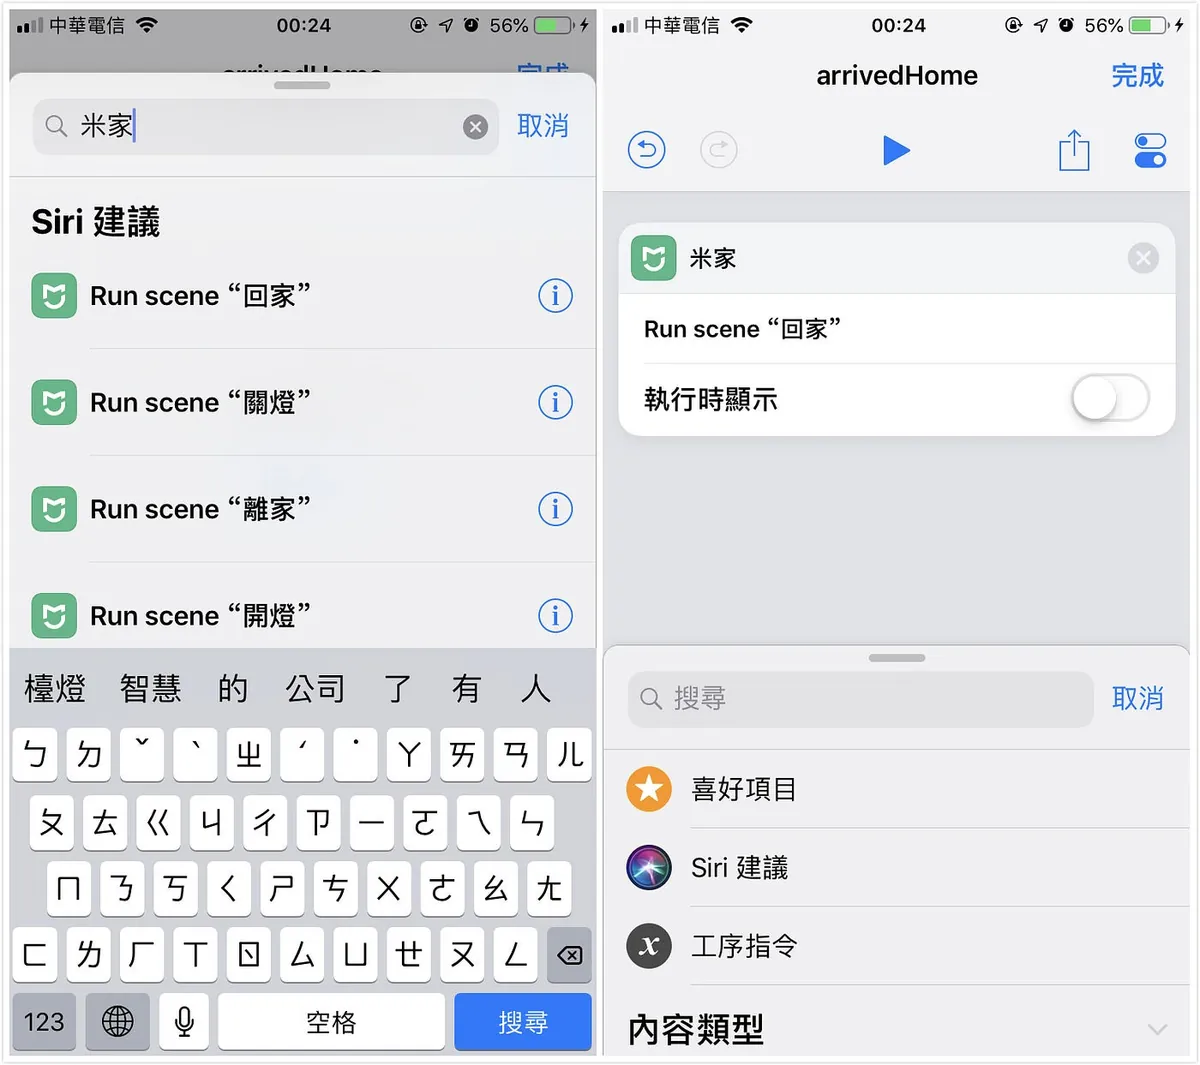
Go back to the Add Shortcut page -> In the bottom menu, type “Mi Home” -> Add the corresponding scene set in Mi Home, and turn off “Show When Run” to prevent Mi Home app from opening after execution.
*If you can’t find Mi Home, go back to the Mi Home app and try toggling “Me” -> “Lab Features” -> “iOS Shortcuts” -> “Add Mi Home Scenes to Shortcuts,” then swipe away and reopen the “Shortcuts” app.
At this point, a third-party app is needed. We use IFTTT for GPS-based background triggers when entering or leaving. Search for “IFTTT” in the App Store to download and install.
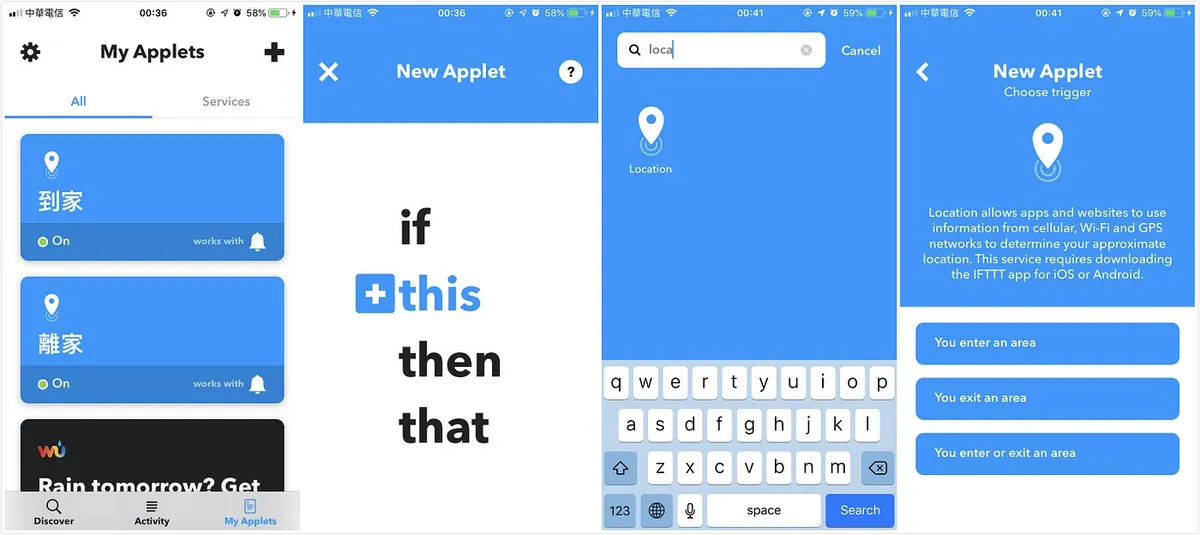
Open IFTTT and log in, then switch to the “My Applets” tab and tap the “+” icon at the top right to add a new applet ->
Click “+this” -> search for “Location” -> choose either entering or leaving.

Set location -> Click “Create trigger” to confirm -> Then click “+that” below -> Search for “notification”
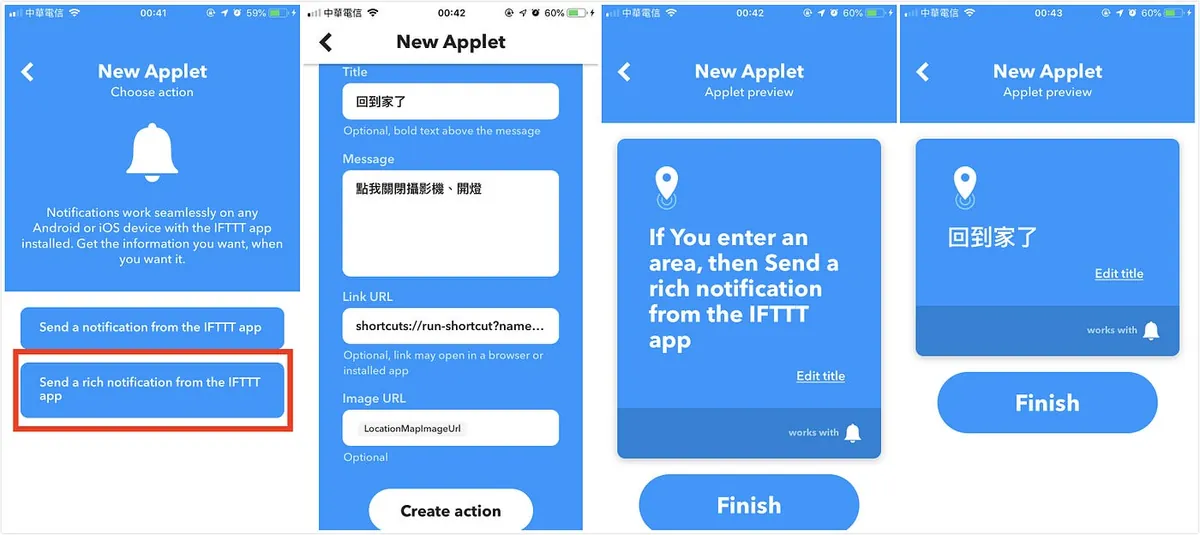
Select “Send a rich notification from the IFTTT app”:
Title = Notification Title, Message = Notification Content
Link URL please enter: shortcuts://run-shortcut?name= Shortcut Name
That’s why it’s better to name shortcuts in English whenever possible.
-> Click “Create action” -> You can click “Edit title” to set the name
-> “Finish” saved successfully!
You will receive a triggered notification the next time you leave/enter the set area (with about a 100-meter margin of error). Tapping the notification will automatically execute the Mi Home scene!
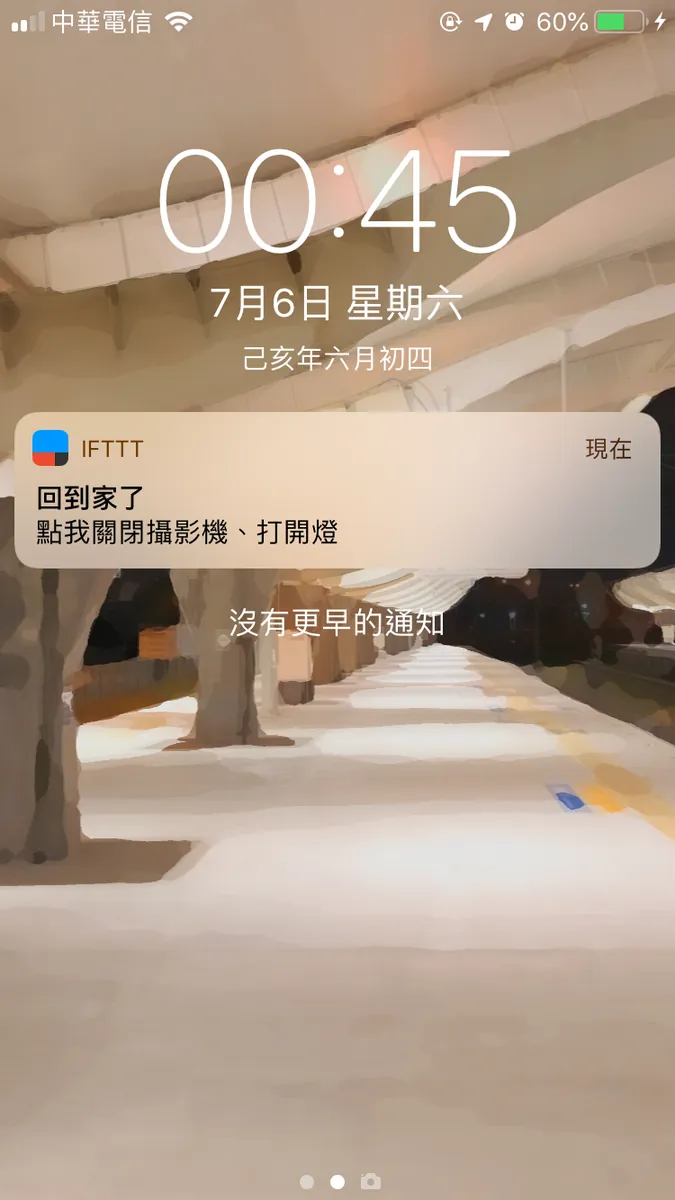
Tapping the notification will automatically run the scene in the background
Siri Voice Control:
Since Mi Home is not a built-in Apple app, additional setup is required to support Siri voice control:
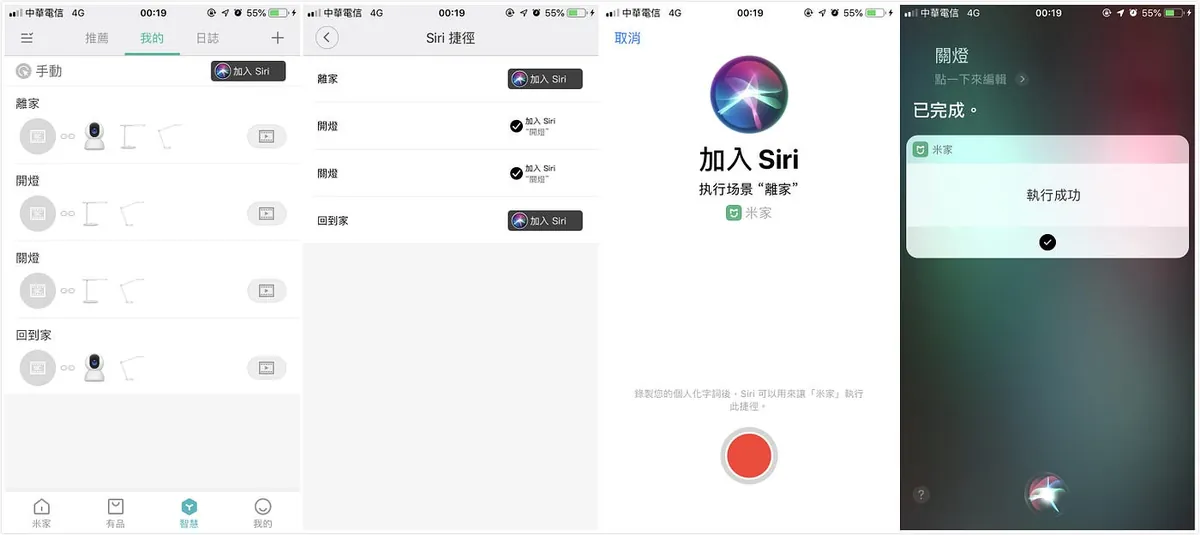
In the “Automation” tab -> “Add to Siri” -> select the “Target Scene” and press “Add to Siri”
-> Tap the red button to record a command (e.g., turn off the light) -> Done!
You can directly call and control scenes using Siri!
Summary
The lengthy setup steps above can be summarized as:
For a good experience, you need to spend a lot of money buying appliances with the HomeKit logo (so you don’t have to keep a Mac running as a HomeBridge server and can directly integrate perfectly with Apple’s native Home app). You also need to buy a HomePod, Apple TV, or iPad to act as a home hub. Both HomeKit-certified appliances and home hubs are not cheap!
If you have technical skills, consider using third-party smart devices (like Xiaomi) with a Raspberry Pi to run HomeBridge.
If you are an ordinary user like me, it’s still easiest to use the Mi Home app directly. My current habit is to trigger scene actions from the Notification Center shortcut widget when I arrive or leave home. The Shortcuts app combined with IFTTT is only used for notifications, just in case I sometimes forget.
Although the current experience hasn’t reached the ideal goal, it is already one step closer to a “smart home”!
Advanced Section
Demo: Using Raspberry Pi as HomeBridge Host to Connect All Xiaomi Appliances to HomeKit

Comments