
Create a Comfortable WFH Smart Home Environment, Control Appliances at Your Fingertips
Demonstration of Using Raspberry Pi as a HomeBridge Server to Connect All Mijia Appliances to HomeKit

photo by picjumbo.com
About
Due to the pandemic, time spent at home has increased; especially when working from home, it’s best if all home appliances can be smart-controlled via an app, so you don’t have to keep leaving your spot to turn on the lights, the rice cooker, and so on, which wastes a lot of time.
Previously, I wrote an article “Smart Home First Experience — Apple HomeKit & Xiaomi Mijia,” which was a first attempt to connect Xiaomi appliances to HomeKit using HomeBridge. It proved theoretically feasible, but practical applications were rarely discussed. Today’s article is a comprehensive advanced version of the previous one, including how to set up a Raspberry Pi as the host, with a step-by-step guide from start to finish.
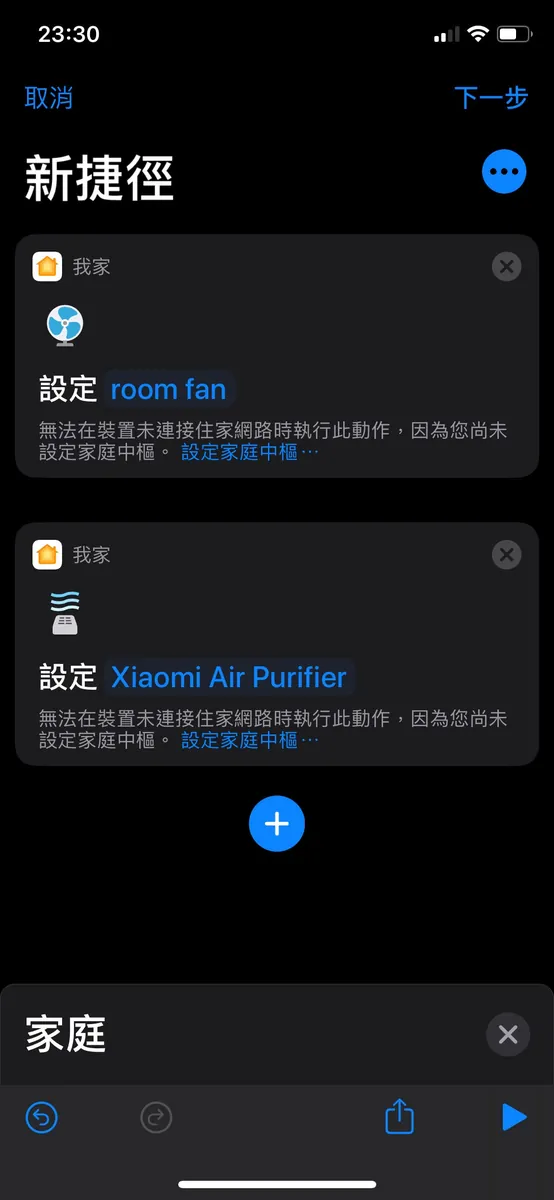
The reason is that I recently switched to an iPhone 11 Pro, which supports NFC automation in iOS 13 or later. This means the phone can trigger shortcuts when it detects an NFC tag. Although you can directly use an old EasyCard as an NFC tag, it takes up too much space and I don’t have that many cards. I asked around Guanghua but couldn’t find any NFC tag stickers for sale. Finally, I found some on Shopee for $50 each, bought 5 to try out, and the seller thoughtfully color-coded them for me.
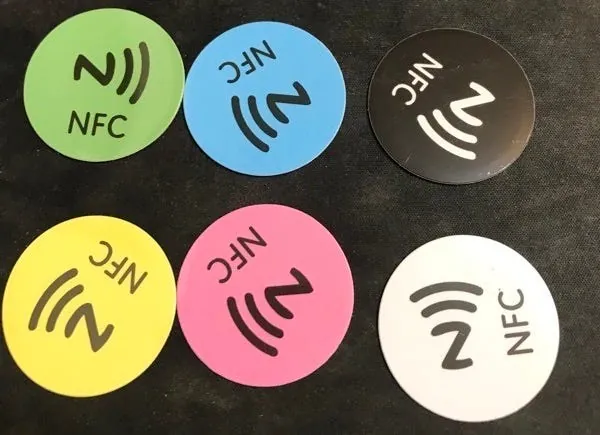
*The NFC automation feature is device-specific and only supported on iPhone XS/XS Max/XR/11/11 Pro/11 Pro Max. Earlier models like the iPhone 8 do not have the NFC option at all.
After some testing, I found an issue: when running a Mi Home app shortcut, the “Show When Run” option must be enabled (otherwise it won’t actually execute). To trigger the shortcut via Tag sensing, you still need to unlock the iPhone, and the shortcut will open visibly during execution, so it can’t run directly in the background. On the other hand, if the shortcut uses native Apple services (like HomeKit devices), it can run in the background without unlocking. Also, HomeKit’s response speed and stability are much better than Mi Home’s.
This makes a big difference in user experience, so I further explored connecting the entire Mi Home smart device series to HomeKit. Devices that support HomeKit are directly paired and won’t be repeated here; unsupported ones are also paired following this guide!
My Mijia Smart Home Project
-
Mi Home Smart Camera PTZ Version 1080P
-
Mi Home DC Inverter Fan
-
Mijia LED Smart Desk Lamp
-
Xiaomi Air Purifier 3
-
Mi Home Desk Lamp Pro (natively supports HomeKit)
-
Mi Home LED Smart Bulb Color Version * 2 (natively supports HomeKit)
How It Works
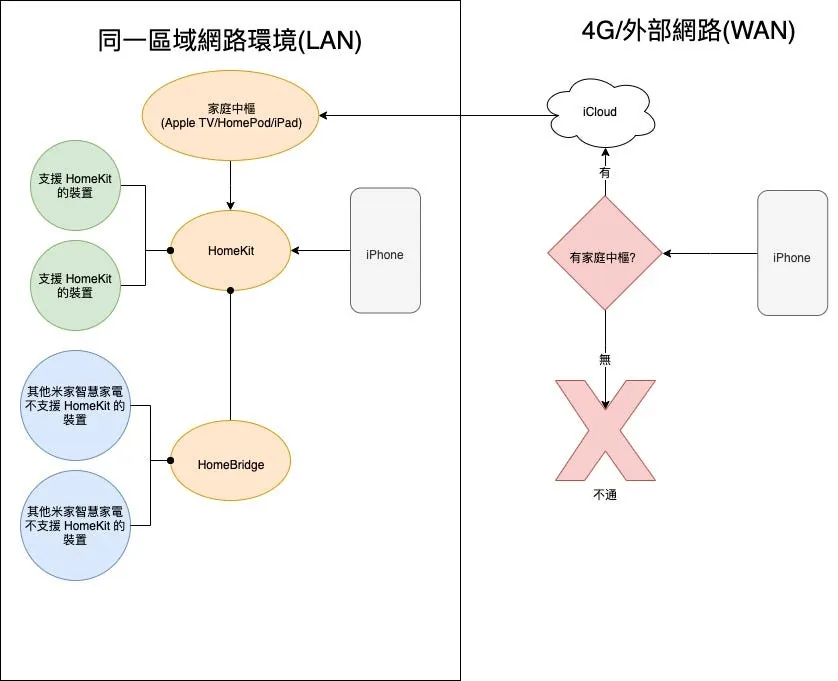
Here is a simple reference diagram: if a smart appliance supports HomeKit, connect it directly. For smart appliances that do not support HomeKit, you can bridge them by setting up a “HomeBridge” server (which must always be on). Within the same network environment (e.g., the same WiFi), the iPhone can freely control all devices in HomeKit. However, when outside the network, such as on a 4G mobile network, you need an Apple TV, HomePod, or iPad as a home hub, kept at home (also always on), to control HomeKit devices remotely. Without a home hub, opening the Home app outside will show “No Response.”
*For Mi Home devices, the appliances are controlled via Mi Home servers, which means there are security concerns as data passes through servers in mainland China.
Required Environment
So there are two devices that need to be always on standby: one is the Apple TV/HomePod or iPad acting as the Home Hub. Currently, there is no workaround or alternative way to simulate this, so you must obtain one of these devices. Without it, HomeKit can only be used locally at home..
Any other computer that can stay on 24/7 (such as your iMac/MacBook), an idle machine (old iMac, Mac Mini), or a Raspberry Pi will work.
*Windows series not tested, but it should work too!
Or if you want to try it out, you can directly use your current computer (can be combined with the previous article).
This article demonstrates using a Raspberry Pi 3B with a MacBook Pro (MacOS 10.15.4). It covers setting up the Raspberry Pi environment from scratch. If you are not using a Raspberry Pi, you can skip directly to the HomeBridge integration with HomeKit section (the steps there are the same).
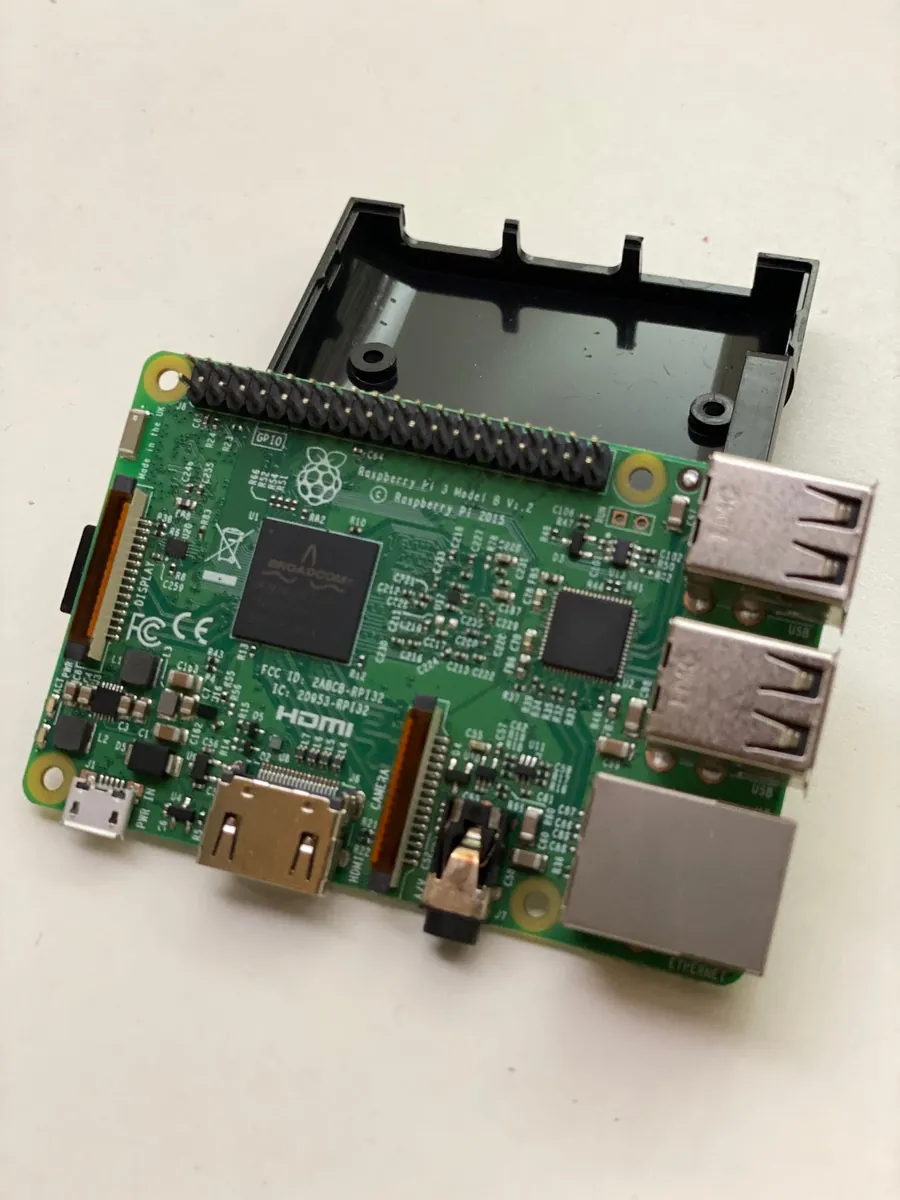
Raspberry Pi 3B (special thanks to Lu Xun Huang )
If using a Raspberry Pi, you will also need a micro SD card (doesn’t need to be large, I used 8G), a card reader, an Ethernet cable (for setup, WiFi can be used later); and the necessary software for the Raspberry Pi:
Raspberry Pi Environment Setup
Flashing the Operating System
After downloading the two required software, insert the memory card into the card reader and connect it to the computer; then open the Etcher program (balenaEtcher)

For the first option, select the Raspberry Pi OS image you just downloaded, “xxxx.img”. For the second option, choose your memory card device, then click “Flash!” to start writing!
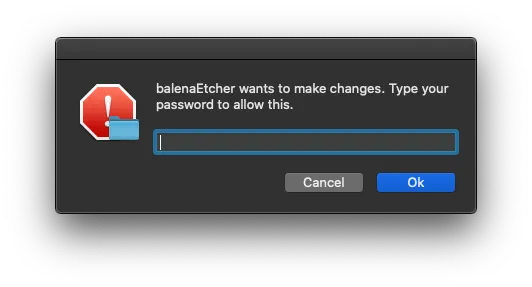
A prompt will appear asking you to enter your MacOS password. Enter it and click “Ok” to continue.
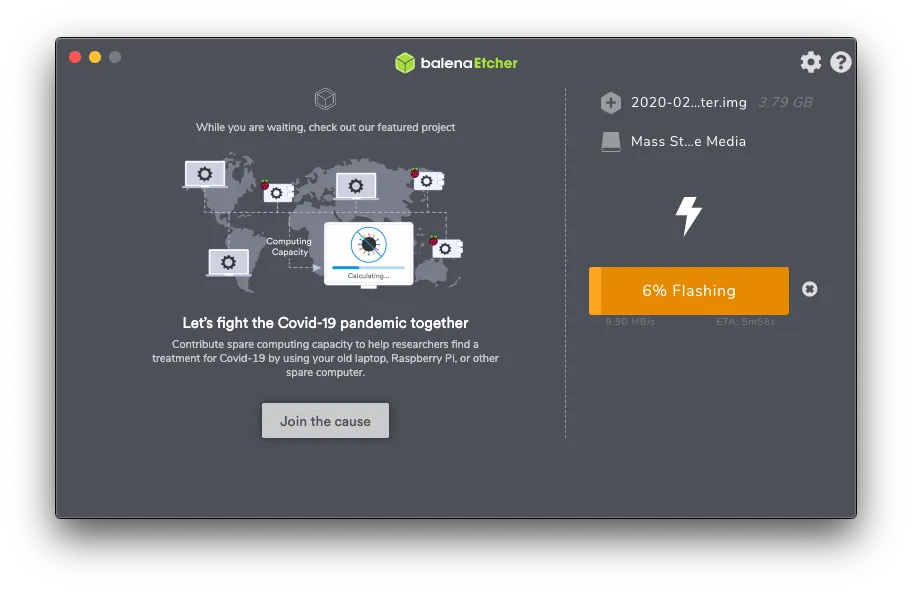
Flashing in progress… please wait….
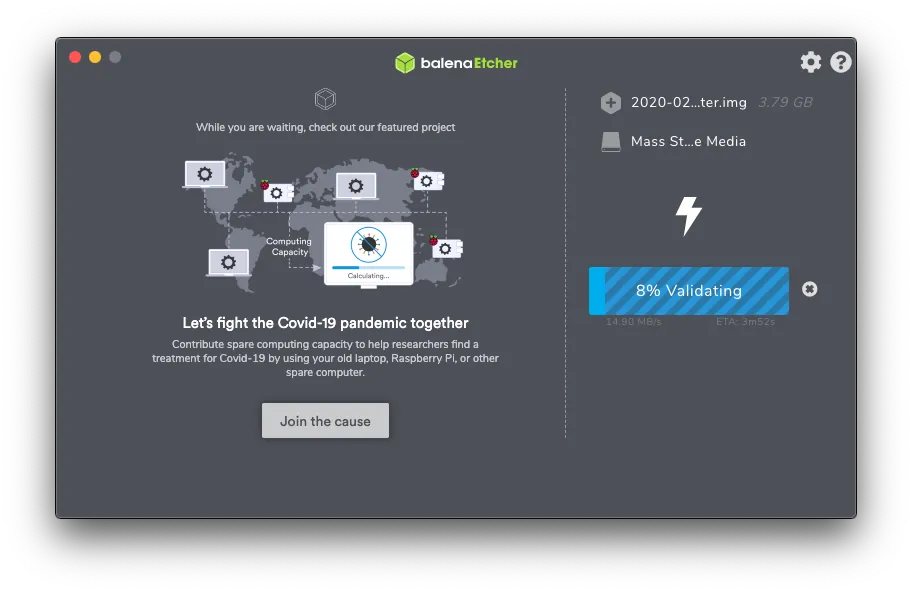
Verifying… please wait….
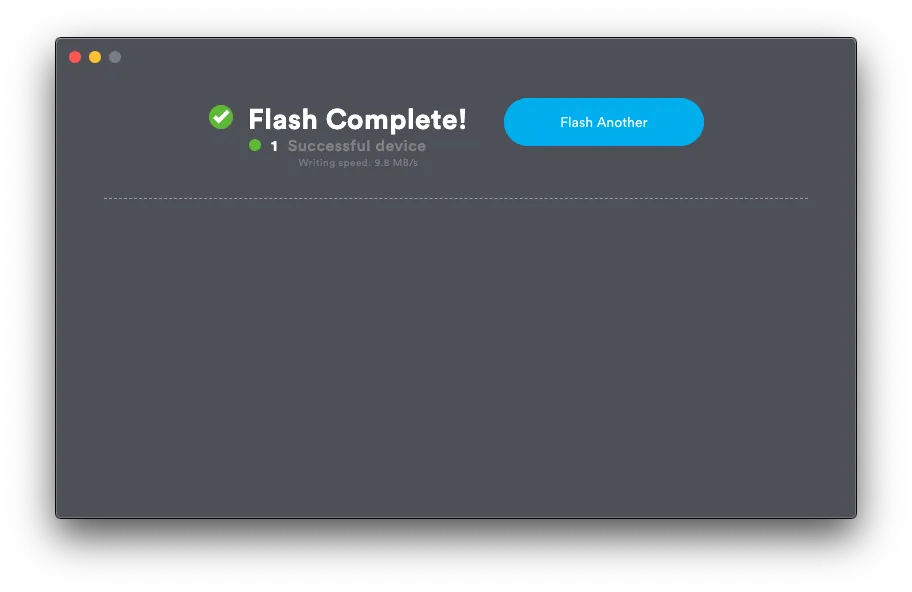
Burning successful!
*If a red Error appears, try formatting the memory card and flashing it again.
Reconnect the card reader to the computer, and create an empty file named “ssh” in the root directory of the memory card ( or download here ). The file should be blank, without any extension—just a plain “ssh” file. This allows us to connect to the Raspberry Pi via Terminal.
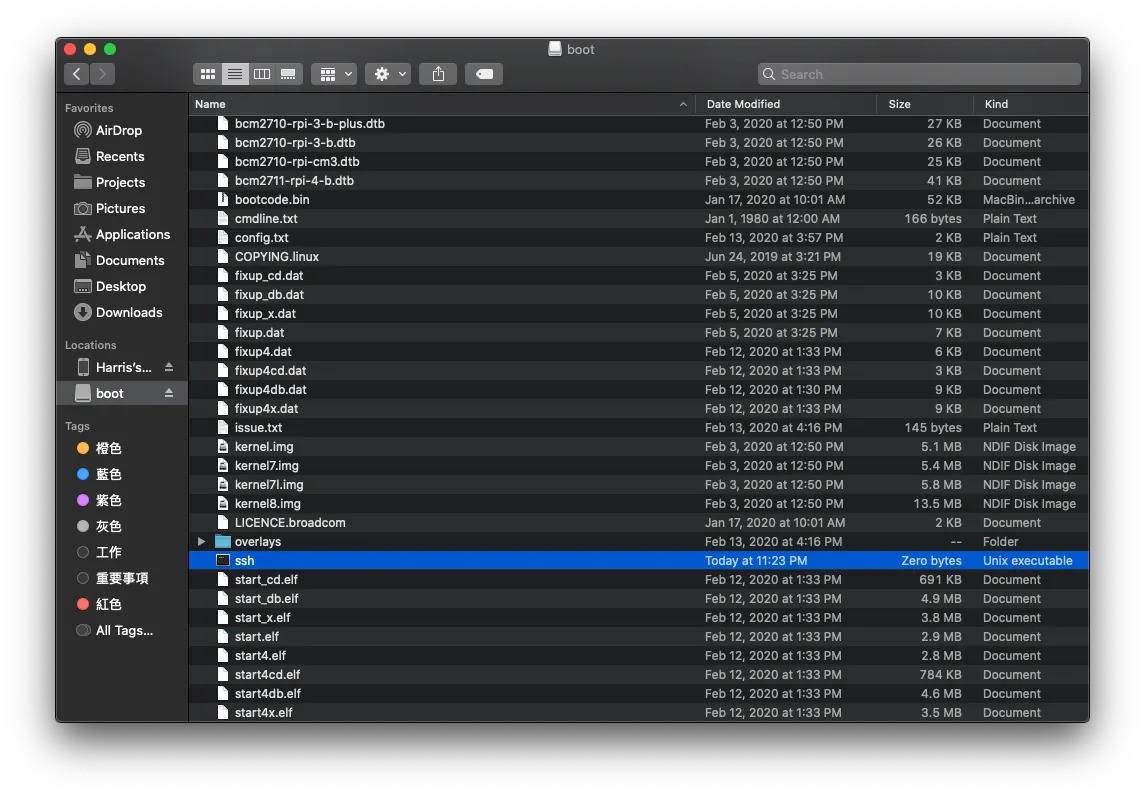
ssh
Setting up Raspberry Pi
Eject the memory card, insert it into the Raspberry Pi, connect the Ethernet cable, and power it on; ensure the MacBook and Raspberry Pi are on the same network.
Check the IP Address Assigned to the Raspberry Pi
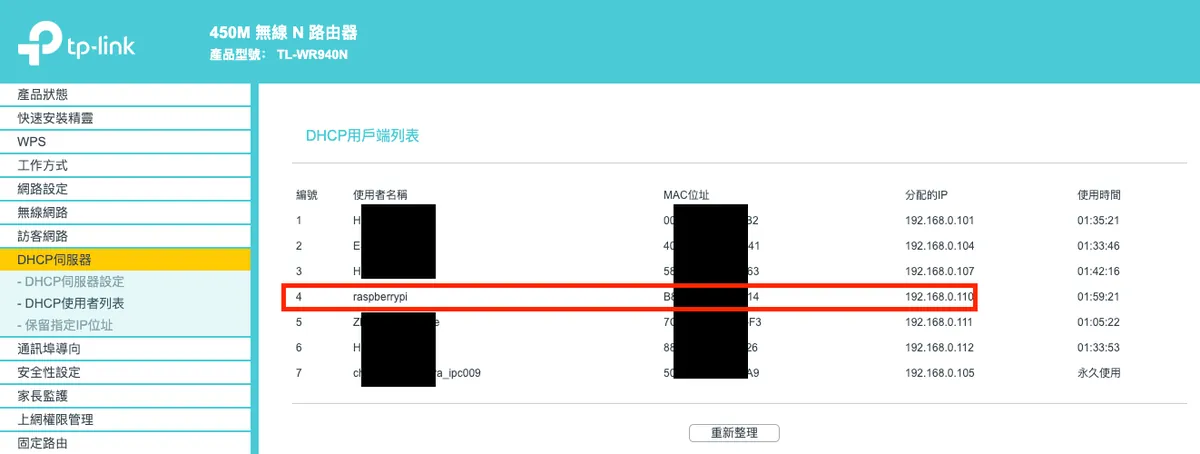
The IP address assigned to the Raspberry Pi is: 192.168.0.110 (Please replace all IP addresses in this article with the ones you find)
It is recommended to set a fixed/reserved IP for the Raspberry Pi; otherwise, the IP address may change after rebooting and reconnecting, requiring you to check it again.
Use SSH to Access the Raspberry Pi for Operations
Open Terminal and enter:
ssh pi@your_raspberry_pi_IP_address
If prompted, enter yes. For the password, use the default: raspberry
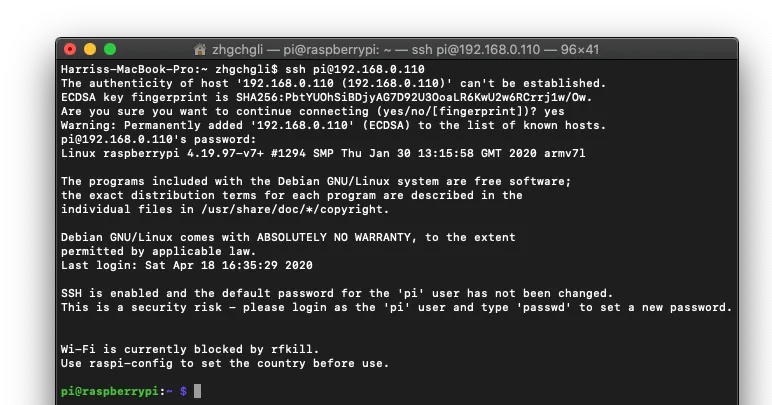
Connection Successful!
*If you encounter a WARNING: REMOTE HOST IDENTIFICATION HAS CHANGED error message, open /Users/xxxx/.ssh/known_hosts with a text editor and clear its contents.
Basic Raspberry Pi Tool Installation and Setup
- Enter the following command to install the Vim editor:
sudo apt-get install vim
![]()
2. Fix the following language warnings:
perl: warning: Setting locale failed.
perl: warning: Please check that your locale settings:
    LANGUAGE = (unset),
    LC_ALL = (unset),
    LC_LANG = "zh_TW.UTF-8",
    LANG = "zh_TW.UTF-8"
    are supported and installed on your system.
perl: warning: Falling back to the standard locale ("C").
Input
vi .bashrc
Press “Enter” to proceed
Press “i” to enter edit mode
Move to the very bottom of the file and add a line: export LC_ALL=C
Press “Esc” and type “:wq!” to save and exit.
Then run source .bashrc to update.

3. Install nvm to manage nodejs/npm:
curl -o- https://raw.githubusercontent.com/creationix/nvm/v0.33.11/install.sh \\| bash
4. Install the latest version of nodejs using nvm:
nvm install 12.16.2
*Choose to install version “12.16.2” here
5. Confirm Environment Installation Completion:
Enter the following command
npm -v
and
node -v
Confirmation
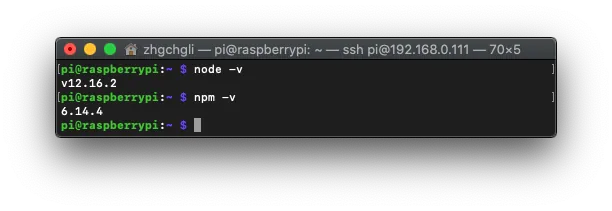
No error messages!
6. Establish nodejs connection
Enter the following command
which node
Get the path information of nodejs location
Enter Again
sudo ln -fs paste the path from your which node command here (no "double quotes") /usr/local/bin/node
Create Connection
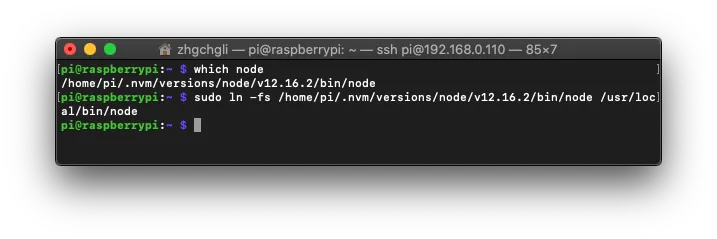
Setup Complete!
Enable Raspberry Pi VNC Remote Desktop
Here, although we are installing the GUI version, you can of course connect a keyboard and HDMI to the Raspberry Pi and use it like a regular computer. However, for convenience, we will control the Raspberry Pi via remote desktop.
Input:
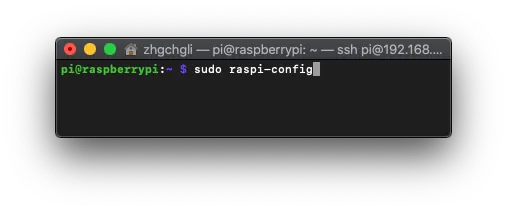
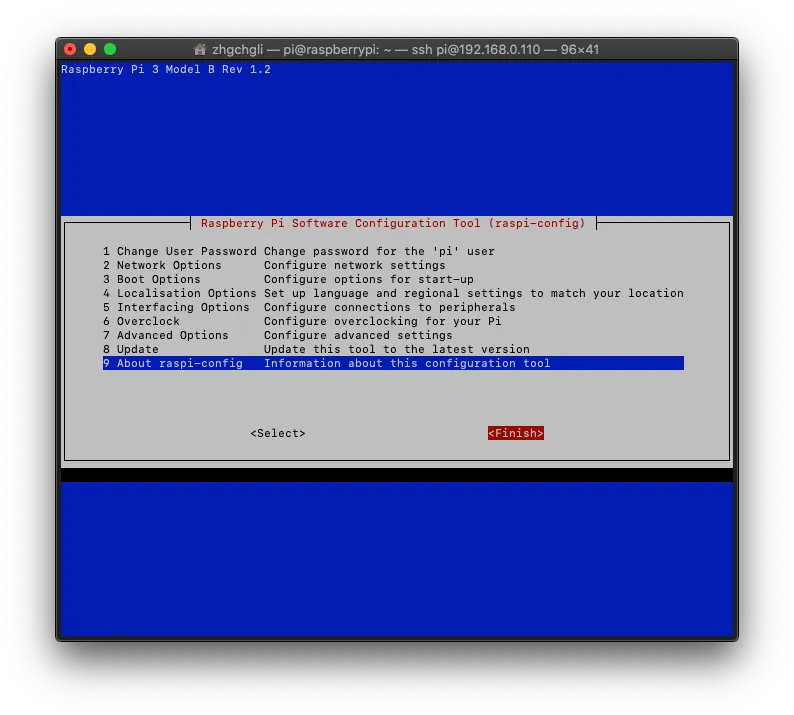
sudo raspi-config
Enter Settings:
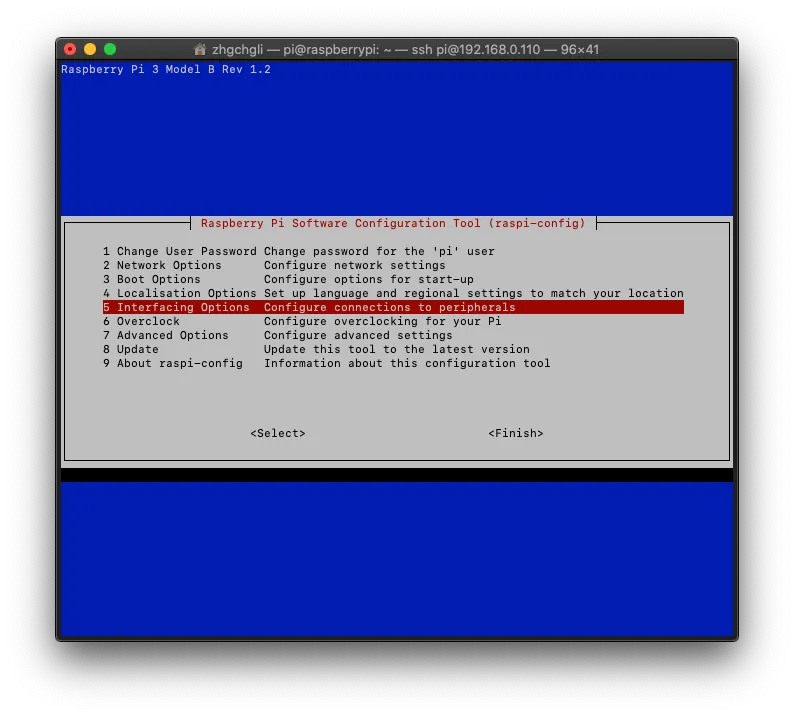
Select the fifth item “Interfacing Options”
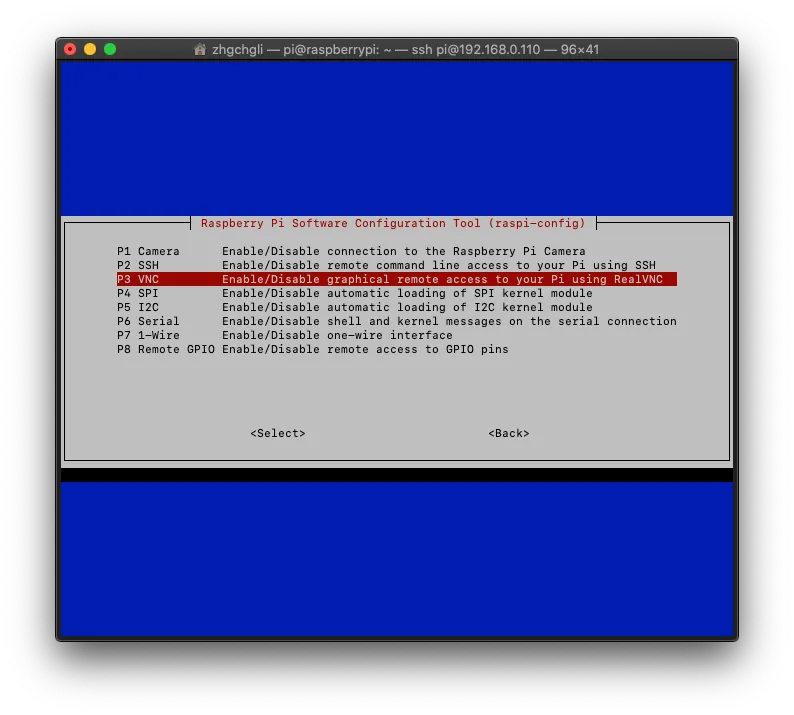
Select the third option “P3 VNC”
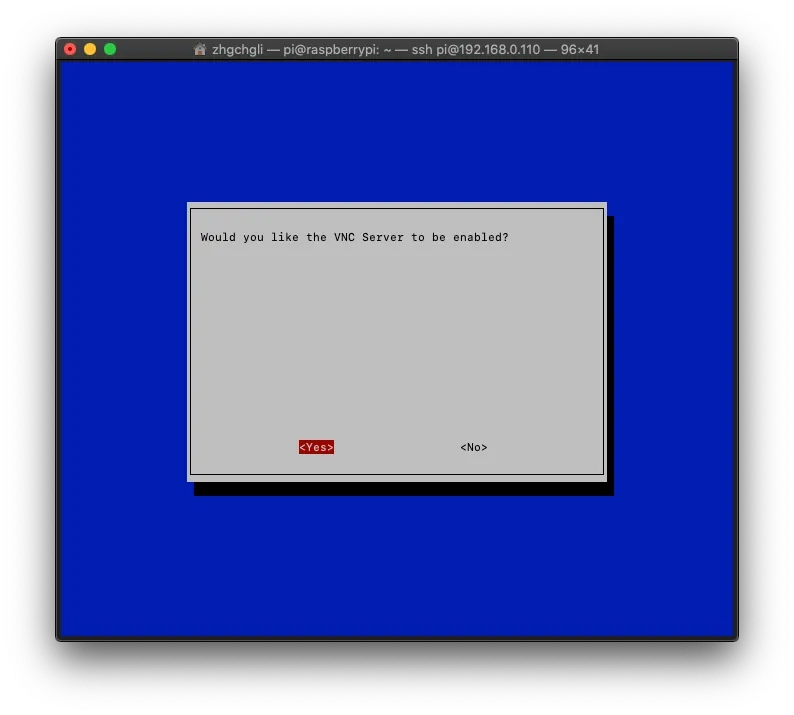
Use “ ← “ to select “ Yes “ to turn on
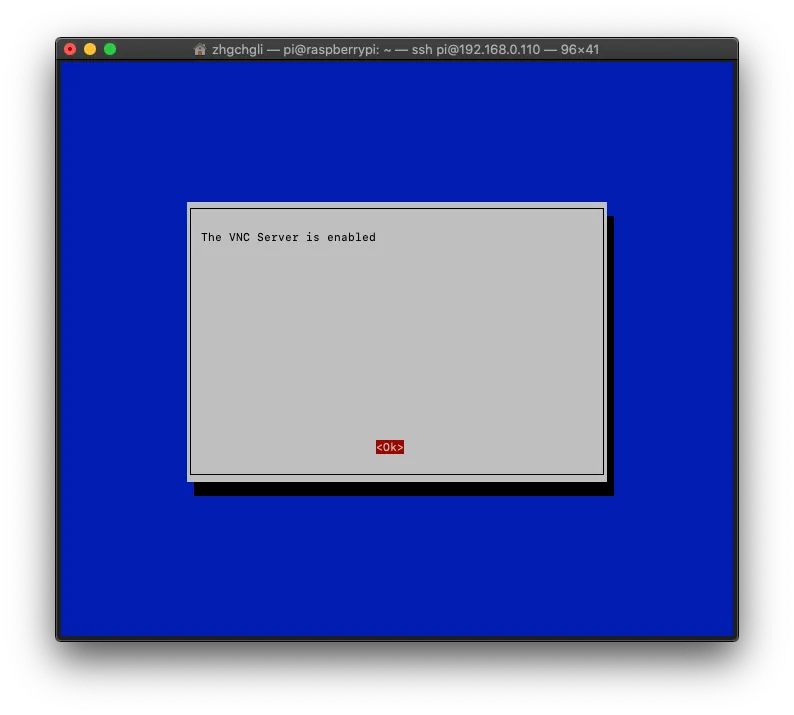
VNC Remote Desktop Function Enabled Successfully!
Use “→” to go directly to “Finish” to exit the setup interface.
Add VNC Remote Desktop Service to Startup Items
We want the VNC remote desktop service to start automatically when the Raspberry Pi boots up.
Input
sudo vim /etc/init.d/vncserver
Press “Enter” to proceed
Press “i” to enter edit mode
#!/bin/sh
### BEGIN INIT INFO
# Provides:          vncserver
# Required-Start:    $local_fs
# Required-Stop:     $local_fs
# Default-Start:     2 3 4 5
# Default-Stop:      0 1 6
# Short-Description: Start/stop vncserver
### END INIT INFO

# More details see:
# http://www.penguintutor.com/linux/vnc

### Customize this entry
# Set the USER variable to the name of the user to start vncserver under
export USER='pi'
### End customization required

eval cd ~$USER

case "$1" in
  start)
    su $USER -c '/usr/bin/vncserver -depth 16 -geometry 1024x768 :1'
    echo "Starting VNC server for $USER "
    ;;
  stop)
    su $USER -c '/usr/bin/vncserver -kill :1'
    echo "vncserver stopped"
    ;;
  *)
    echo "Usage: /etc/init.d/vncserver {start\\|stop}"
    exit 1
    ;;
esac
exit 0
Press “Command” + “C” and “Command” + “V” to copy and paste the above content, then press “Esc” and type “:wq!” to save and exit.
Input again:
sudo chmod 755 /etc/init.d/vncserver
Change file permissions.
Input again:
sudo update-rc.d vncserver defaults
Add to startup items.
Final input:
sudo reboot
Restart the Raspberry Pi.
- After the reboot is complete, reconnect via SSH following the previous steps.
Connecting with VNC Client:
Here, we use the Chrome app “VNC® Viewer for Google Chrome™”. After installing and launching it, enter Raspberry Pi IP address:1. Please make sure to include the Port:1 at the end!
*I couldn’t connect using the Mac’s built-in VNC://, unsure of the reason.
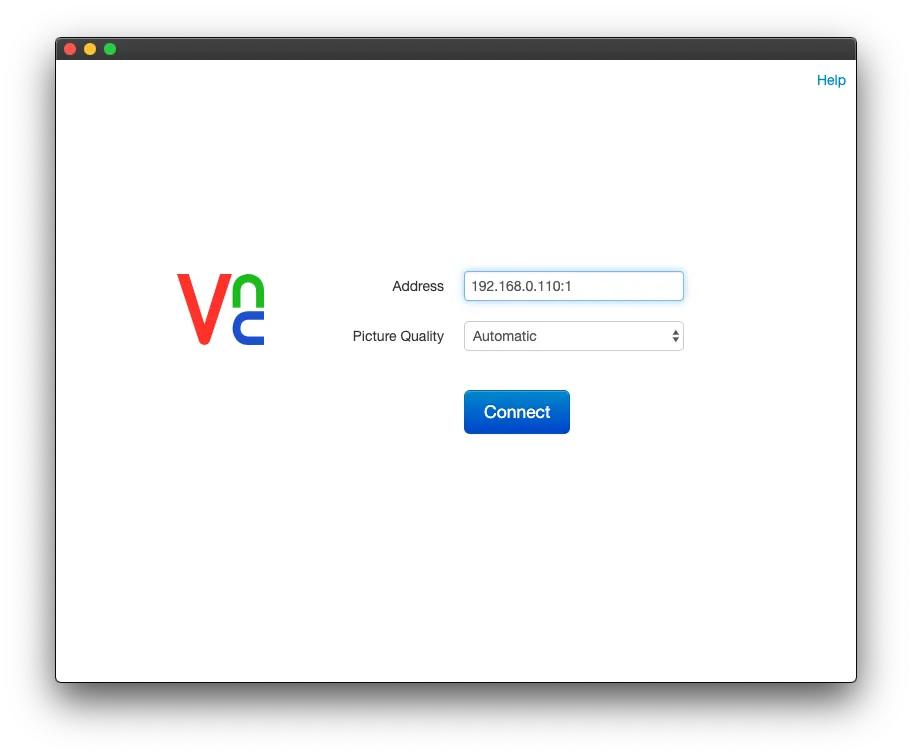
Click “Connect”.
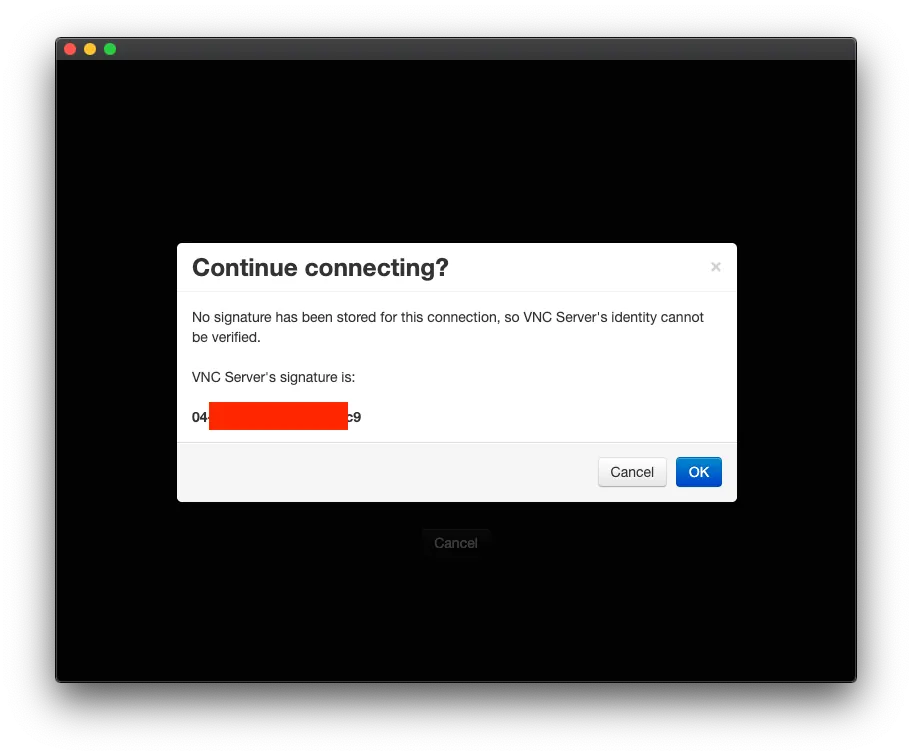
Click “OK”.
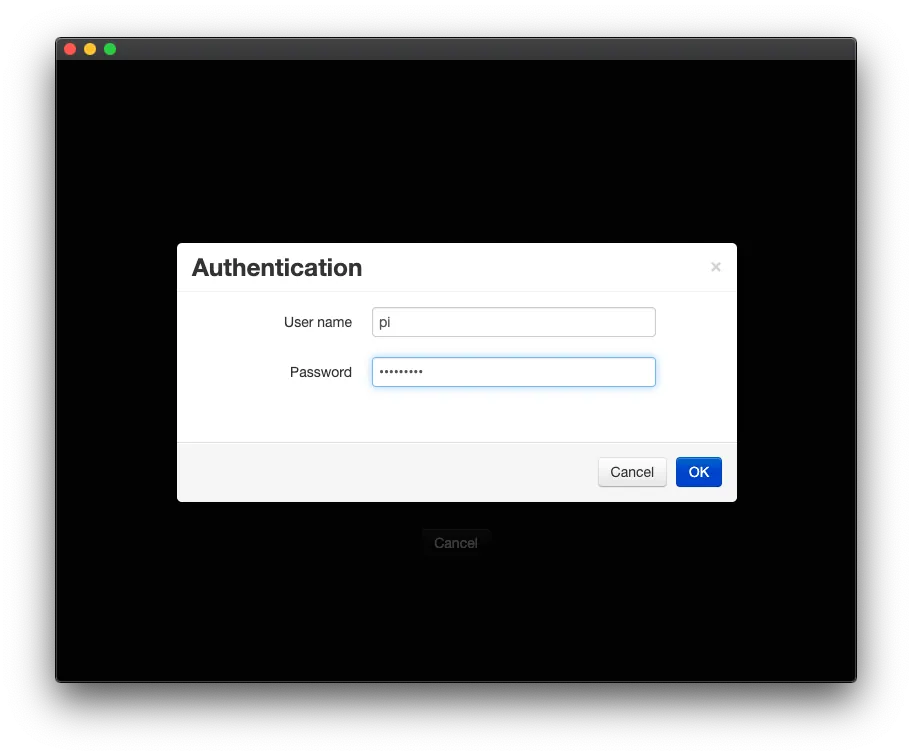
Enter the login username and password, then connect via SSH. The default username is pi and the default password is raspberry.
Successfully Connected!
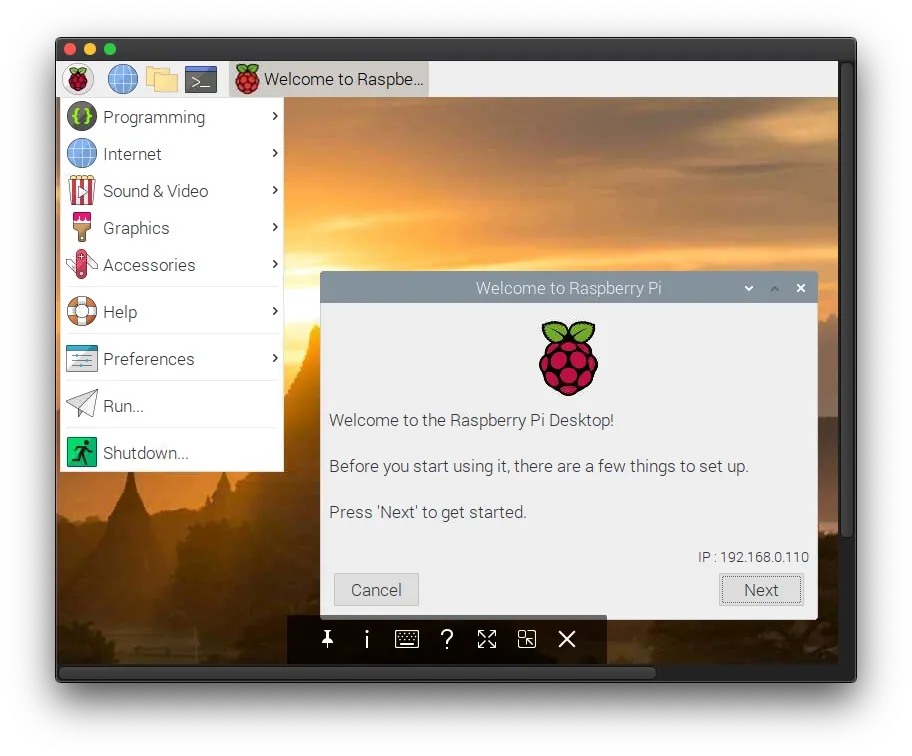
Complete Raspberry Pi Initial Setup:
Next are all graphical interfaces! Very easy!
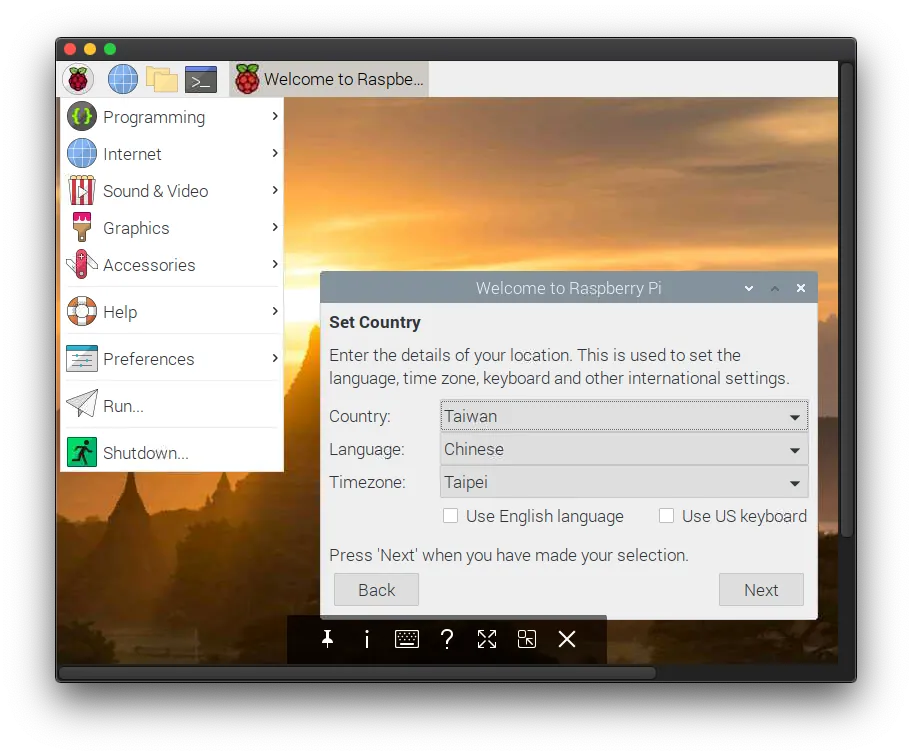
Set language, region, and time zone.
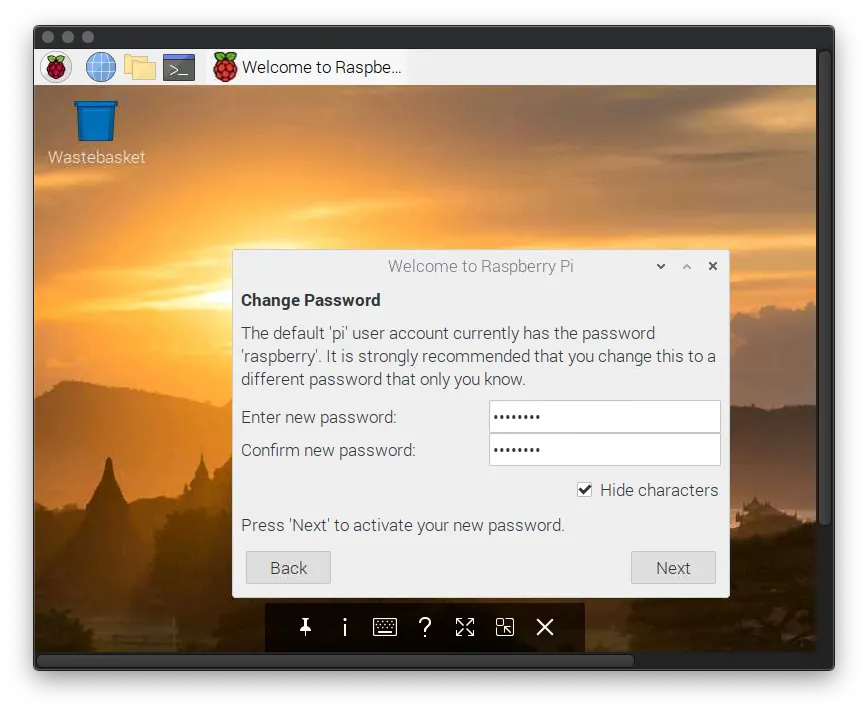
Change the default Raspberry Pi password by entering your desired password.
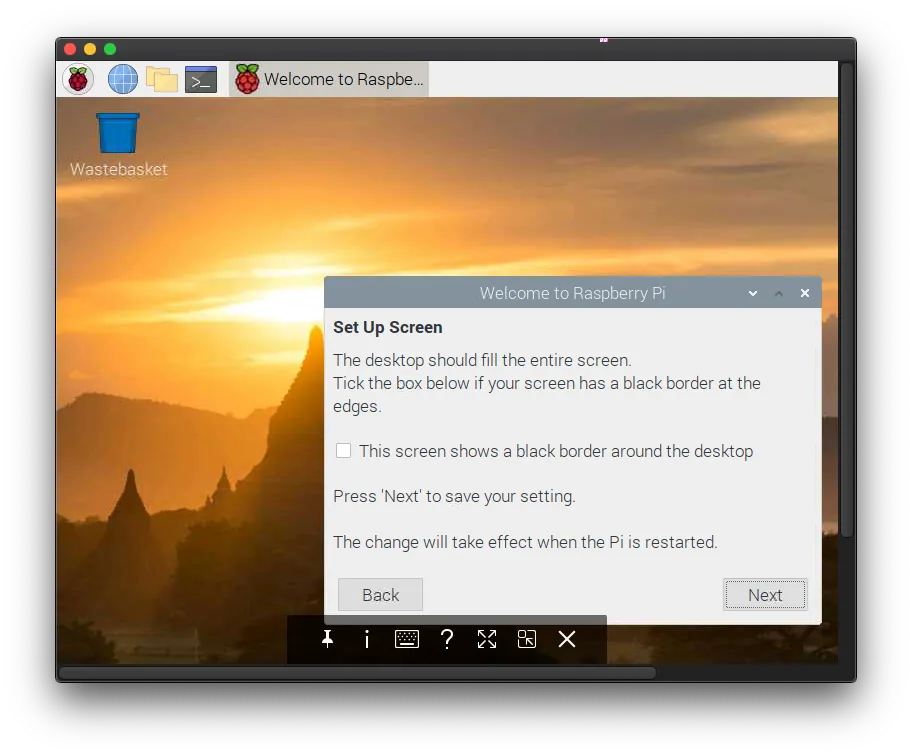
Directly proceed to the next step “Next”.
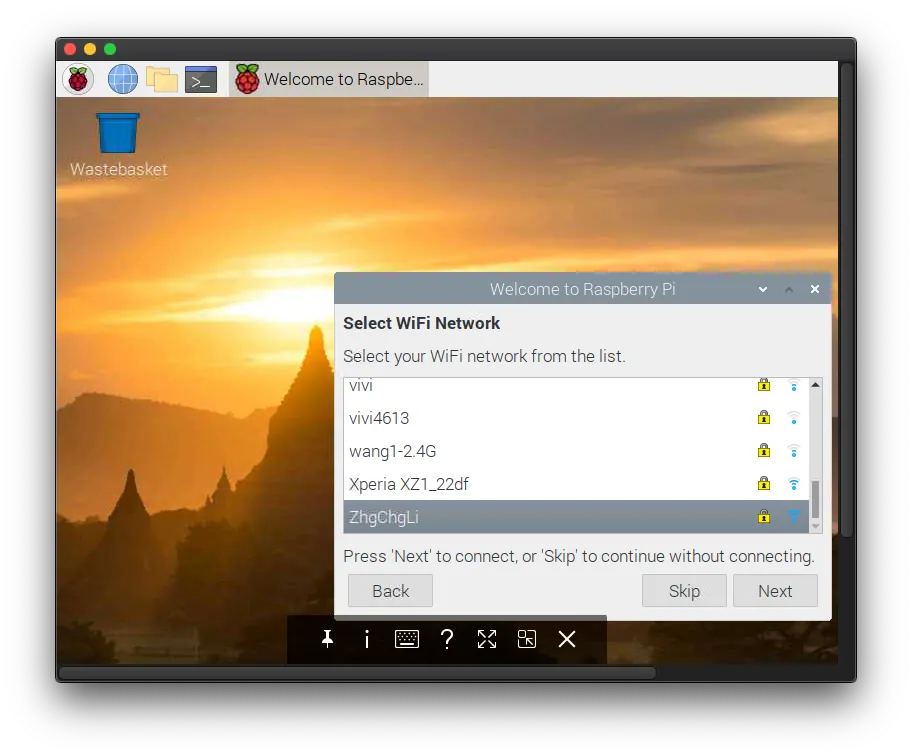
Set up the WiFi connection so you won’t need to use a cable afterward.
*Note that the Raspberry Pi’s IP address may change, so check your router to confirm.
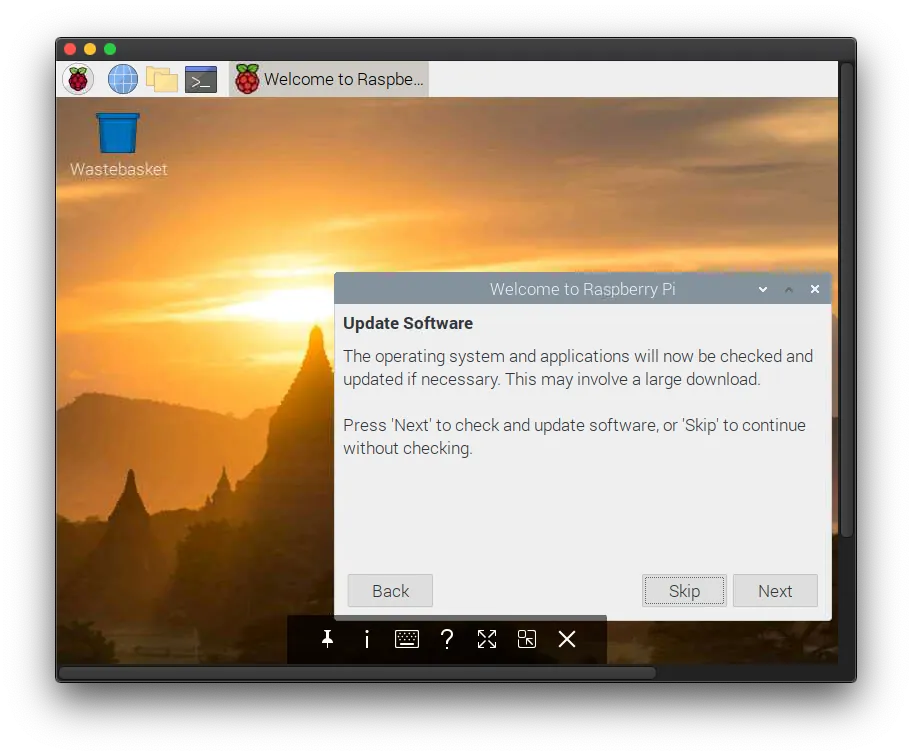
If you are not in a hurry, choose “Next” to update the current operating system!
*The update takes about 20~30 minutes (depending on your internet speed)
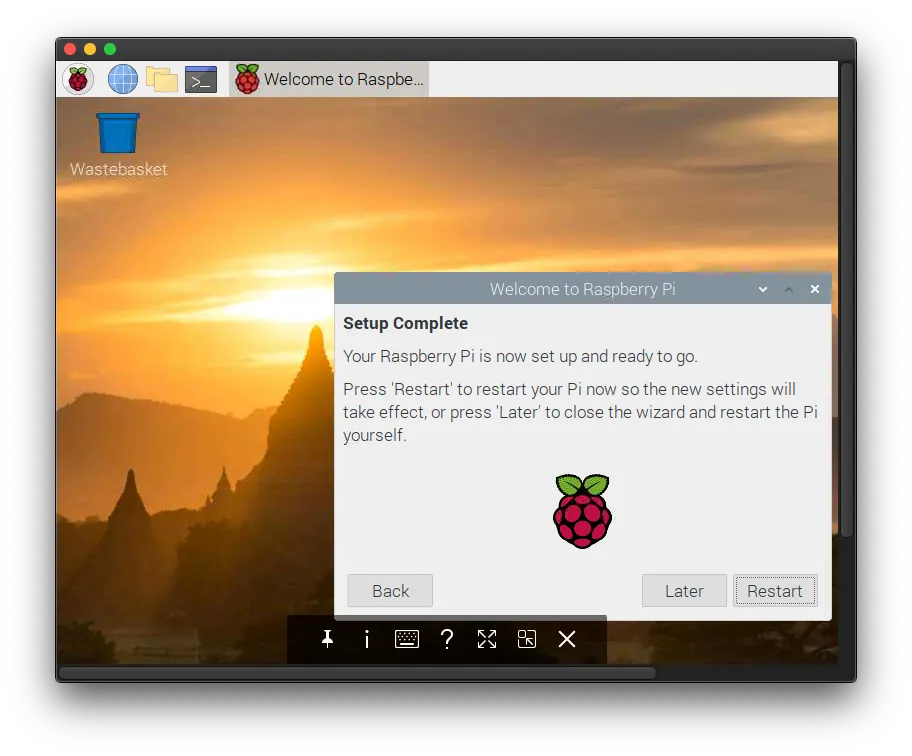
After the update is complete, click “Restart” to reboot.
Raspberry Pi Environment Setup Complete!
HomeBridge Installation
Let’s get to the main part: installing and using HomeBridge.
Use Terminal to SSH into the Raspberry Pi or directly use the Terminal in the VNC remote desktop.
Input:
npm -g install homebridge --unsafe-perm
^( without sudo )
Install HomeBridge
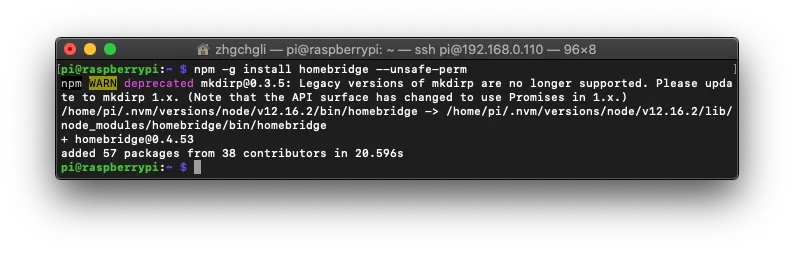
Installation Complete!
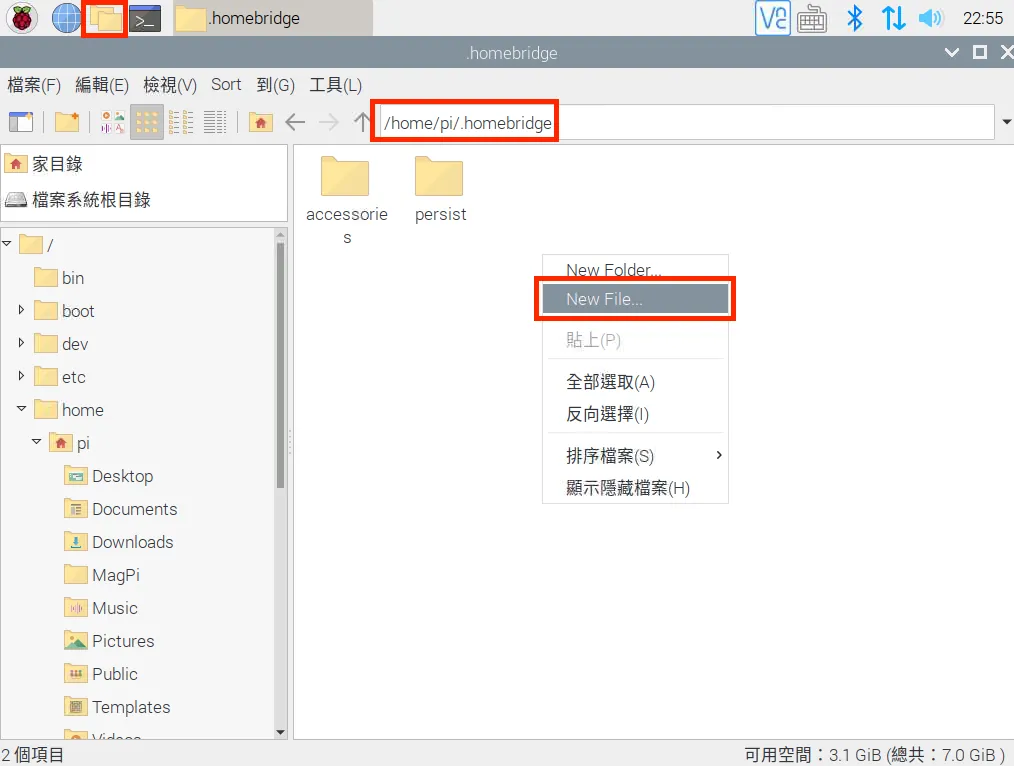
Create/Modify Configuration File (config.json):
For easier editing, use VNC remote desktop to connect to the Raspberry Pi (you can also use commands directly):
Click the top left corner to open “File Manager” -> go to “/home/pi/.homebridge”
If you don’t see the “config.json” file, right-click on the blank area, select “New File” -> enter the file name “config.json”.
Right-click on “config.json” and open it with “Text Editor”.
Paste the following basic configuration:
{
   "bridge": {
  "name": "Homebridge",
  "username": "CC:22:3D:E3:CE:30",
  "port": 51826,
  "pin": "123-45-568"
}
No need to modify the content, just copy it as is!
Remember to save your work!
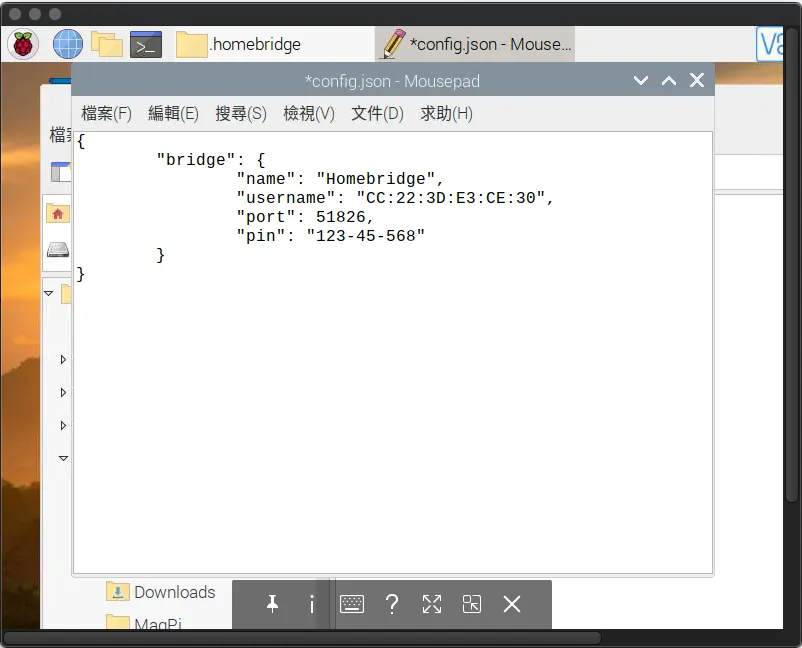
Done!
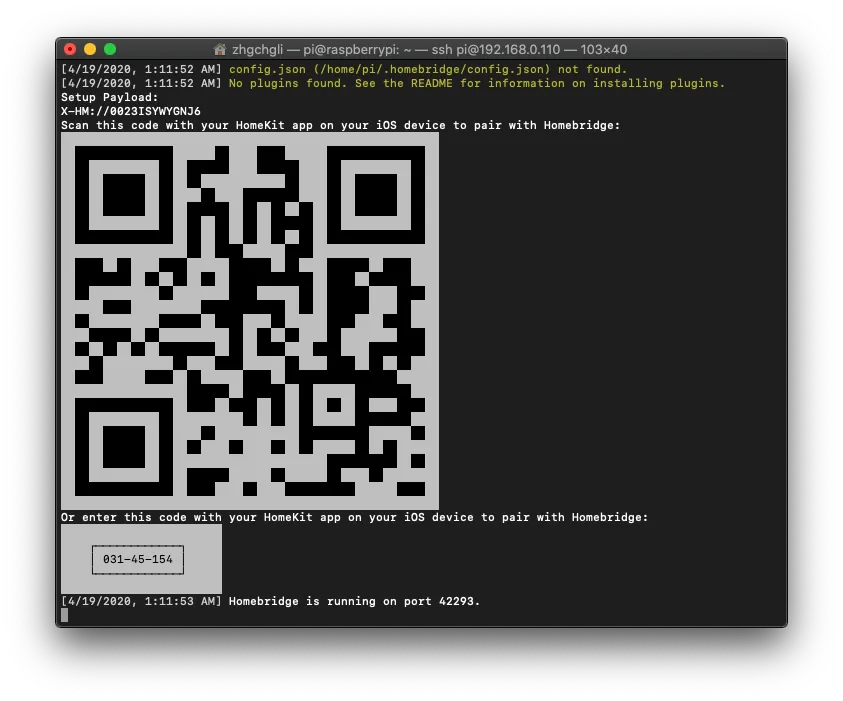
Binding HomeBridge to HomeKit
Input:
homebridge start
^( without sudo )
Enable
*If you encounter errors like “Error: Service name is already in use on the network” or port conflicts, try deleting the service, using
homebridge restartto restart, or rebooting the system.
*If you encounter errors like “was not registered by any plugin,” it means you haven’t installed the corresponding HomeBridge plugin yet.
If you make changes to the config.json file during startup, be sure to update it accordingly:
sudo homebridge restart
Restart HomeBridge
*Press “Control” + “C” to close and exit the HomeBridge service in the Terminal.
Take out your iPhone and open the “Home” app. Tap the “+” at the top right corner of “Home,” select “Add Accessory,” and scan the QR code that appears.
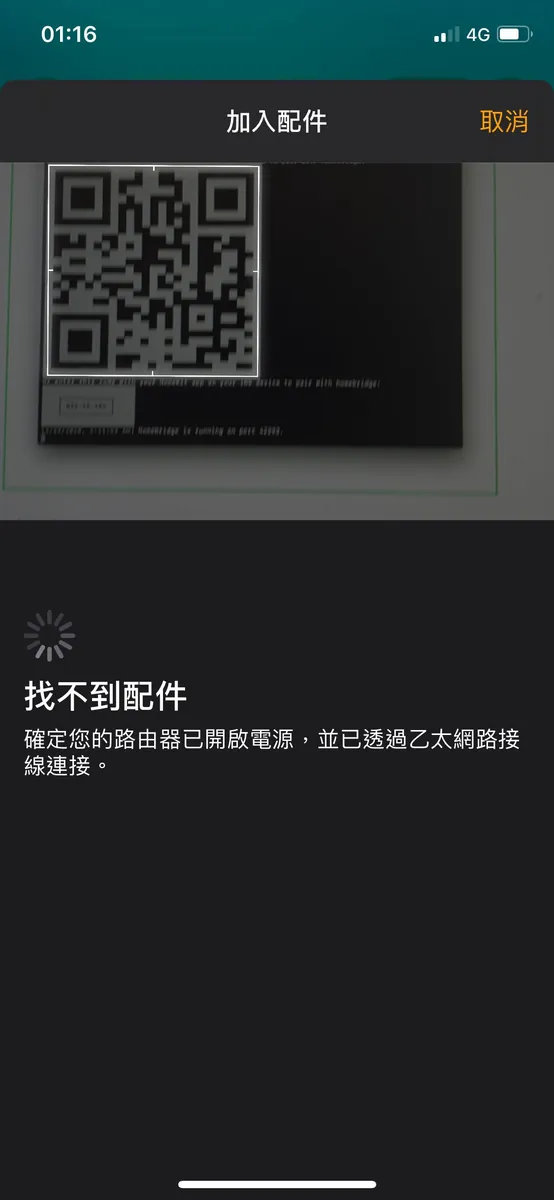
At this point, you should see “No Accessories Found.” Don’t worry! This is because we haven’t added any accessories to the HomeBridge bridge yet. It’s okay, let’s continue.
At least one accessory is required to scan and add!!! (Using a camera as an example here) :
At least one accessory is required to scan and add!!! (Using a camera as an example here) :
At least one accessory is required to scan and add!!! (Using a camera as an example here) :
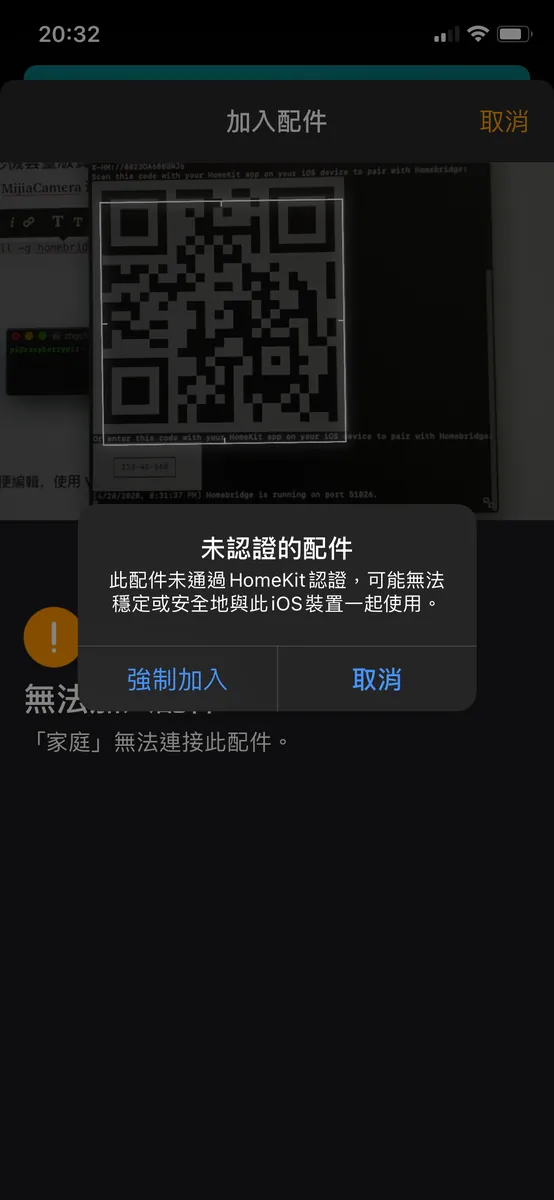
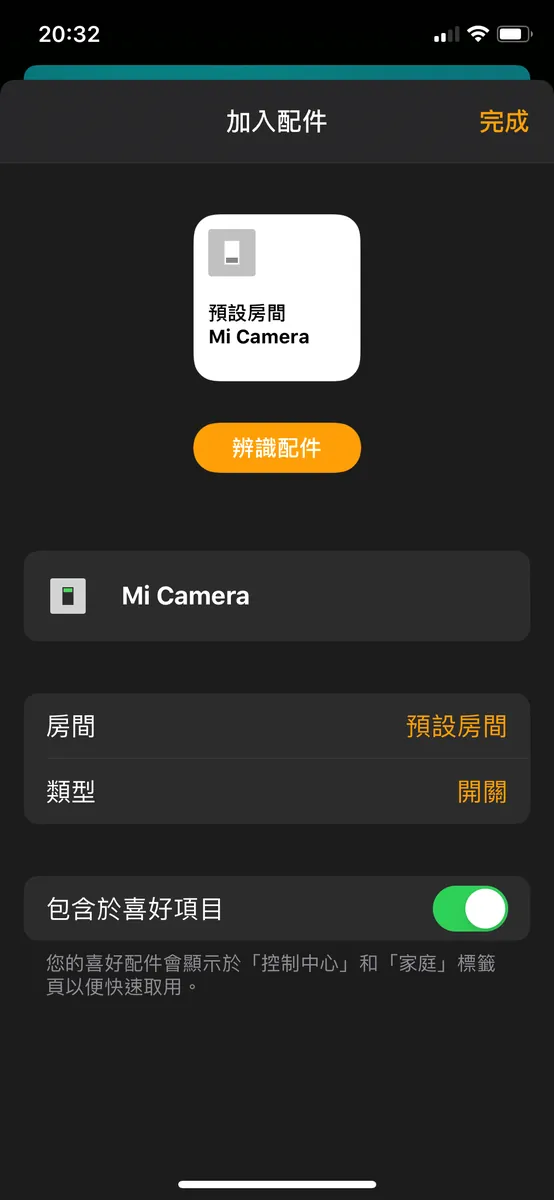
The first time you scan to add, a warning window will appear. Just click “Force Add”!
After adding once, you don’t need to scan again for new accessories; they will update automatically!
Add HomeBridge Service to Raspberry Pi Startup Items Automatically
Like the VNC remote desktop service, we also want the HomeBridge service to start automatically when the Raspberry Pi boots up. Otherwise, after a reboot, we would have to manually connect and activate it again.
Input:
which homebridge
Get homebridge path information
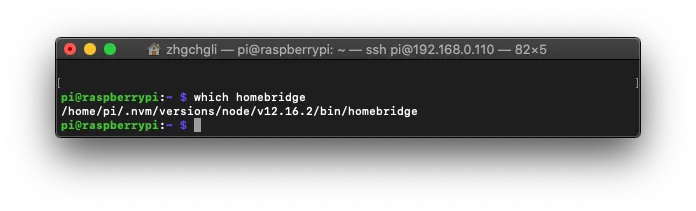
Note down this path.
Input again:
sudo vim /etc/init.d/homebridge
Press “Enter” to proceed
Press “i” to enter edit mode
#!/bin/sh
### BEGIN INIT INFO
# Provides:
# Required-Start:    $remote_fs $syslog
# Required-Stop:     $remote_fs $syslog
# Default-Start:     2 3 4 5
# Default-Stop:      0 1 6
# Short-Description: Start daemon at boot time
# Description:       Enable service provided by daemon.
### END INIT INFO


dir="/home/pi"
cmd="DEBUG=* Paste the path from which homebridge here"
user="pi"


name=`basename $0`
pid_file="/var/run/$name.pid"
stdout_log="/var/log/$name.log"
stderr_log="/var/log/$name.err"


get_pid() {
cat "$pid_file"
}


is_running() {
[ -f "$pid_file" ] && ps -p `get_pid` > /dev/null 2>&1
}


case "$1" in
start)
if is_running; then
echo "Already started"
else
echo "Starting $name"
cd "$dir"
if [ -z "$user" ]; then
sudo $cmd >> "$stdout_log" 2>> "$stderr_log" &
else
sudo -u "$user" $cmd >> "$stdout_log" 2>> "$stderr_log" &
fi
echo $! > "$pid_file"
if ! is_running; then
echo "Unable to start, see $stdout_log and $stderr_log"
exit 1
fi
fi
;;
stop)
if is_running; then
echo -n "Stopping $name.."
kill `get_pid`
for i in 1 2 3 4 5 6 7 8 9 10
# for i in `seq 10`
do
if ! is_running; then
break
fi


echo -n "."
sleep 1
done
echo


if is_running; then
echo "Not stopped; may still be shutting down or shutdown may have failed"
exit 1
else
echo "Stopped"
if [ -f "$pid_file" ]; then
rm "$pid_file"
fi
fi
else
echo "Not running"
fi
;;
restart)
$0 stop
if is_running; then
echo "Unable to stop, will not attempt to start"
exit 1
fi
$0 start
;;
status)
if is_running; then
echo "Running"
else
echo "Stopped"
exit 1
fi
;;
*)
echo "Usage: $0 {start\\|stop\\|restart\\|status}"
exit 1
;;
esac
exit 0
To:
cmd="DEBUG=* Paste the path you found from which homebridge here"
Replace with the path information you found (no quotation marks)
Press “Command” + “C” and “Command” + “V” to copy and paste the above content, then press “Esc” and type “:wq!” to save and exit.
Input again:
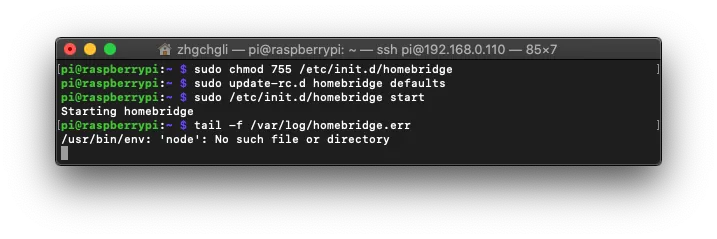
sudo chmod 755 /etc/init.d/homebridge
Change file permissions.
Final input:
sudo update-rc.d homebridge defaults
Add to startup items.
Done!
You can directly start the
homebridgeservice usingsudo /etc/init.d/homebridge start.
You can also use:
tail -f /var/log/homebridge.errto check startup error messages, andtail -f /var/log/homebridge.logto view logs.
Preparation Before Connecting Mijia Smart Appliances
Once Homebridge is up and running, we can start adding all Mi Home devices to Homebridge and connect them to HomeKit one by one!
First, we need to add all Mi Home smart devices to the Mi Home APP. We will extract the necessary information from there to connect them to HomeBridge.
After adding all smart appliances to the Mi Home APP:
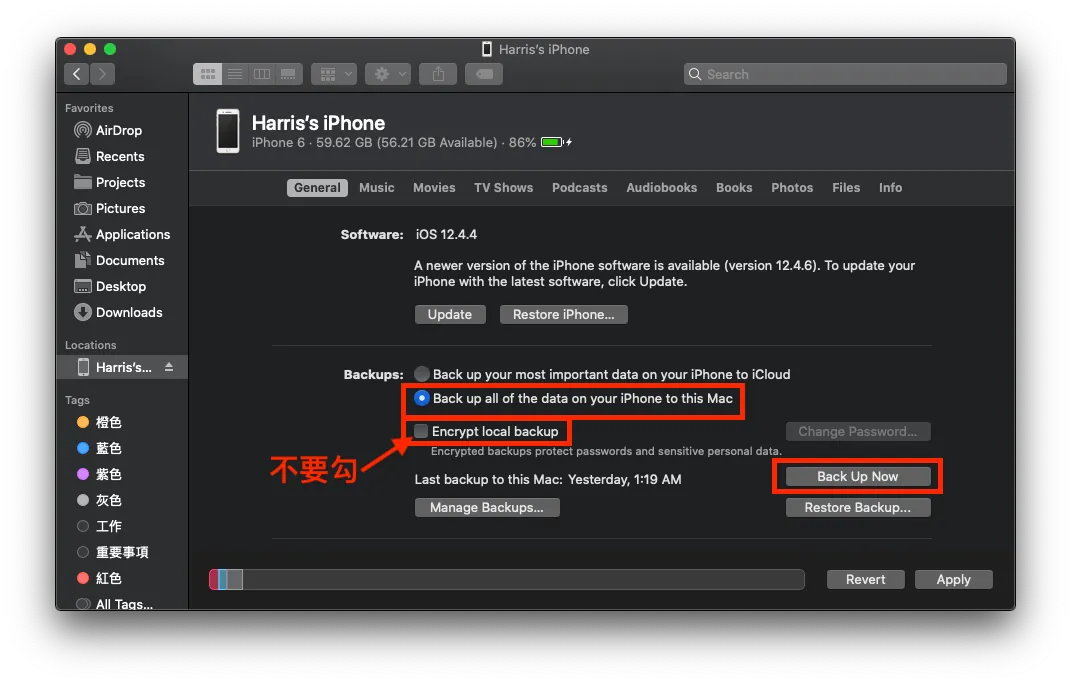
Connect the iPhone to the Mac, open the Finder/iTunes interface, and select the connected phone.
Select backup to “This Computer” and “Do not check! Encrypt local backup,” then click “Back Up Now”
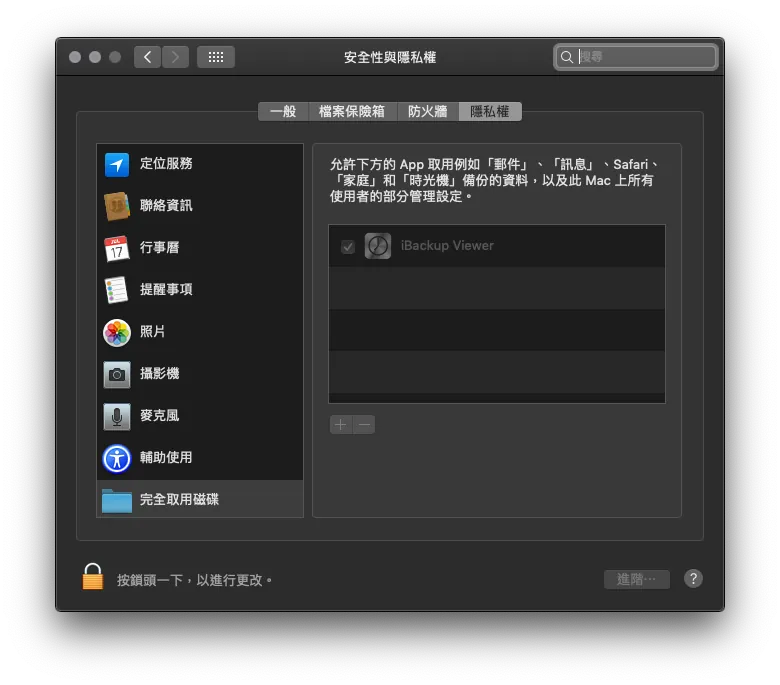
After completing the backup, download and install the backup viewer software: iBackupViewer
Open “iBackupViewer”
The first time you start, it will ask you to go to your Mac’s “System Preferences” - “Security & Privacy” - “Privacy” - “+” - and add “iBackupViewer”.
**If you have privacy concerns, you can disable the network when using this software and remove it after use*
Open iBackupViewer again and successfully load the backup file, then click on the “Recently Backed Up Phone”
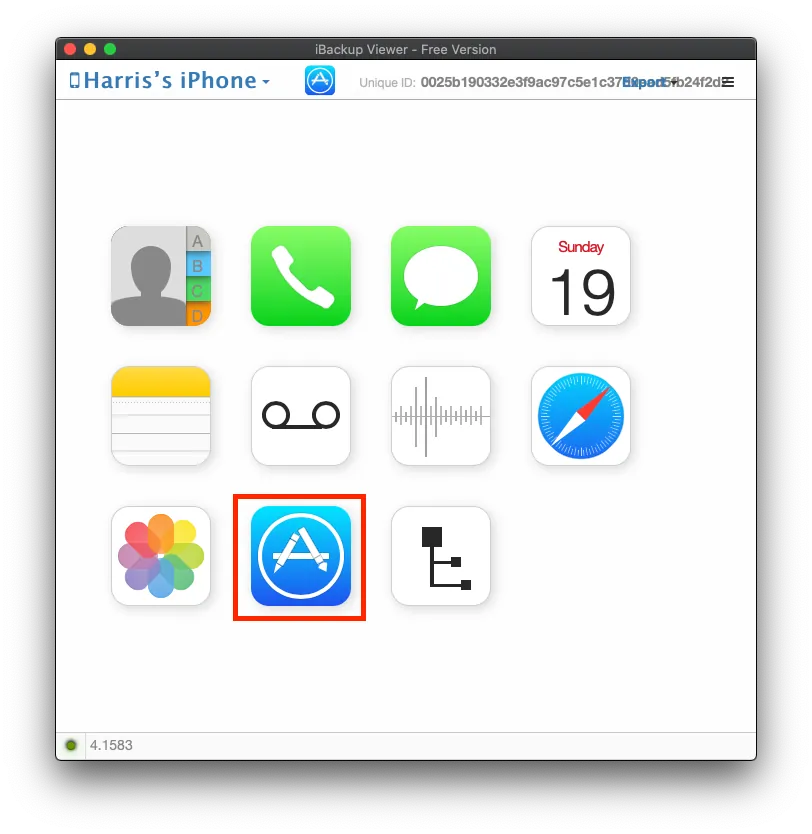
Select the “App Store” Icon
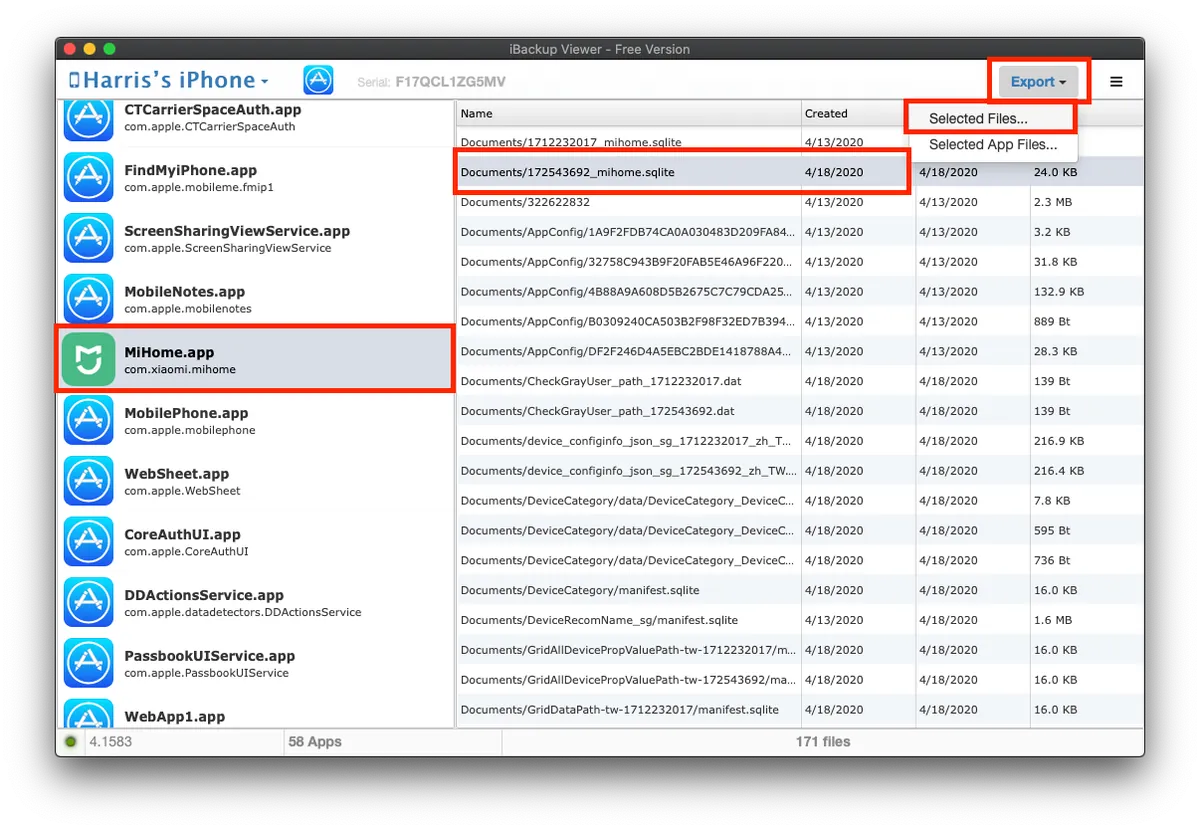
On the left, find “MiHome.app” -> on the right, find the file “number_mihome.sqlite” and “select” it -> top right corner “Export” -> “Selected Files”
*If there are two “number_mihome.sqlite” files, choose the one with the newest Created date.
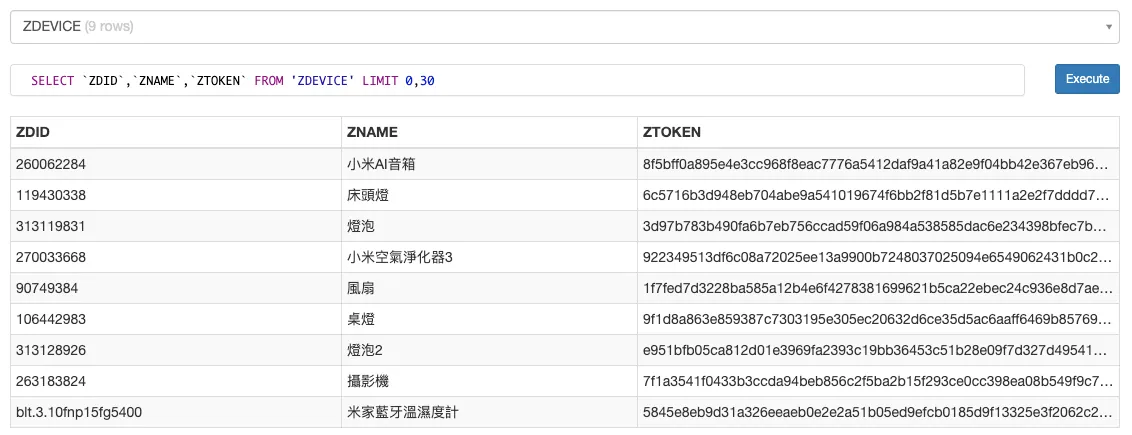
Drag the exported number_mihome.sqlite file into this website to view its content:
![]()
You can change the query syntax to:
SELECT `ZDID`,`ZNAME`,`ZTOKEN` FROM 'ZDEVICE' LIMIT 0,30
Only display the required field information (if specific device plugins need additional fields, you can include them for filtering)
-
ZDID: Device ID
-
ZNAME: Device Name
-
ZTOKEN: Device ZToken
ZTOKEN cannot be used directly; it must be converted to “Token” before use.
Here is an example of converting the ZToken of a camera to a Token:
First, we obtain the camera’s ZToken field content from the list above.
7f1a3541f0433b3ccda94beb856c2f5ba2b15f293ce0cc398ea08b549f9c74050143db63ee66b0cdff9f69917680151e
But the TOKEN obtained here cannot be used yet; we still need to convert it.
Open the website http://aes.online-domain-tools.com/:
-
Paste the copied ZTOKEN into the “Input Text” field and select “Hex”.
-
Enter the key as “00000000000000000000000000000000” (32 zeros), and still select “Hex”.
-
Then press “Decrypt!” to convert.
-
Select and copy the output of the two lines at the bottom right & remove the spaces to get the Token we need.
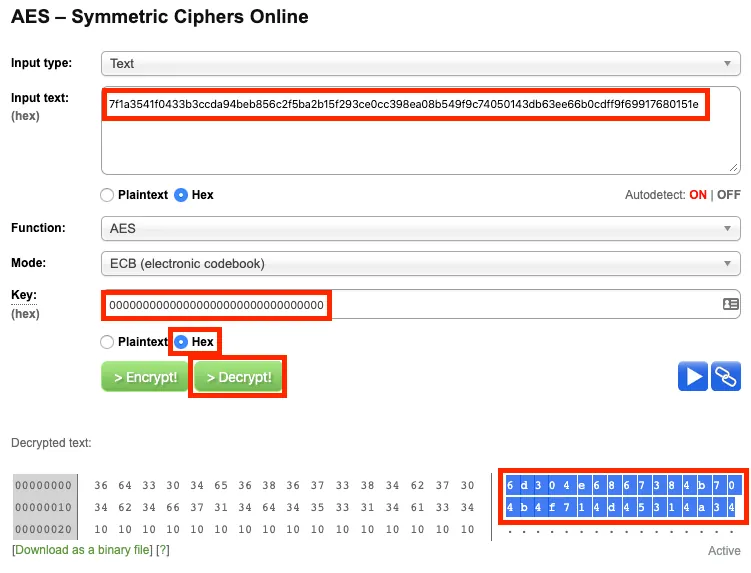
“6d304e6867384b704b4f714d45314a34” is the Token result we need!
*For obtaining the Token, I tried using the “miio” sniffing method, but it seems the Mi Home firmware has been updated, and this method no longer works to quickly and easily get the Token!
Finally, we also need to know the device’s IP address (here, using the camera as an example):
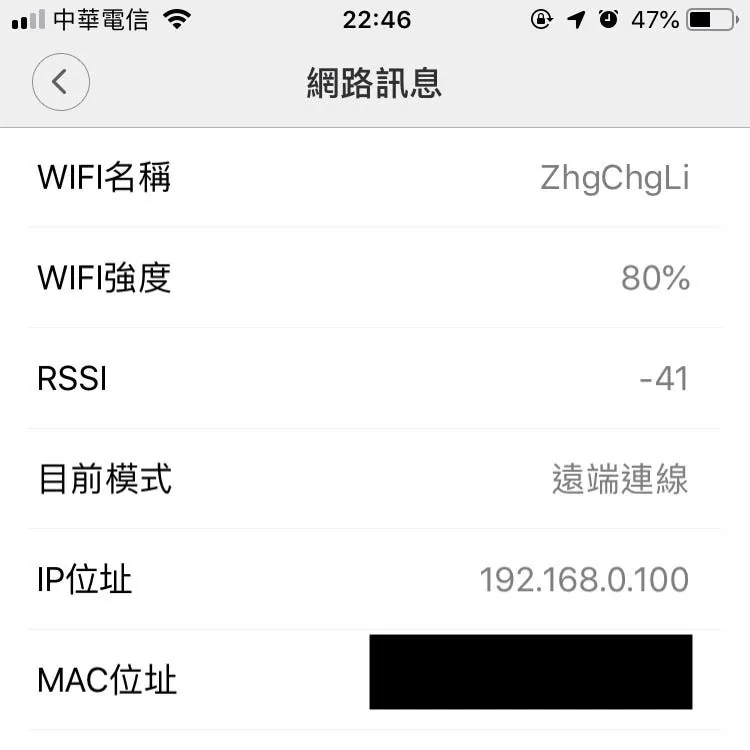
Open the Mi Home app → Camera → Top right corner “…” → Settings → Network info to get the IP address!
Record the ZDID/Token/IP information for later use.
Adding Mijia Smart Devices to HomeBridge One by One
According to the required plugins and connection information for each device, install and configure them one by one, then add them to HomeBridge.
接下來,打開終端機透過 SSH 連線到樹莓派,或使用 VNC 遠端桌面內的終端機繼續以下操作…
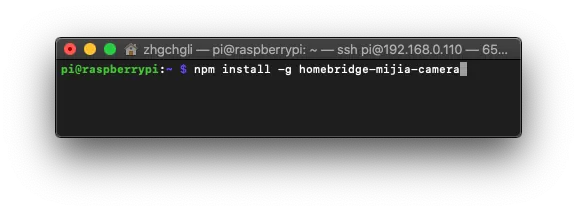
1. Mi Home Camera Pan-Tilt Version:
In Terminal, run the command to install the MijiaCamera HomeBridge plugin (without sudo):
npm install -g homebridge-mijia-camera
Refer to the previous tutorial on modifying the configuration file (config.json), and add the accessories section in the file:
{
   "bridge":{
      "name":"Homebridge",
      "username":"CC:22:3D:E3:CE:30",
      "port":51826,
      "pin":"123-45-568"
   },
   "accessories":[
      {
         "accessory":"MijiaCamera",
         "name":"Mi Camera",
         "ip":"",
         "token":""
      }
   ]
}
accessories: Add the Mi Home camera configuration, with the IP set to the camera’s IP and the token set to the token obtained from the previous tutorial.
Remember to save your work!
Then, follow the Homebridge chapter to start/restart/scan and add Homebridge; you will be able to see the camera controls in the “Home” app.
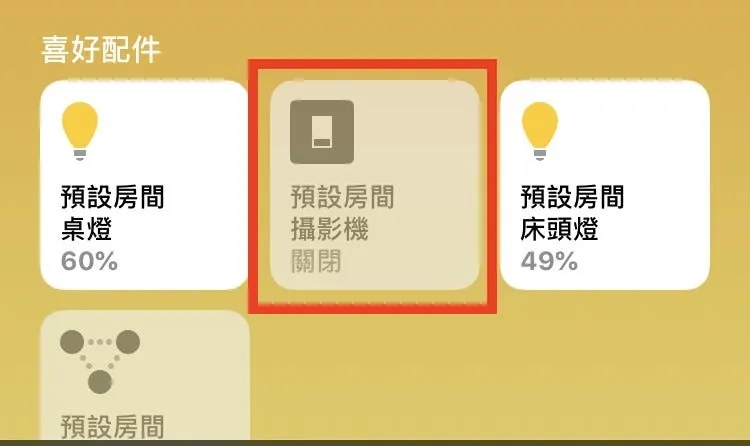
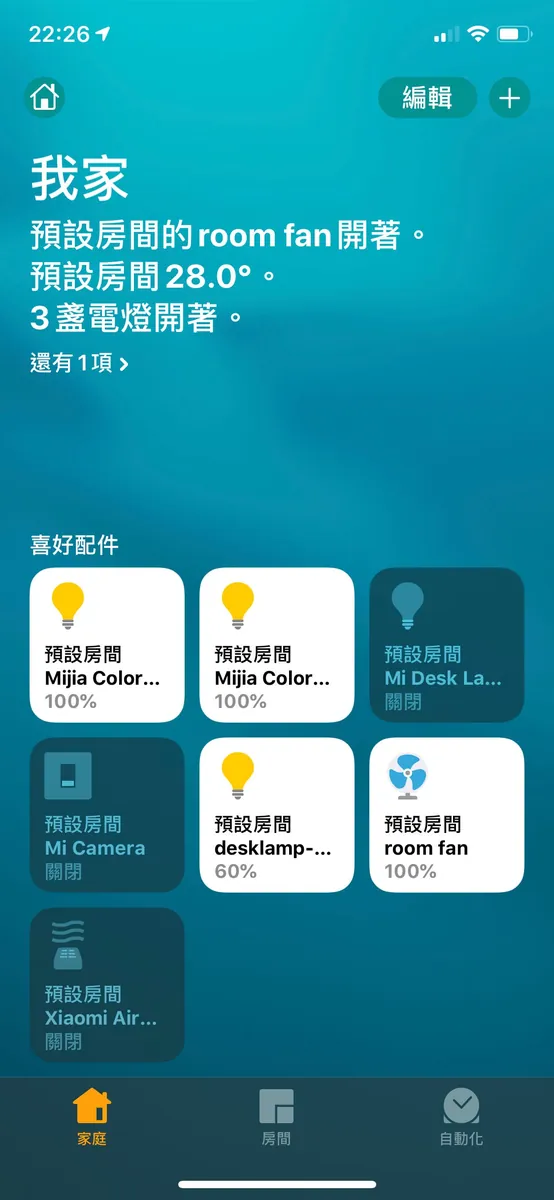
Controllable item: Camera On/Off
2. Mijia DC Inverter Fan
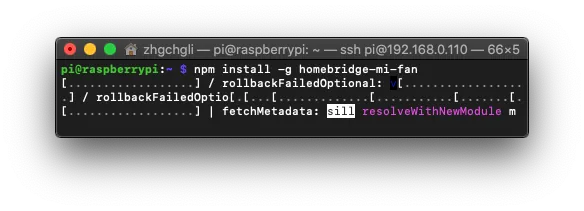
In the Terminal, run the command to install the homebridge-mi-fan HomeBridge plugin (without sudo):
npm install -g homebridge-mi-fan
Refer to the previous tutorial on modifying the configuration file (config.json). Add the platforms section in the file (if it already exists, add a new subsection separated by a comma) :
{
   "bridge":{
      "name":"Homebridge",
      "username":"CC:22:3D:E3:CE:30",
      "port":51826,
      "pin":"123-45-568"
   },
   "platforms":[
      {
         "platform":"MiFanPlatform",
         "deviceCfgs":[
            {
               "type":"MiDCVariableFrequencyFan",
               "ip":"",
               "token":"",
               "fanName":"room fan",
               "fanDisable":false,
               "temperatureName":"room temperature",
               "temperatureDisable":true,
               "humidityName":"room humidity",
               "humidityDisable":true,
               "buzzerSwitchName":"fan buzzer switch",
               "buzzerSwitchDisable":true,
               "ledBulbName":"fan led switch",
               "ledBulbDisable":true
            }
         ]
      }
   ]
}
platforms: Add Mi Home fan configuration, with ip set to the camera’s ip, token set to the token from the previous tutorial, and humidity/temperature to control whether to display the humidity and temperature sensor data.
type must match the corresponding model name. Four different fan models are supported:
-
ZhiMi DC Variable Frequency Floor Fan: ZhiMiDCVariableFrequencyFan
-
ZhiMi Natural Wind Fan: ZhiMiNaturalWindFan
-
Mi Home DC Inverter: MiDCVariableFrequencyFan (Sold in Taiwan)
-
Mi Home Fan: DmakerFan
Please replace with your own fan model.
Remember to save your work!
Then, follow the Homebridge chapter to start/restart/scan and add Homebridge; you will be able to see the camera controls in the “Home” app.
Controllable items: Fan on/off, wind speed adjustment
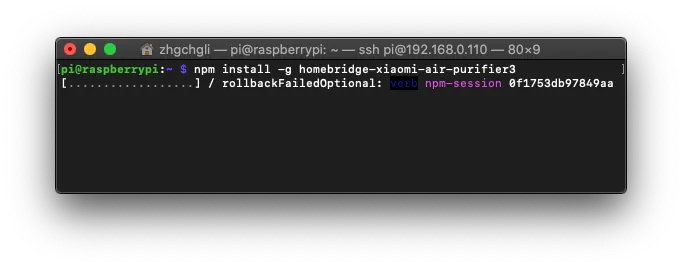
3. Xiaomi Air Purifier 3
In Terminal, run the command to install the homebridge-xiaomi-air-purifier3 HomeBridge plugin (without sudo):
npm install -g homebridge-xiaomi-air-purifier3
Refer to the previous tutorial on modifying the configuration file (config.json), and add the accessories section in the file (if it already exists, add a new subsection with a comma inside the section) :
{
   "bridge":{
      "name":"Homebridge",
      "username":"CC:22:3D:E3:CE:30",
      "port":51826,
      "pin":"123-45-568"
   },
   "accessories":[
      {
         "accessory":"XiaomiAirPurifier3",
         "name":"Xiaomi Air Purifier",
         "did":"",
         "ip":"",
         "token":"",
         "pm25_breakpoints":[
            5,
            12,
            35,
            55
         ]
      }
   ]
}
accessories: Add Mi Home fan configuration, with the IP set to the camera’s IP, the token set to the token obtained from the previous tutorial, and the did set to zdid.
Remember to save your work!
Then, follow the Homebridge chapter to start/restart/scan and add Homebridge; you will be able to see the camera controls in the “Home” app.
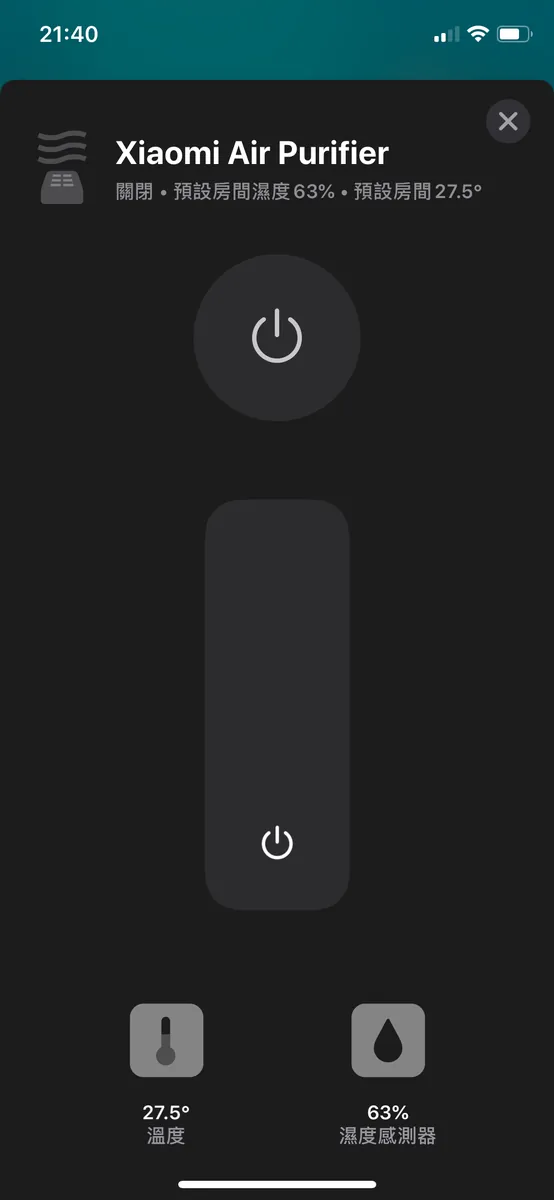

Controllable items: Air purifier power switch, fan speed adjustment
Viewable items: Current temperature and humidity
4. Mi Home LED Smart Desk Lamp
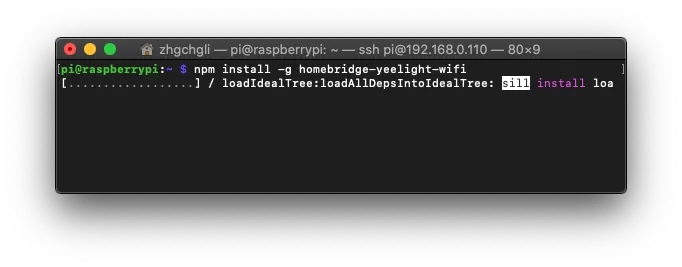
In the Terminal, run the command to install the homebridge-yeelight-wifi HomeBridge plugin (without sudo):
npm install -g homebridge-yeelight-wifi
Refer to the previous tutorial on modifying the configuration file (config.json). Add the platforms section in the file (if it already exists, add a new subsection separated by a comma) :
{
   "bridge":{
      "name":"Homebridge",
      "username":"CC:22:3D:E3:CE:30",
      "port":51826,
      "pin":"123-45-568"
   },
   "platforms":[
      {
         "platform":"yeelight",
         "name":"Yeelight"
      }
   ]
}
No need to pass any special parameters! For more detailed settings, refer to the official documentation (such as brightness/color temperature…).
Remember to save your work!
The smart desk lamp also needs to be re-bound to the Yeelight app, and then enable “Local Network Control” to allow Homebridge to control it.
- Download and install the “Yeelight” app on your iPhone
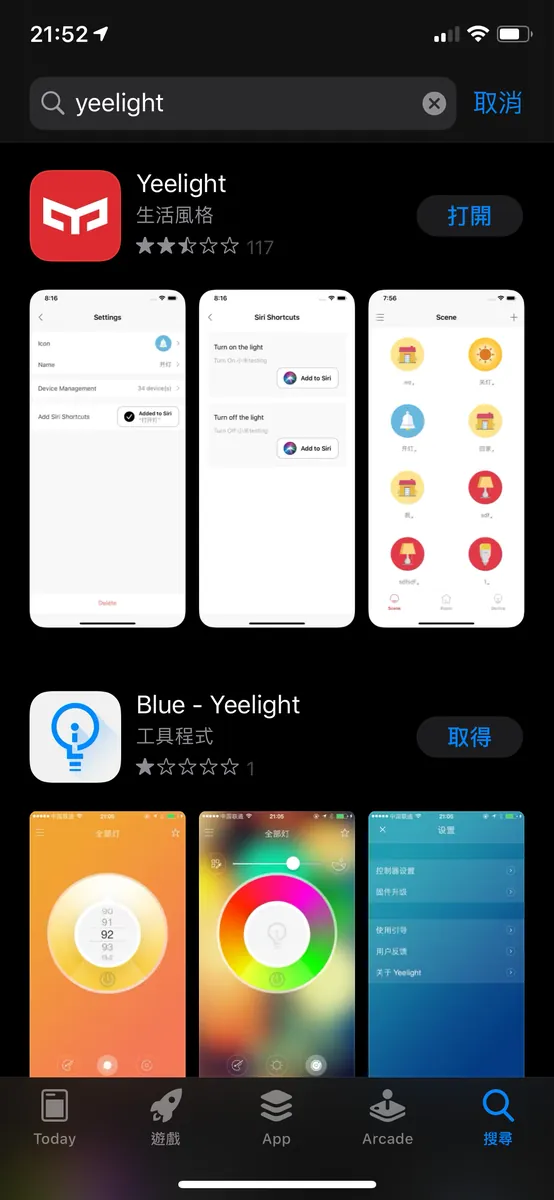
Search “Yeelight” on the App Store and install it.


After installation, open the Yeelight APP -> “Add Device” -> find “Mijia Desk Lamp” -> re-pair and bind
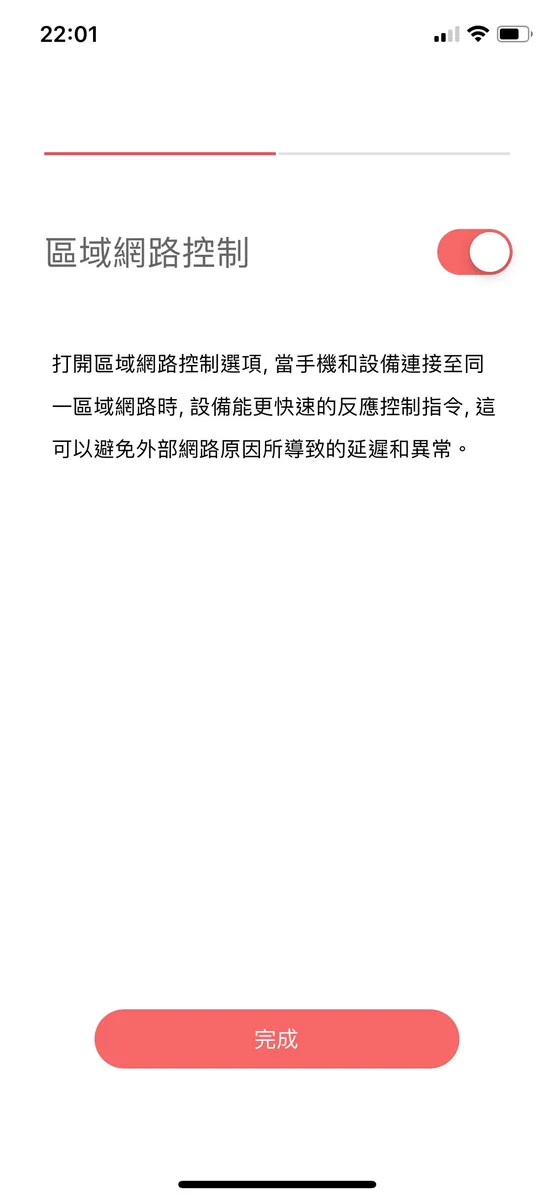
The final step is to enable “Local Network Access”.
*If you accidentally didn’t enable it, go to the “Devices” page -> select the desk lamp device -> tap the “△” tab at the bottom right -> tap “LAN Control” to enter settings -> turn on LAN Control.
Honestly, this is really frustrating. The Mi Home app itself doesn’t have this toggle feature; you have to bind it to the Yeelight app, and you can’t unbind or rebind it back to Mi Home… otherwise, it will stop working.
Then, follow the Homebridge chapter to start/restart/scan and add Homebridge; you will be able to see the camera controls in the “Home” app.

Controllable items: light on/off, color temperature adjustment, brightness adjustment
Other HomeBridge Plugins for Mijia Smart Devices:
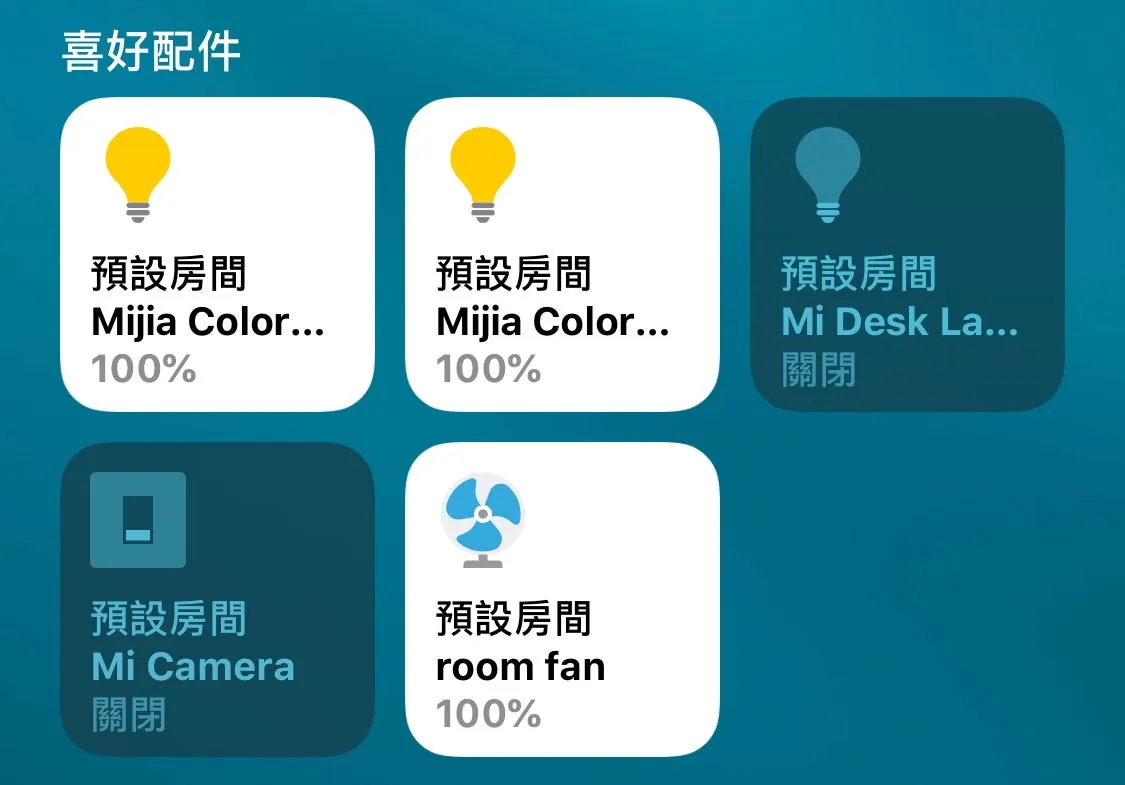
My final config.json looks like this:
{
   "bridge":{
      "name":"Homebridge",
      "username":"CC:22:3D:E3:CE:30",
      "port":51826,
      "pin":"123-45-568"
   },
   "accessories":[
      {
         "accessory":"MijiaCamera",
         "name":"Mi Camera",
         "ip":"192.168.0.105",
         "token":"6d304e6867384b704b4f714d45314a34"
      },
      {
         "accessory":"XiaomiAirPurifier3",
         "name":"Xiaomi Air Purifier",
         "did":"270033668",
         "ip":"192.168.0.108",
         "token":"5c3eeb03065fd8fc6ad10cae1f7cce7c",
         "pm25_breakpoints":[
            5,
            12,
            35,
            55
         ]
      }
   ],
   "platforms":[
      {
         "platform":"MiFanPlatform",
         "deviceCfgs":[
            {
               "type":"MiDCVariableFrequencyFan",
               "ip":"192.168.0.106",
               "token":"dd1b6f582ba6ce34f959bbbc1c1ca59f",
               "fanName":"room fan",
               "fanDisable":false,
               "temperatureName":"room temperature",
               "temperatureDisable":true,
               "humidityName":"room humidity",
               "humidityDisable":true,
               "buzzerSwitchName":"fan buzzer switch",
               "buzzerSwitchDisable":true,
               "ledBulbName":"fan led switch",
               "ledBulbDisable":true
            }
         ]
      },
      {
         "platform":"yeelight",
         "name":"Yeelight"
      }
   ]
}
For everyone’s reference!
The Mi Home devices I used are as shown in the tutorial. I didn’t try the others I don’t have. You can check on npm (homebridge-plugin XXX English name) and follow the similar logic to install, configure, and connect them!
Here are some HomeBridge plugins I found but haven’t tried (no guarantee they work):
-
Xiaomi Air Purifier 1st Gen: homebridge-mi-air-purifier
-
Mi Home Smart Socket Series: homebridge-mi-outlet
-
Xiaomi Robot Vacuum: homebridge-mi-robot_vacuum
-
Mi Home Smart Gateway: homebridge-mi-aqara
Tips
-
It is recommended to assign fixed/reserved IPs to all Mi Home devices on your router; otherwise, their IP addresses may change, and you will need to update the config.json settings.
-
If all steps are correct but you still encounter errors or “No Response” in HomeKit, try again. If the problem persists, it may mean the plugin no longer works, and you need to find another plugin to connect. (You can check the GitHub issues)
-
Functionality failure and slow response are also unsolvable. You can submit an issue to inform the author and wait for updates. Since it is an open-source project, don’t expect too much!
-
After binding each device, you can start Homebridge once, then check on your iPhone if it works. If it does, press “Control” + “C” to stop it; after all devices are bound, you can restart the Raspberry Pi to let it automatically start the Homebridge service in the background after rebooting; this is what we want.
Conclusion
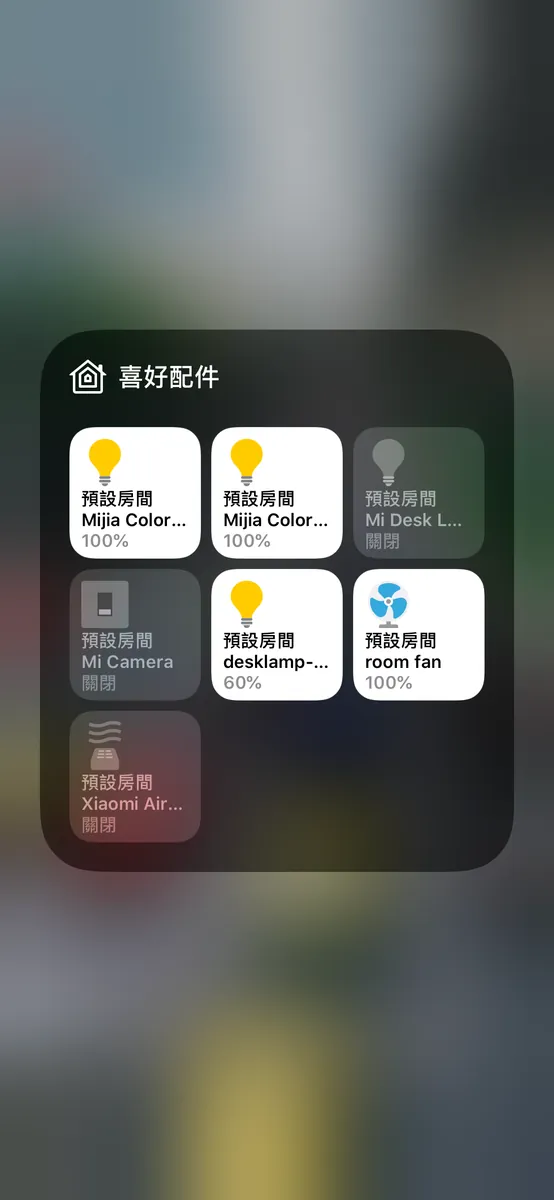
Additionally, you can go to “Settings” -> “Control Center” -> “Customize Controls” and add the “Home” app to quickly operate HomeKit from the Control Center pull-down!
After connecting everything to HomeKit, there’s only one word: “Awesome”! The response time for switches is much faster. The only thing missing is a home hub for remote control. This concludes the advanced Homebridge guide. Thank you for reading.
Back to the beginning of the article, once everything is added to HomeKit, we can seamlessly use the automation features of iOS ≥ 13 Shortcuts.
I want to study how the HomeBridge plugins work later—it seems really interesting! So if a HomeBridge plugin doesn’t meet your needs or breaks with no replacement, just wait for me to research it!
Home assistant
There is another smart home platform called Homeassistant that can be installed on a Raspberry Pi (note: it requires a 2A power supply to start). I have also tried Homeassistant, which offers a full GUI for easy device integration with just a few clicks. I plan to explore it further later. It feels like another version of the Mi Home platform and is more suitable if you have many IoT devices from different manufacturers.

Comments