
Building a Fully Automated WFH Employee Health Reporting System with Slack
Master Slack Workflow with Google Sheet and App Script to Boost Work Efficiency
Photo by Stephen Phillips — Hostreviews.co.uk
Introduction
In response to full remote work, the company cares about the health of all members. Everyone must report their health status daily, and People Operations centrally records and manages the data.
Our Flow Before Optimization

-
[Automation] Slack Channel sends a daily reminder message at 10 AM to prompt everyone to fill out the health form (the only automation before optimization)
-
Employees click the link to open the Google Form and fill out health questions
-
Saving Data Back to Google Sheet Response Records
-
[Manual] People Operations compares the list near the end of each workday to identify employees who forgot to submit.
-
[Manual] Send reminder messages in the Slack Channel & tag each person who forgot to fill in the form
The above is our company’s health report tracking process. Every company will have different workflows depending on their size and operations. This article serves only as an optimization example to learn Slack Workflow usage and basic App Script writing. Actual implementation should be done on a case-by-case basis.
Issues
-
Requires leaving the Slack context to open the Google Form webpage in a browser to fill it out, which is especially inconvenient on mobile devices.
-
Google Form can only automatically capture email messages, but cannot automatically include the respondent’s name or department information.
-
Daily manual comparison and manual tagging consume a lot of manpower and time.
Solution
Having done quite a few small automation tasks, this process has a fixed data source (employee list), simple conditions, and routine actions; it clearly suits automation. Initially, I didn’t implement it because I couldn’t find a good way to collect input (actually, I couldn’t find an interesting point to explore). So I just left it alone until I saw this post by 海總理, which made me realize that Slack Workflow can do more than scheduled messages—it also has form capabilities:
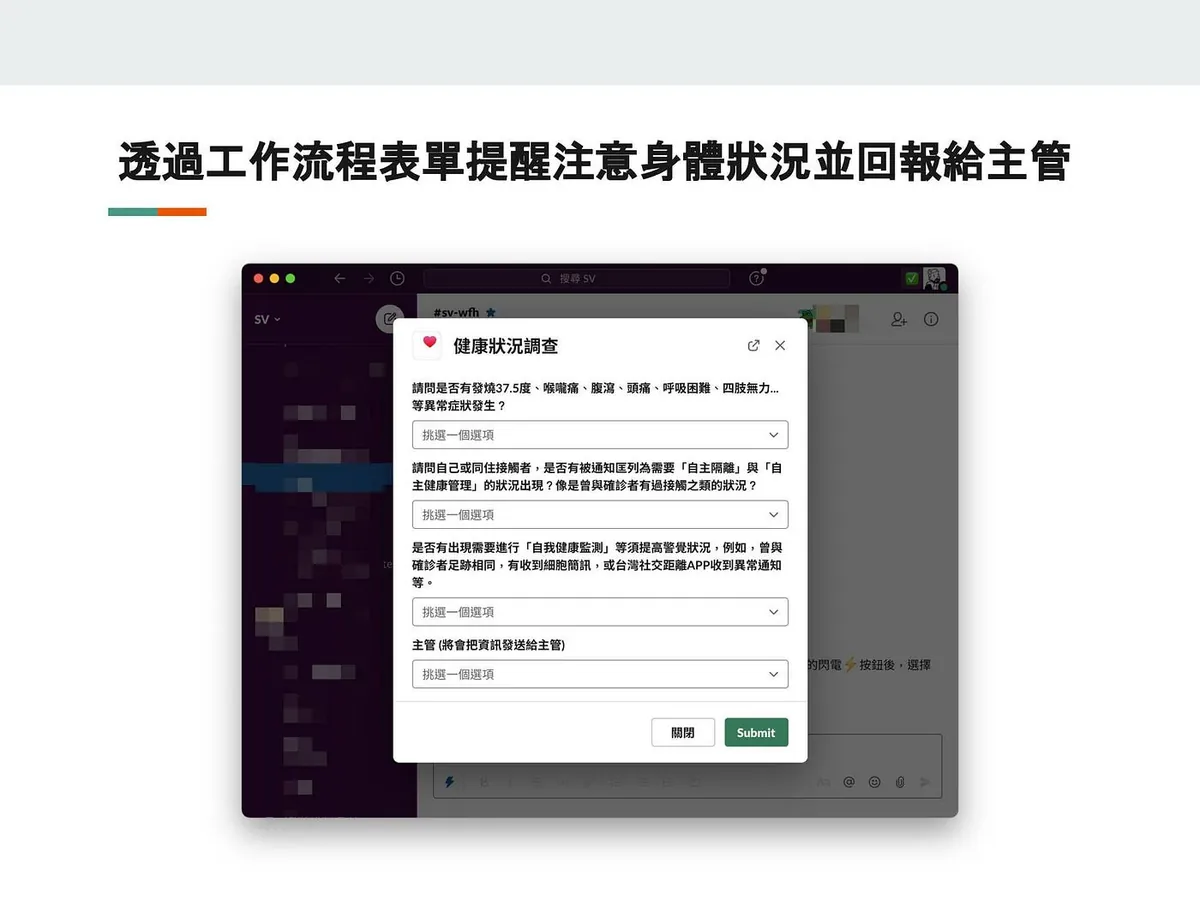
Image source: 海總理
Now my hands are itching to get started!!
If combined with Slack Workflow Form and automated message sending, it could solve all the pain points mentioned above. The concept is feasible! So, I started working on the implementation.
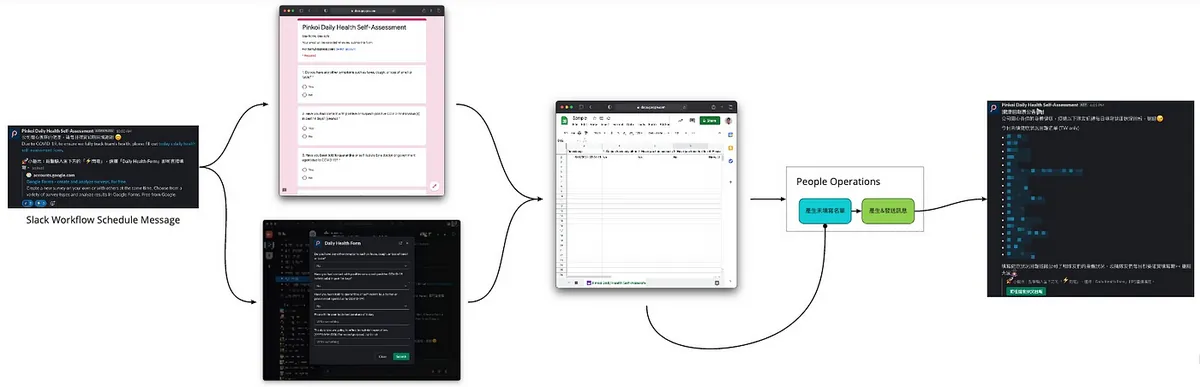
Optimized Flow
First, let’s review the optimized process and results.
-
[Automation] Slack channel sends a daily reminder message at 10 AM to fill out the health form.
-
Fill out health questions via Google Form or Slack Workflow form.
-
All data is saved back to the Google Sheet response records.
-
People Operations clicks the “Generate Unsubmitted List” button near the end of each workday.
-
[Automation] Use App Script to compare the employee list and filled list to filter out those who haven’t filled in.
-
[Automation] Click “Generate & Send Message” to automatically send reminders to those who haven’t filled in and auto-tag targets.
-
Done!
Results
(Personal estimation)
-
Each employee can save about 30 seconds per day filling out the form.
-
People Operations can save about 20 to 30 minutes daily managing this task.
How It Works
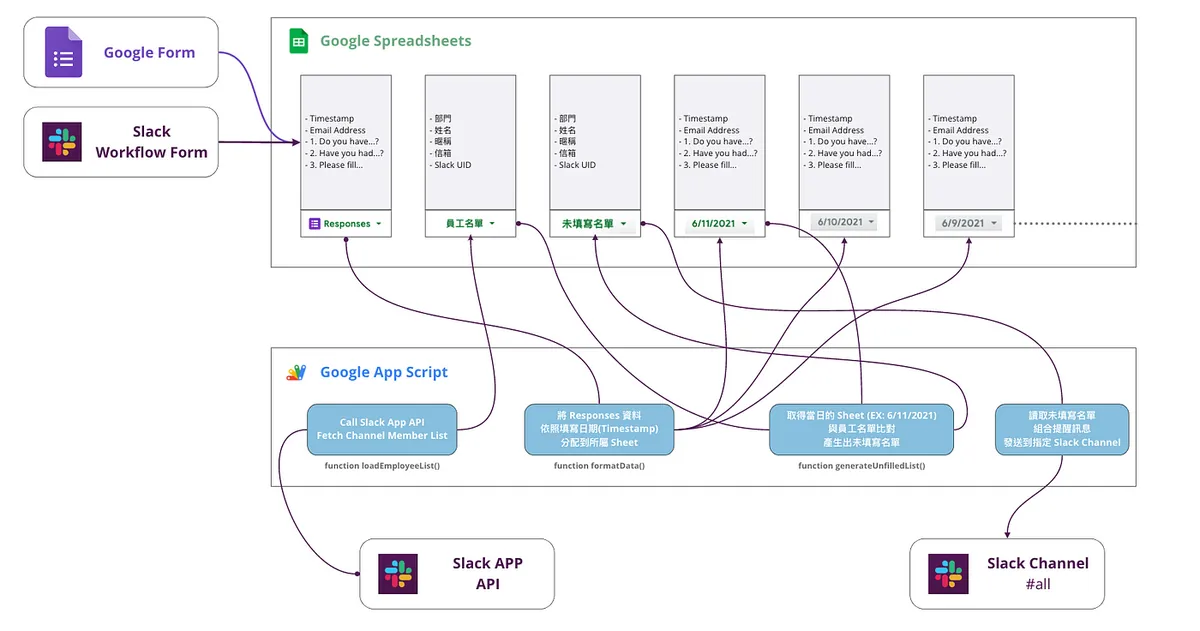
Managing Sheets by writing App Script.
-
Store all externally input data in the Responses Sheet
-
Write an App Script function to distribute the Responses data into Sheets based on the submission date. If a Sheet for that date doesn’t exist, create a new one named after the date for easy identification and access.
-
Get the current date’s Sheet and compare it with the employee list to generate a Sheet with the list of those who have not submitted.
-
Read the list of missing submissions from the Sheet, compose a message, and send it to the specified Slack Channel
-
Integrate Slack APP API to automatically read and import the employee list from a specified Channel
-
Message content uses Slack UID Tag
<@UID>to mention members who have not submitted.
Identity Verification
The identity information linking Google Form and Slack is Email, so please ensure all employees use their company email to fill out the Google Form and have their company email entered in their Slack profile.
Getting Started
After discussing the problems, improvements, and results, let’s move on to the implementation phase; let’s complete this automation case step by step together.
The article is a bit long, so feel free to skip sections you already understand or start by making a copy of the completed result to follow along and learn while editing.
Completed result form: https://forms.gle/aqGDCELpAiMFFoyDA
Final Result Google Sheet:

Create a Health Report Google Form & Link Responses to Google Sheet
Steps are omitted; if you have questions, please Google directly. Here, it is assumed that you have already created and linked the health report form.
Remember to check “Collect emails” in the form:
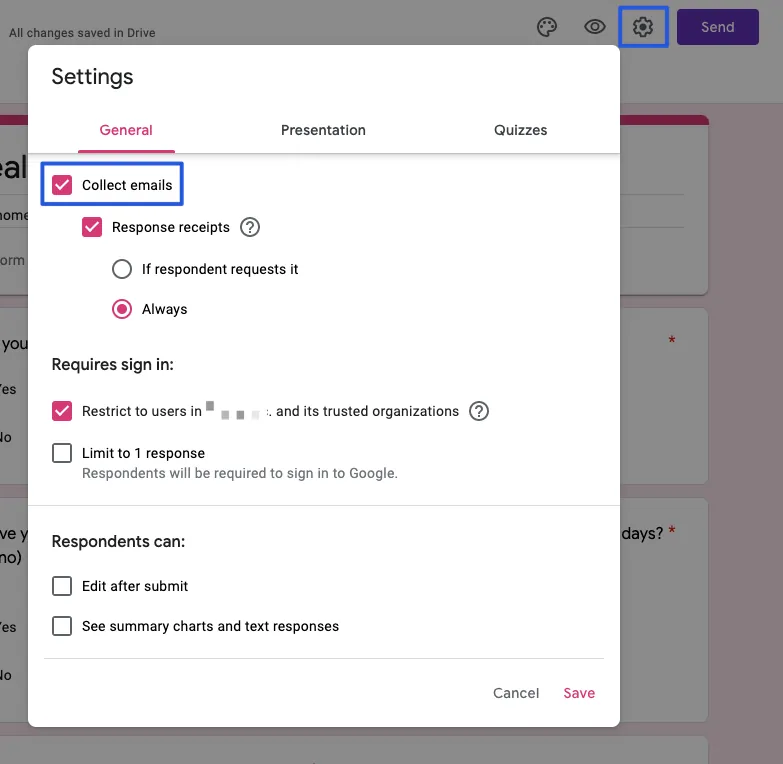
Collect the submitter’s email for later comparison with the list.
How to link responses to Google Sheet?
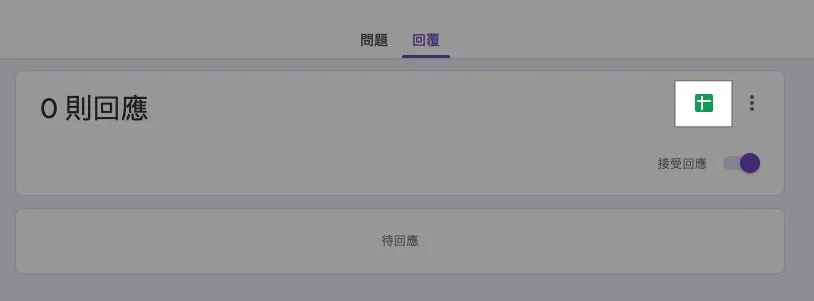
Switch to the “Responses” tab at the top of the form and click the “Google Sheet Icon.”
Change the Sheet Name in the Link:

It is recommended to rename the linked Sheet from “Form Responses 1” to “Responses” for easier use.
Create Slack Workflow Form Entry Point
After setting up the traditional Google Form entry, let’s add the Slack submission method.
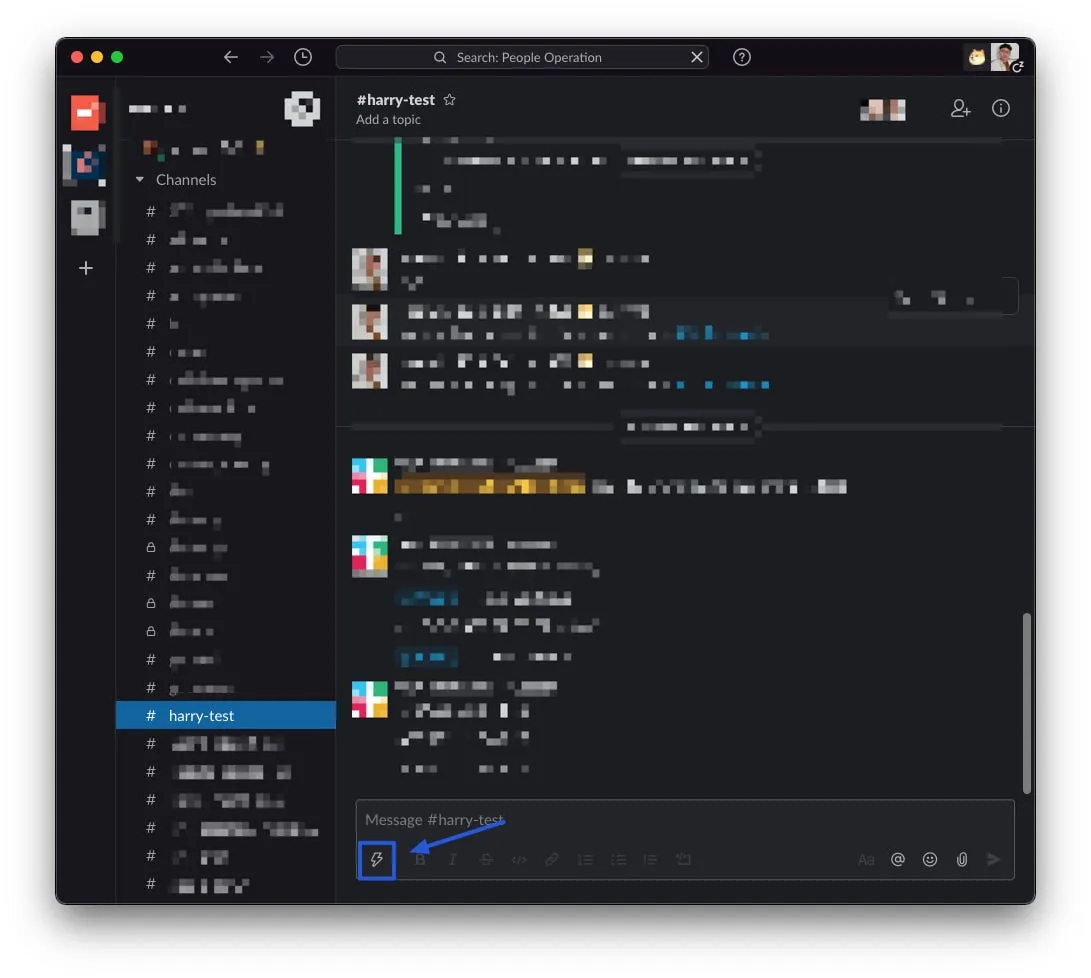
In any Slack chat window, find the blue lightning bolt ⚡️ located below the input box and click it.
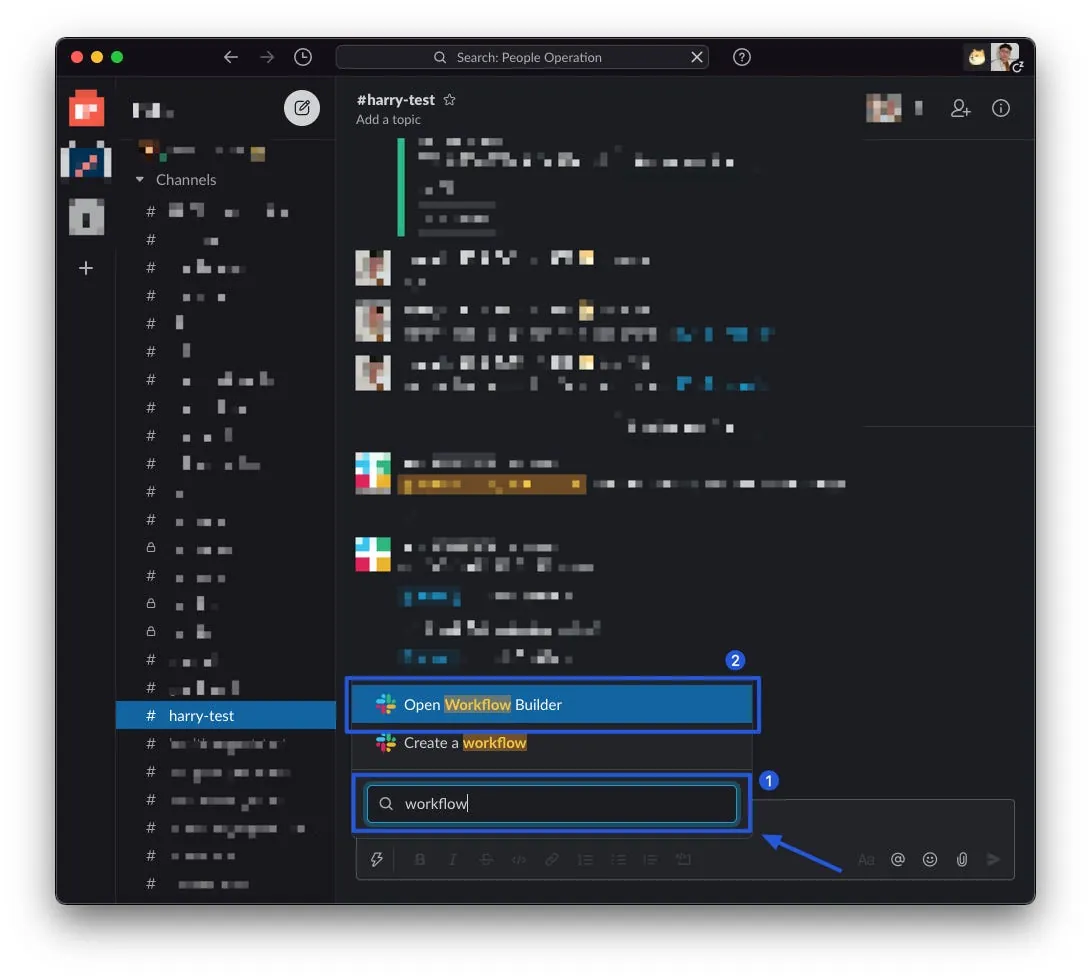
In the menu, type “workflow” in the “Search shortcuts” field and select “Open Workflow Builder”
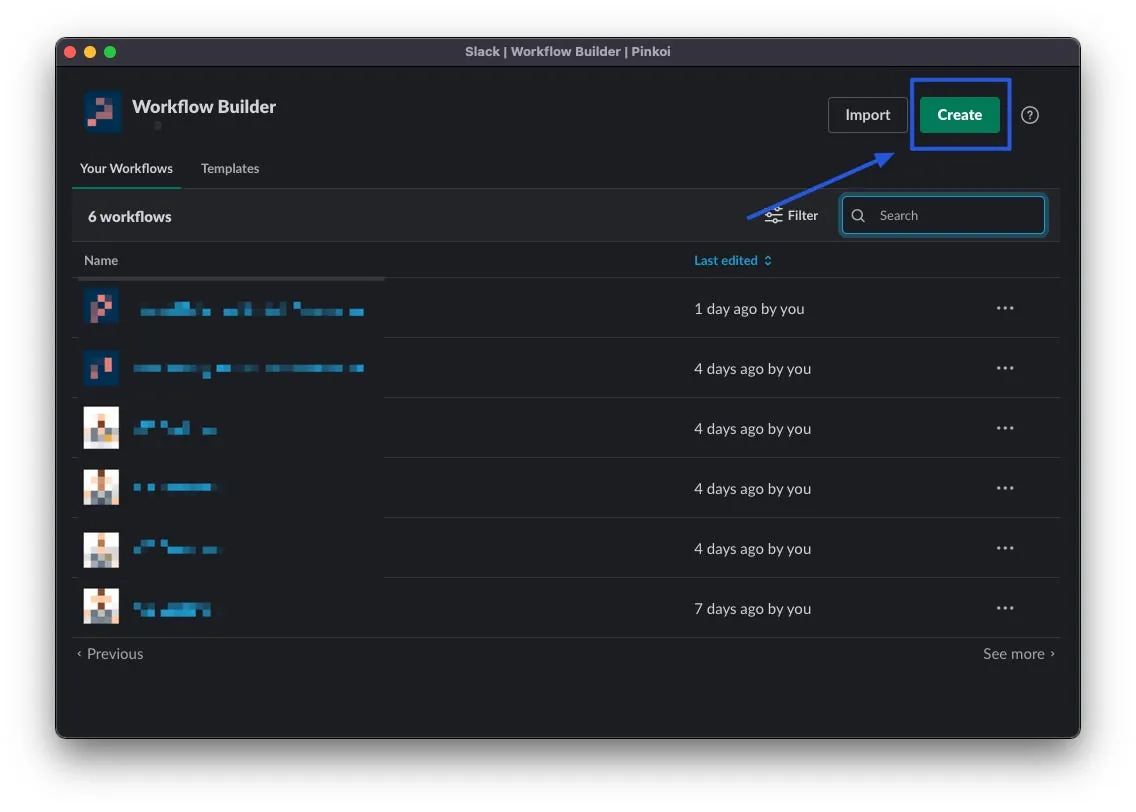
Here you will see the Workflows you have created or participated in. Click “Create” at the top right to create a new Workflow.
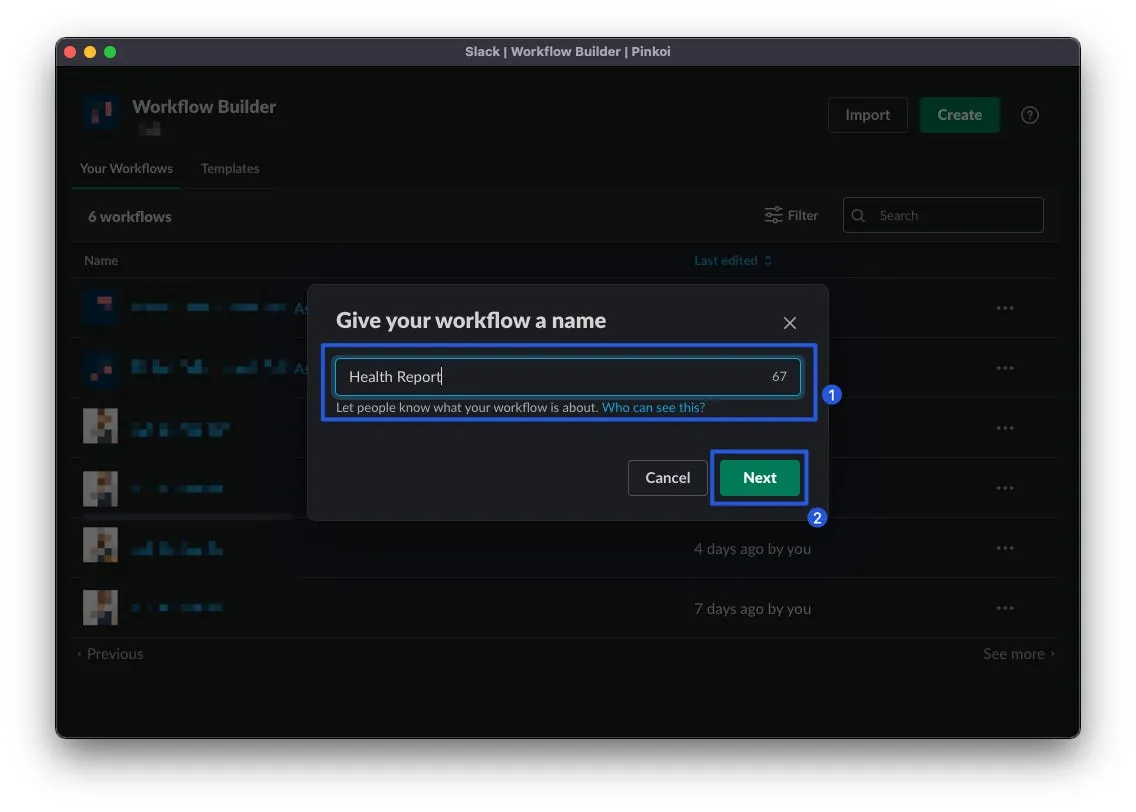
Step 1: Enter the workflow name (for display in the Workflow Builder interface)
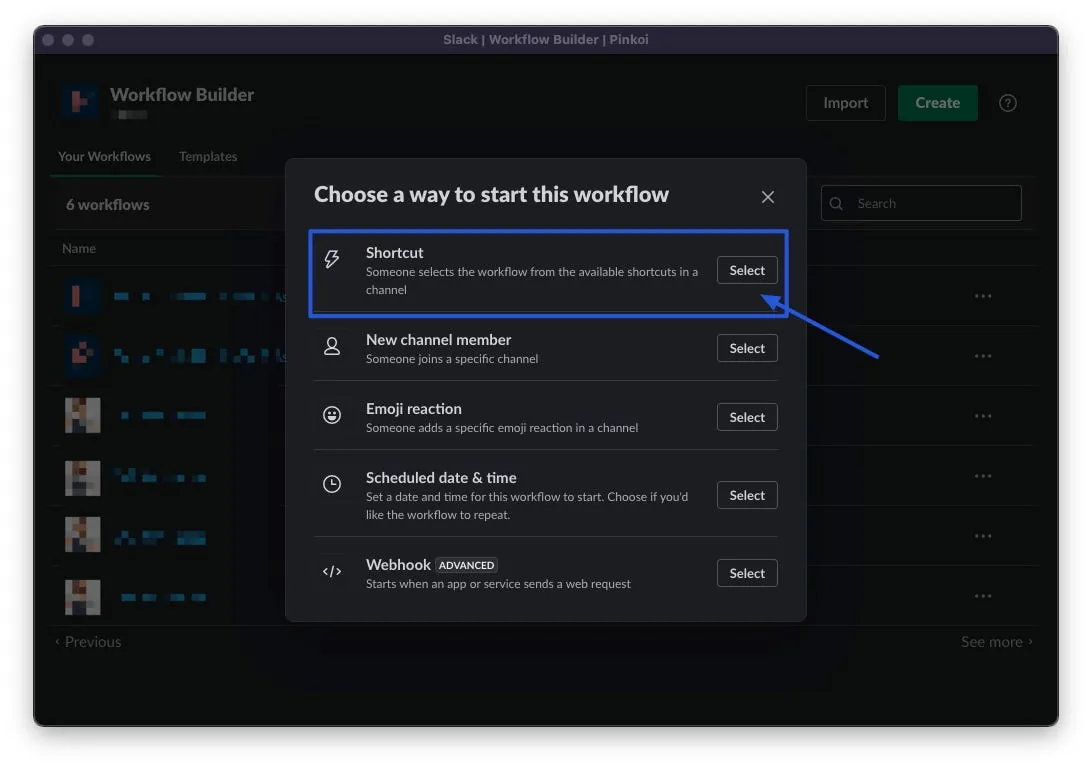
For the Workflow trigger method, select “Shortcut”
There are currently 5 types of Slack workflow trigger timings:
-
Shortcut: Manually trigger the “Blue Lightning ⚡️” option, which appears in the workflow menu. Click it to start the workflow.
-
New channel member: When a new member joins the Target Channel… (EX: Welcome message)
-
Emoji reactions: When someone reacts with a specific emoji to a message in the Target Channel… (Maybe this can be used for important messages where readers are asked to press a certain emoji to indicate they have read it?)
-
Scheduled date & time: Schedule, trigger at the specified time… (EX: Send reminder message at a set time)
-
Webhook: External webhook trigger, advanced feature that can connect internal workflows with third-party or self-hosted APIs.
Here, we choose “Shortcut” to create a manual trigger option.
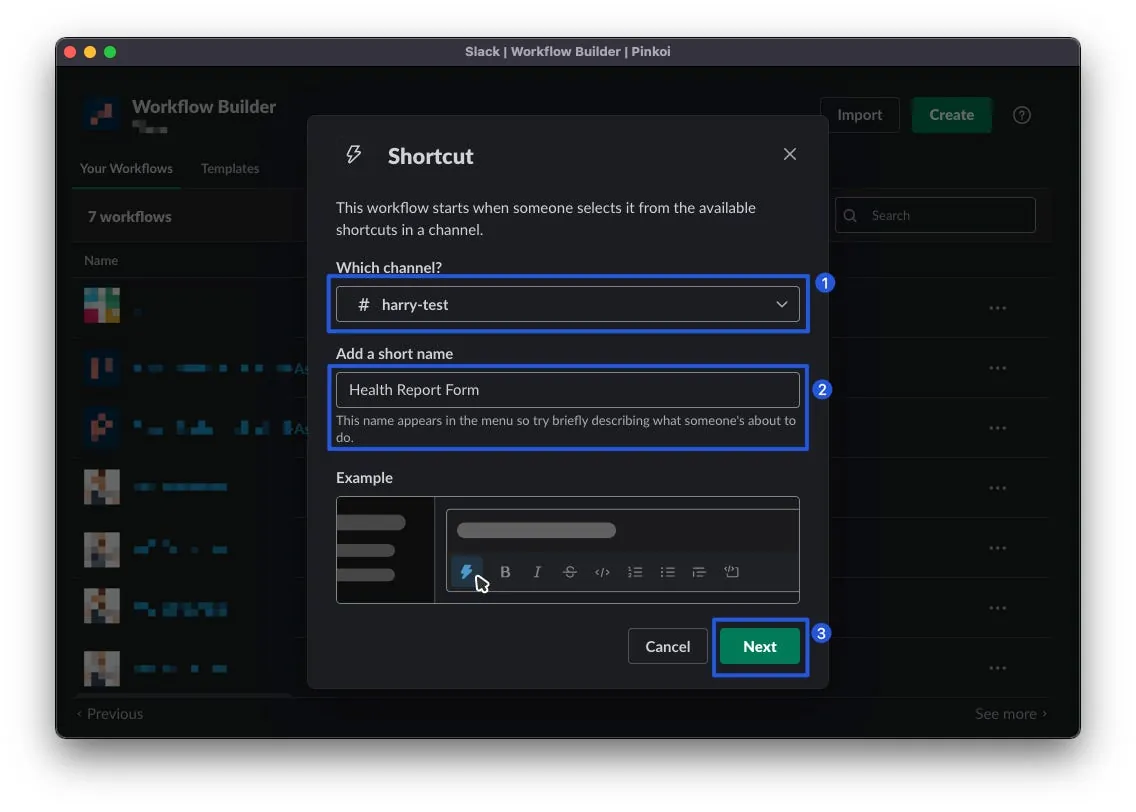
Select the channel where this Workflow Shortcut will be added under “Which Channel Input Box” and enter the “Display Name” you want to show.
*A workflow shortcut can only be added to one channel.
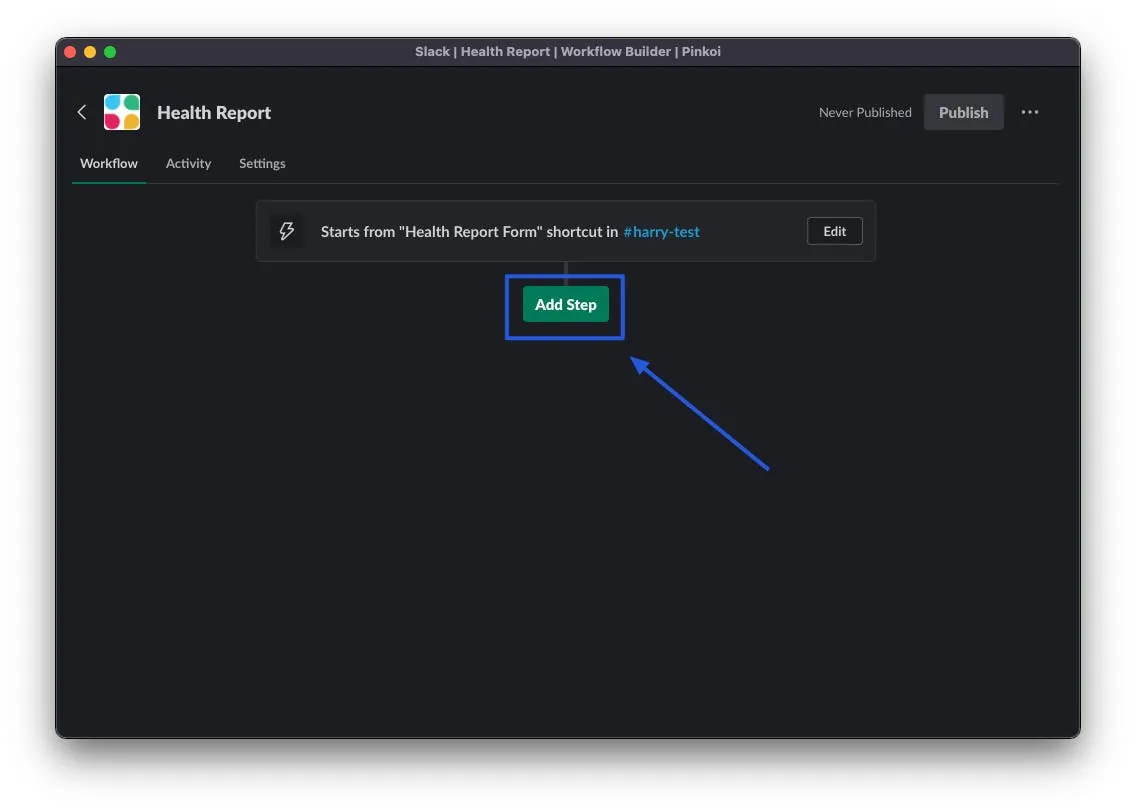
Shortcut created! Start building the workflow by clicking “Add Step” to add a step.

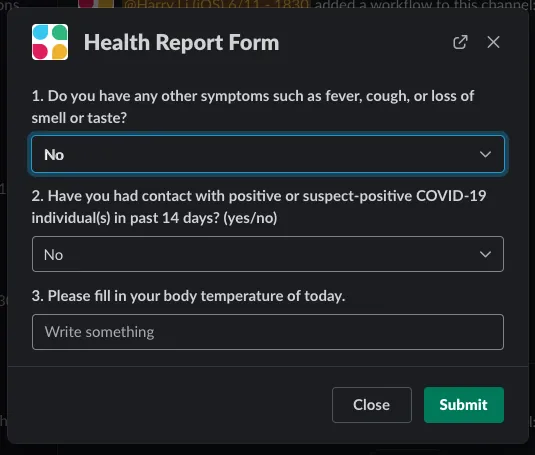
Select the “Send a form” Step
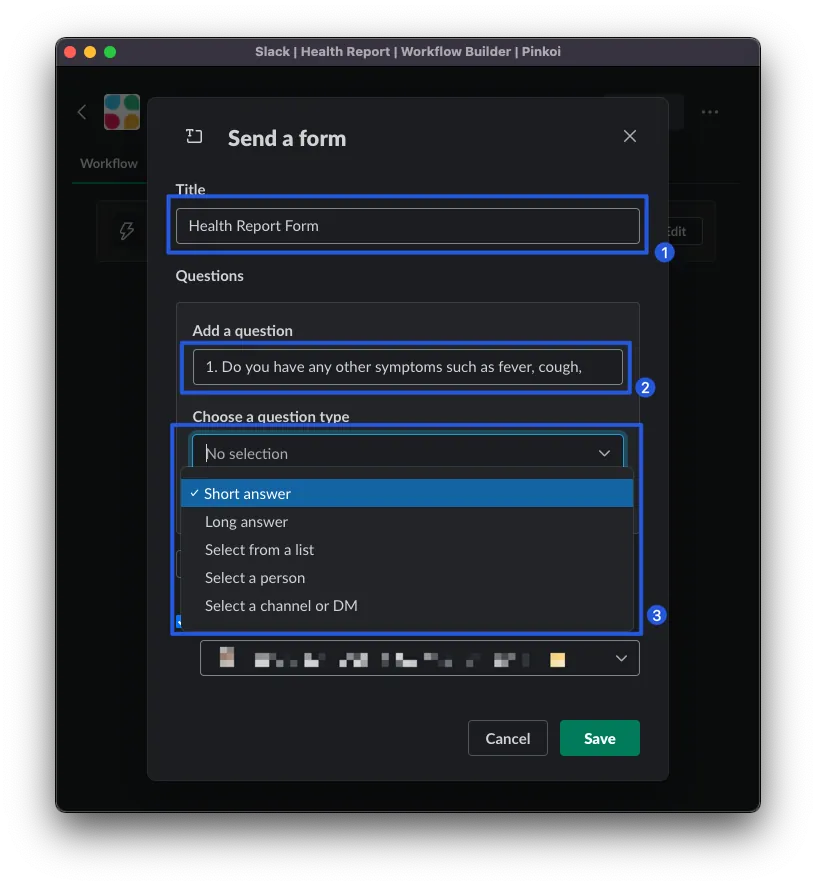
Title: Enter Form Title
Add a question: Enter the title of the first question (you can add the question number in the title, e.g., 1., 2., 3…).
Choose a question type:
-
Short answer: Single-line input box
-
Long answer: Multiline input box
-
Select from a list: Single choice list
-
Select a person: Choose a member within the same workspace
-
Select a channel or DM: Choose a member within the same workspace, a Group DM, or a channel

For example, “Select from a list”:
-
Add list item: You can add an option
-
Default selection: Choose the default option
-
Make this question required: Make this question required
-
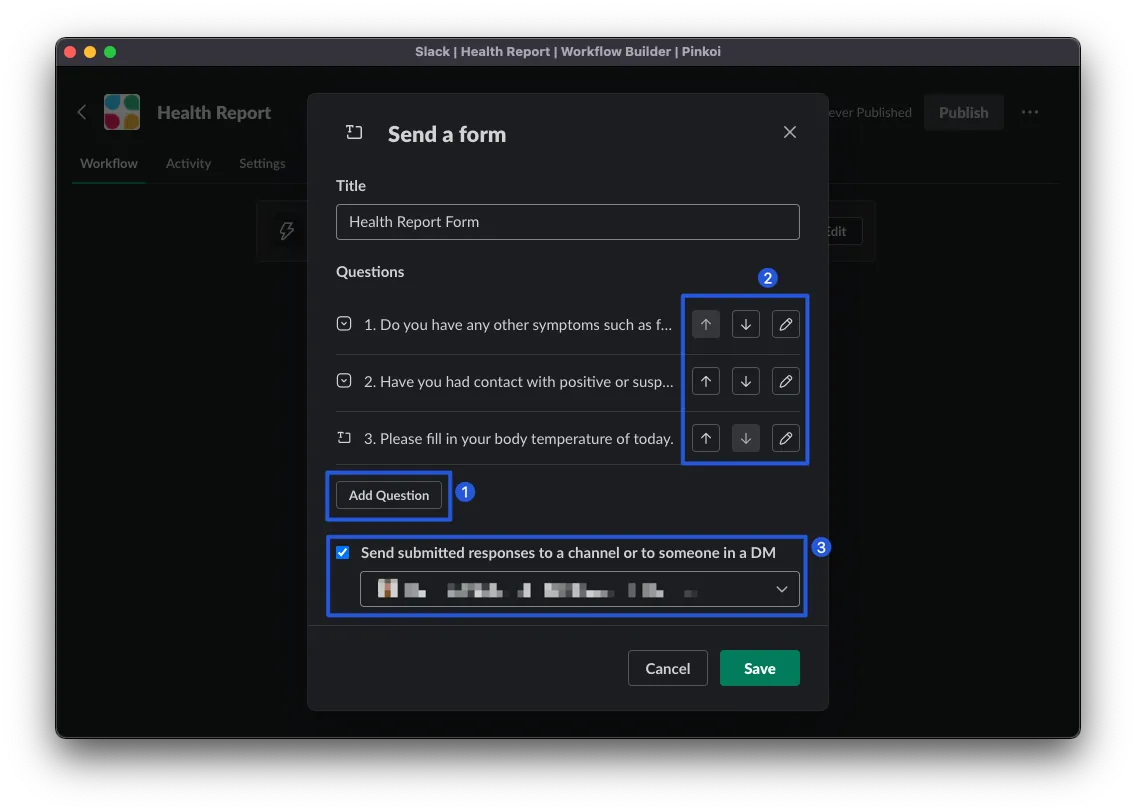
Add Question: You can add more questions
-
The “↓” and “⬆” on the right adjust the order, and the “✎” lets you expand and edit.
-
You can choose whether to send the form submission content back to a Channel or to a specific person.
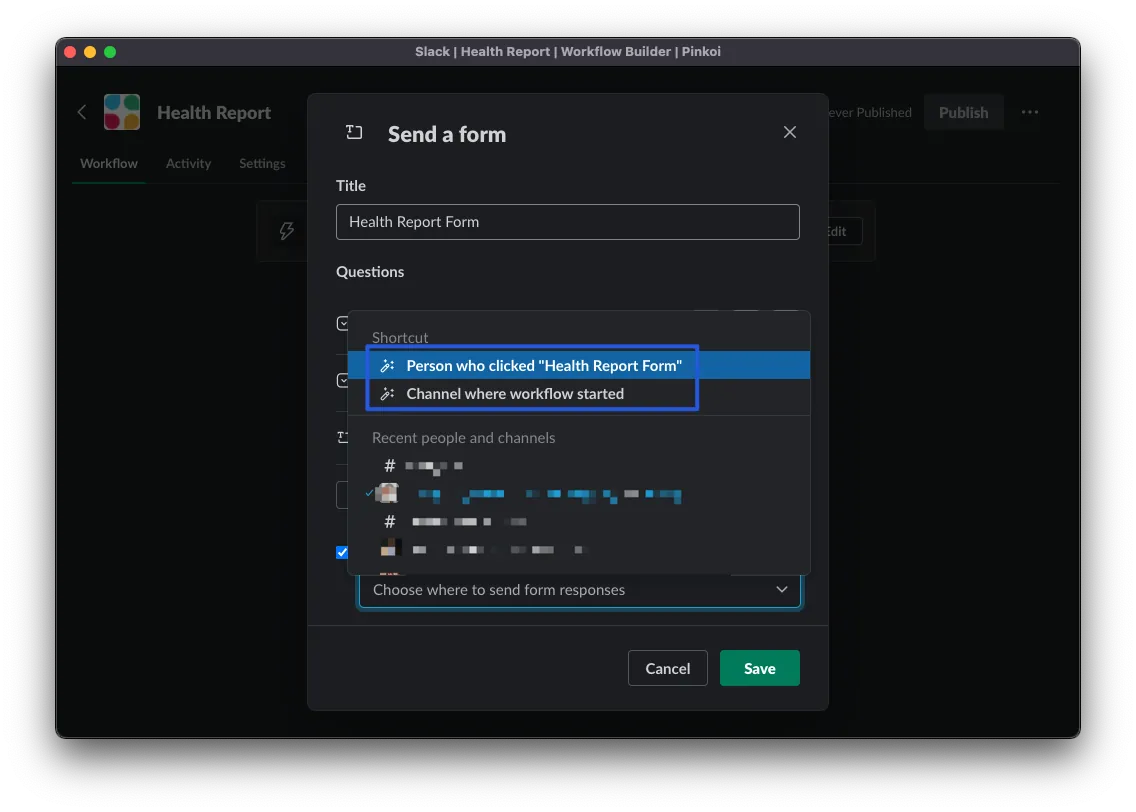
You can also choose to send the reply to…:
-
Person who clicked ….: The person who clicked this form (equivalent to the person who filled it out)
-
Channel where workflow started: The channel this workflow was added to
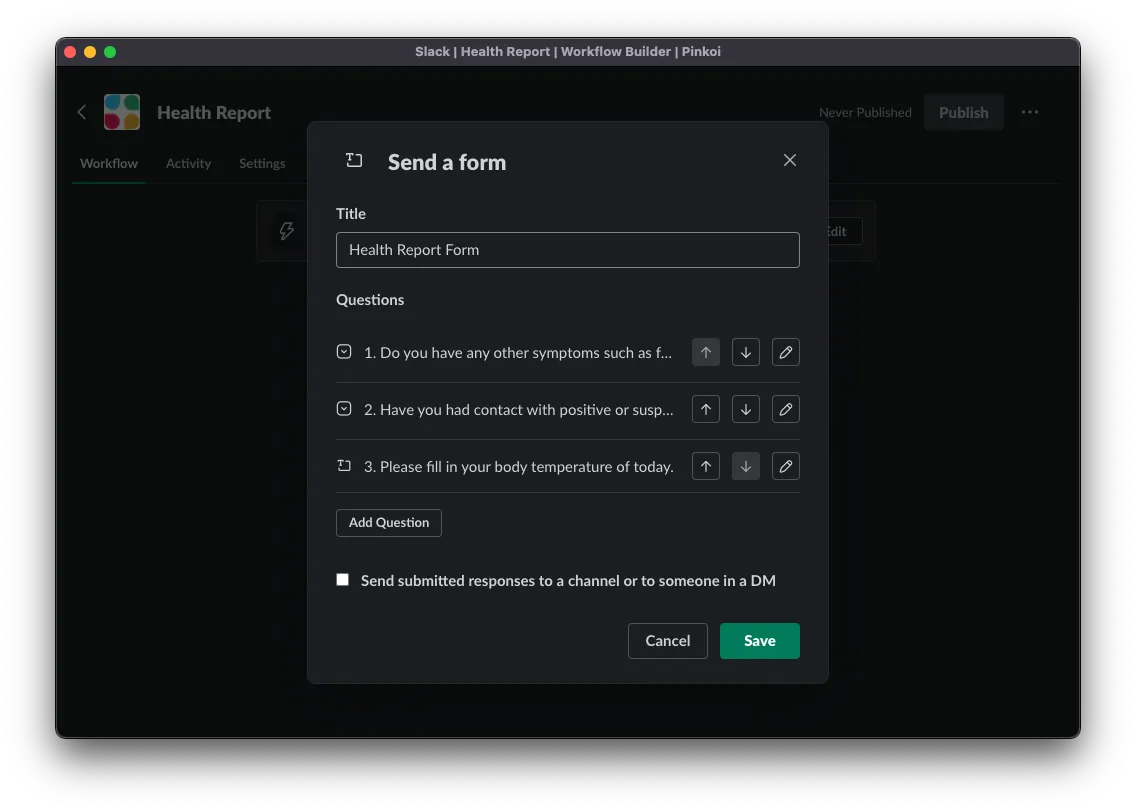
After completing the form, click “Save” to save the step.
*Here, we uncheck the option to return the form submission content because we want to customize the message content in later steps.
Connecting Slack workflow form with Google Sheet
If you haven’t added the Google Sheet App to Slack yet, you can install the app here.
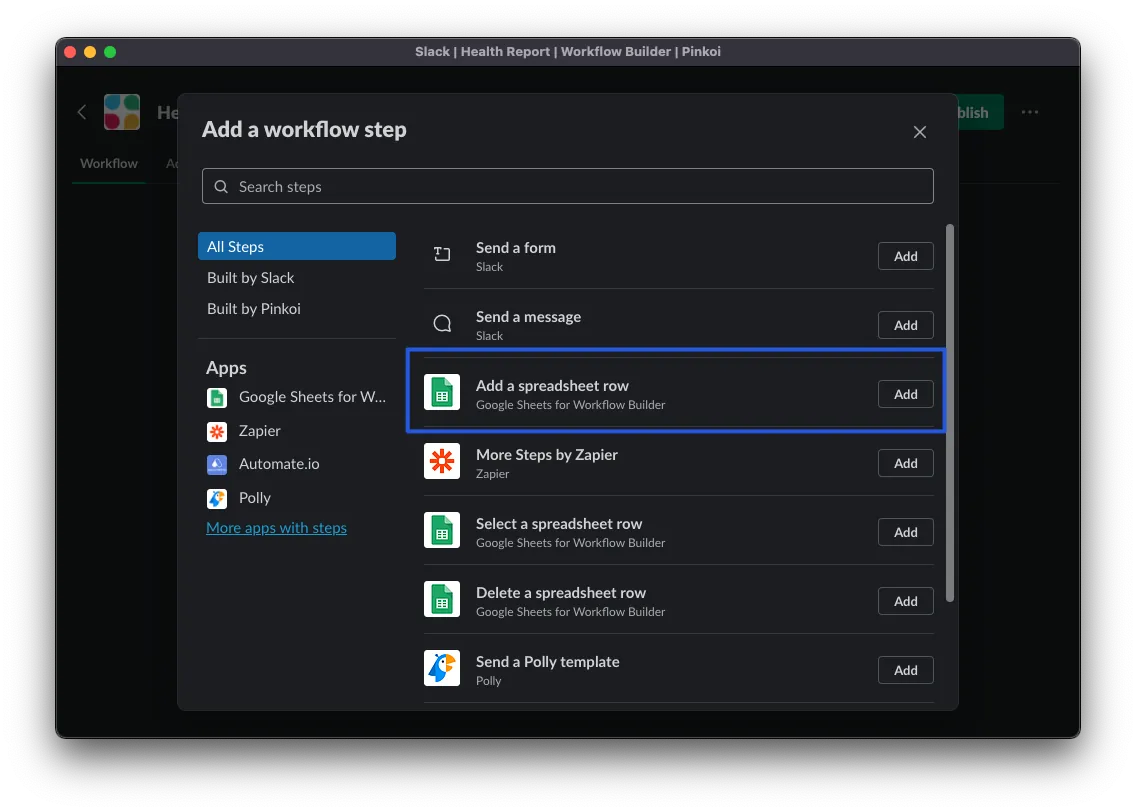
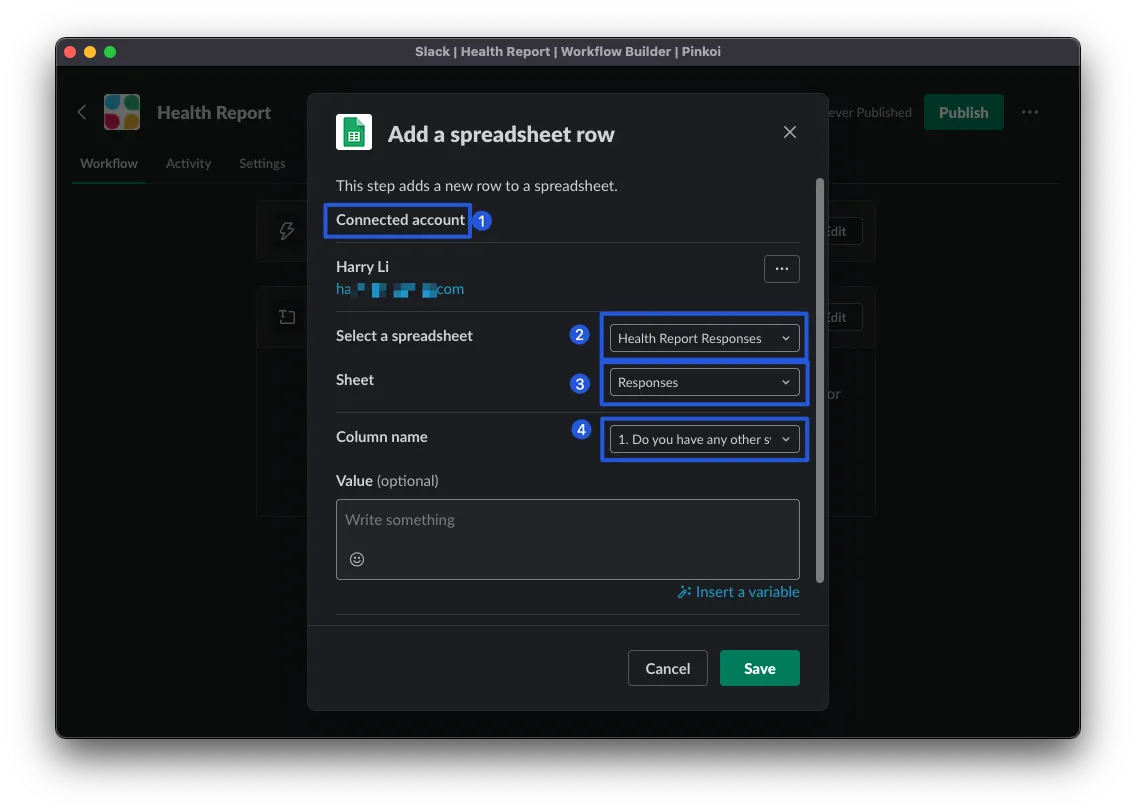
After the previous step, click “Add Step” to add a new step, and select the “Add a spreadsheet row” step from Google Sheets for Workflow Builder.
-
First, complete the Google account authorization by clicking “Connect account”
-
Select a spreadsheet: Choose the target response Google Sheet, please select the Google Sheet created from the initial Google Form.
-
Sheet: Same as above
-
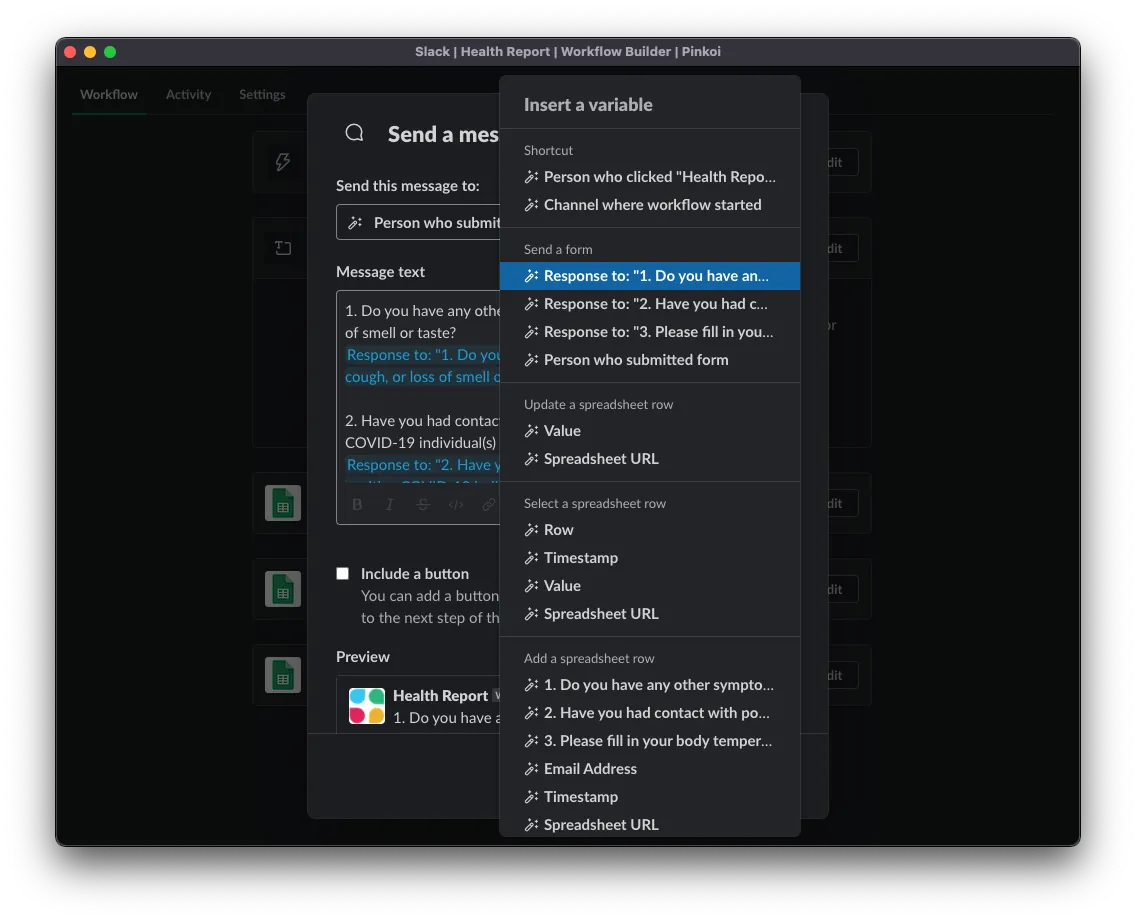
Column name: The first column to input values, here select Question 1 first

Click the “Insert Variable” button at the bottom right and select “Response to Question 1…”. After inserting, you can add other columns from the bottom left “Add Column” button, and repeat this for Question 2, Question 3, and so on.
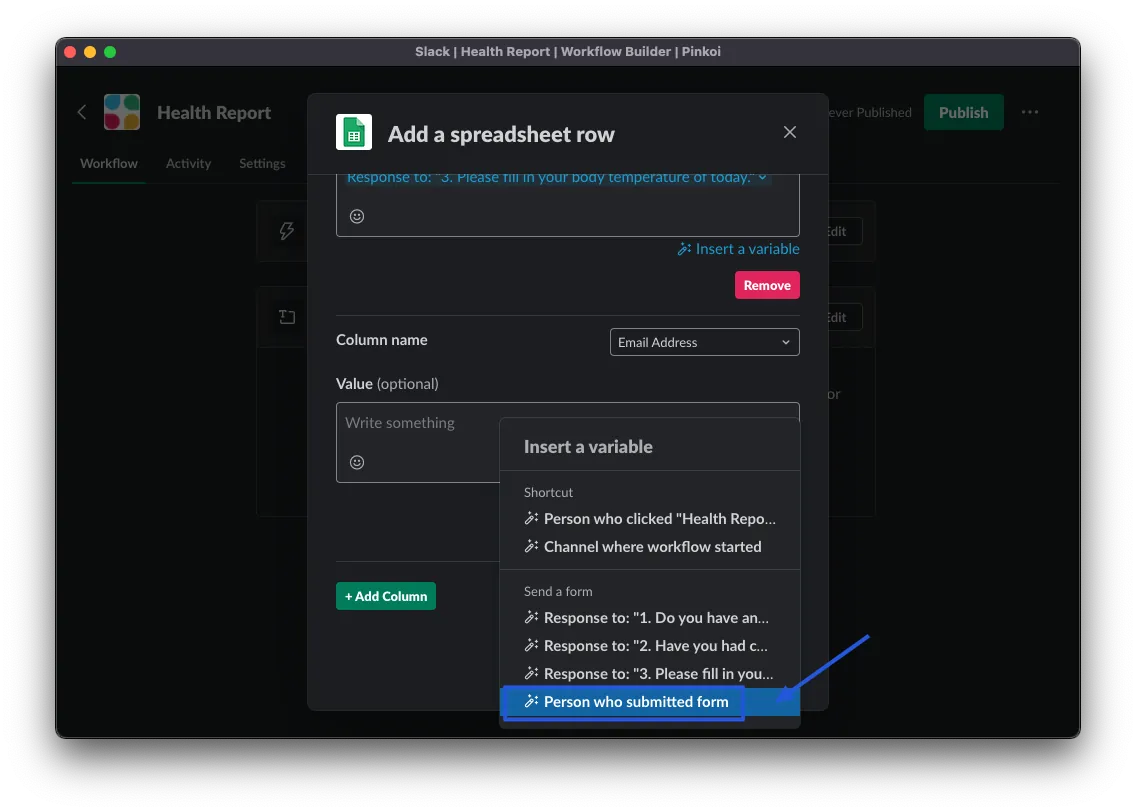
The email of the person filling out the form, optionally choose “Person who submitted form”
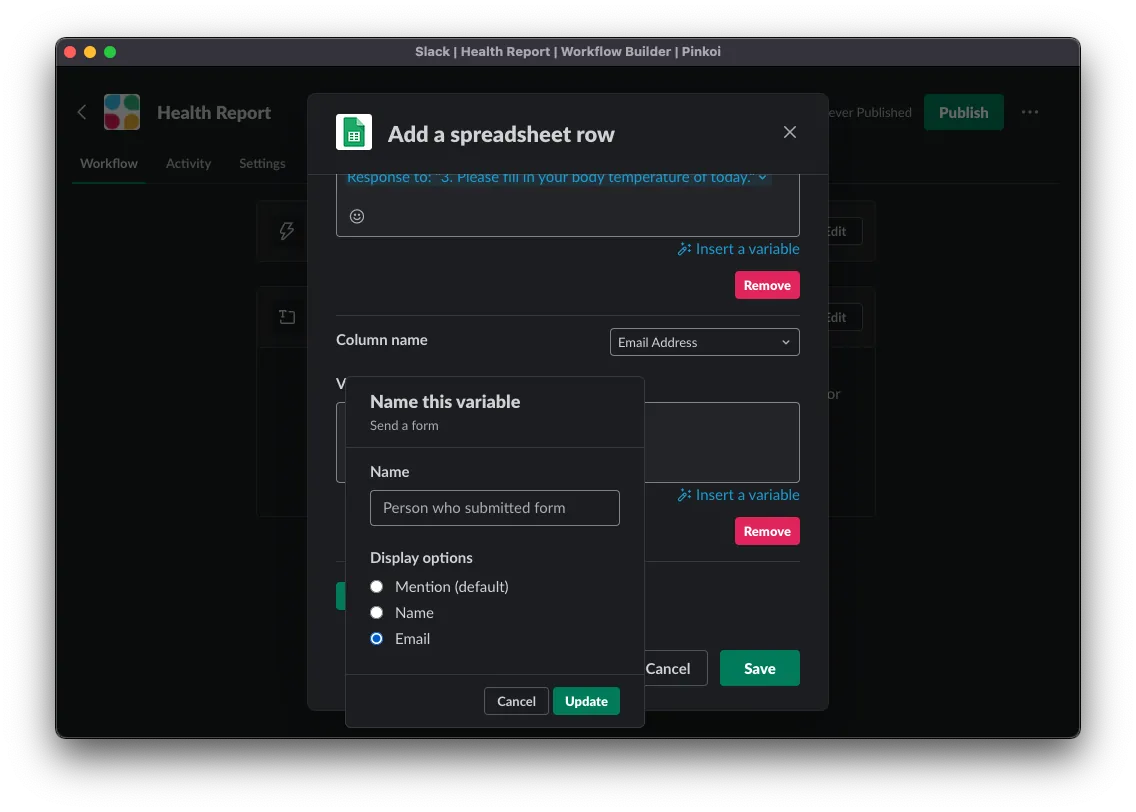
Click the inserted variable and select “Email” to automatically fill in the submitter’s email.
-
Mention (default): tag the User, Raw data is
<@User ID> -
Name: User Name
-
Email: User Email
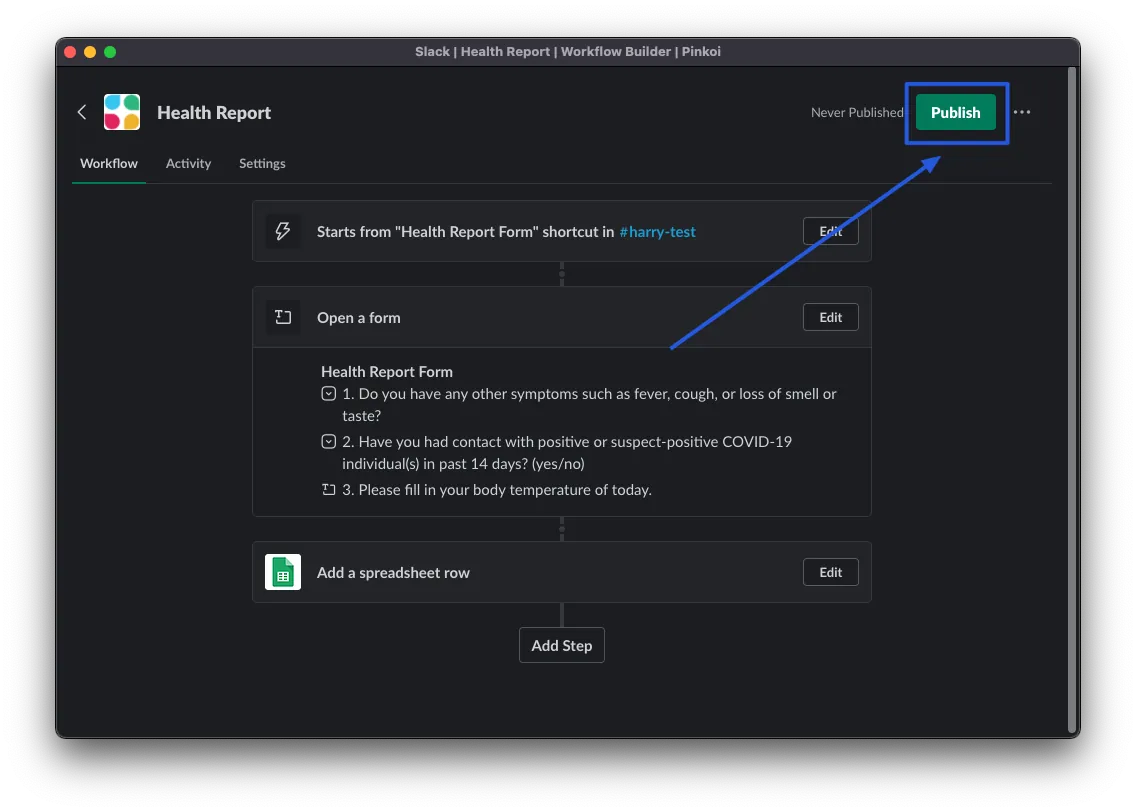
The Timestamp field is a bit tricky, so the setup method will be added later. For now, click “Save” to save, then go to the top right of the page and click “Publish” to publish the Shortcut.
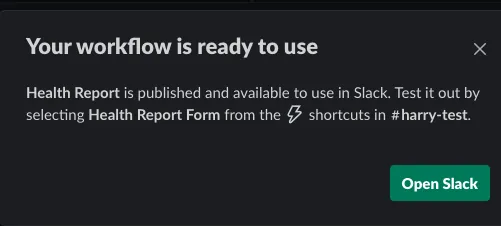
After seeing the success message, you can go back to the Slack Channel and give it a try.
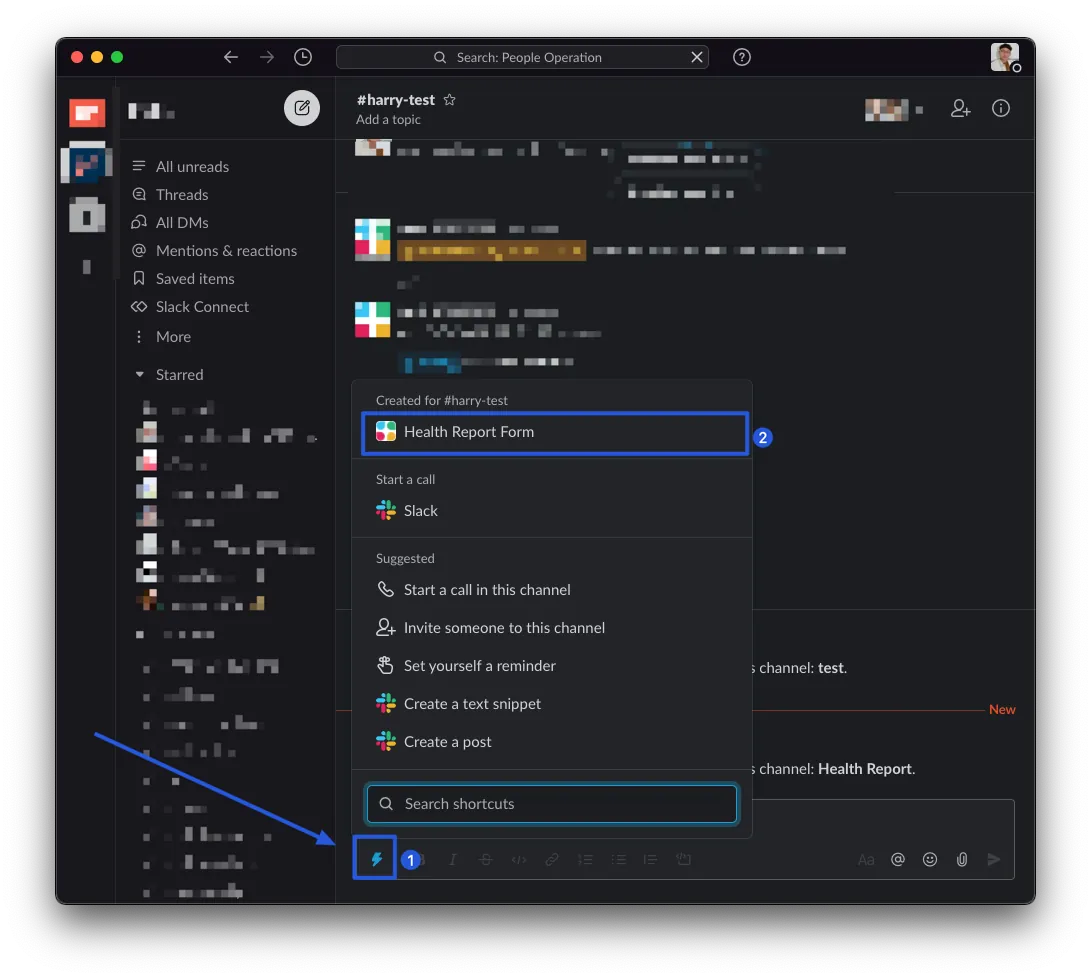
At this point, clicking the lightning bolt will show the Workflow form you just created, which you can click to fill out and try.
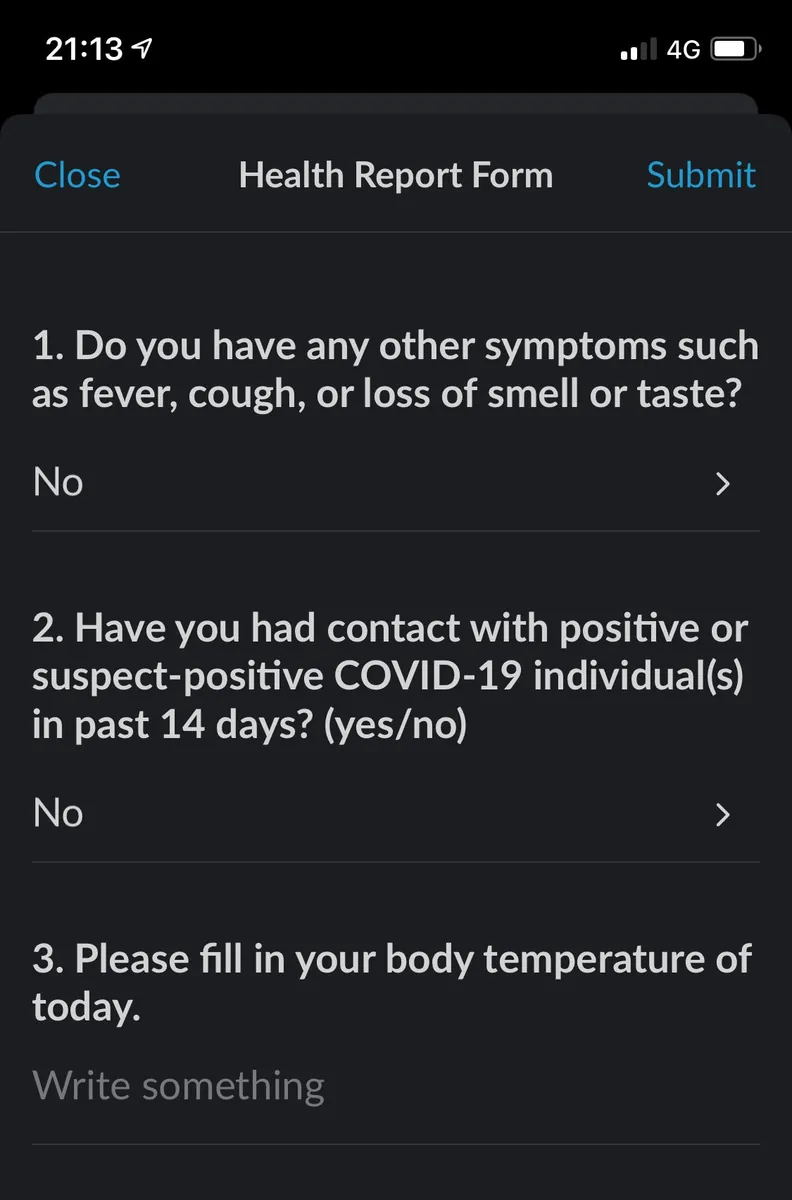
Left: Computer / Right: Mobile version
We can fill in the information and click “Submit” to test if it works properly.

Success! However, the Timestamp column is empty. Next, let’s fix this issue.
Slack workflow for obtaining submission time
Slack workflow does not have a current timestamp global variable available, at least not yet. I only found a wish post on Reddit.
At first, I whimsically entered =NOW() in the Column Value, but this made all records show the current time, which was completely wrong.
Thanks to the clever method shared by an expert on that reddit post, you can create a clean Timestamp Sheet with a single row and a column containing =NOW(). Use Update to force the cell to refresh, then Select to get the current timestamp.
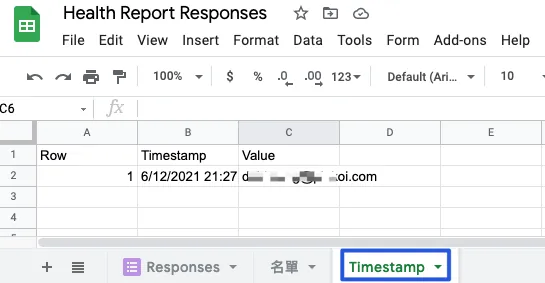
As shown in the structure above, click here to view the example.
-
Row: Acts like an ID. Set it to “1” initially, as it will be used later for Select & Update to identify the data row.
-
Timestamp: Set the value
=NOW()to always display the current time. -
Value: Used to trigger the Timestamp column update time. The content can be arbitrary; here, the submitter’s email is inserted. As long as it triggers the update, it’s fine.
You can right-click on the Sheet and select “Hide Sheet” to hide it, as it is not intended for external use.
Return to Slack Workflow Builder to edit the workflow form you just created.
Click “Add Step” to add a new step:
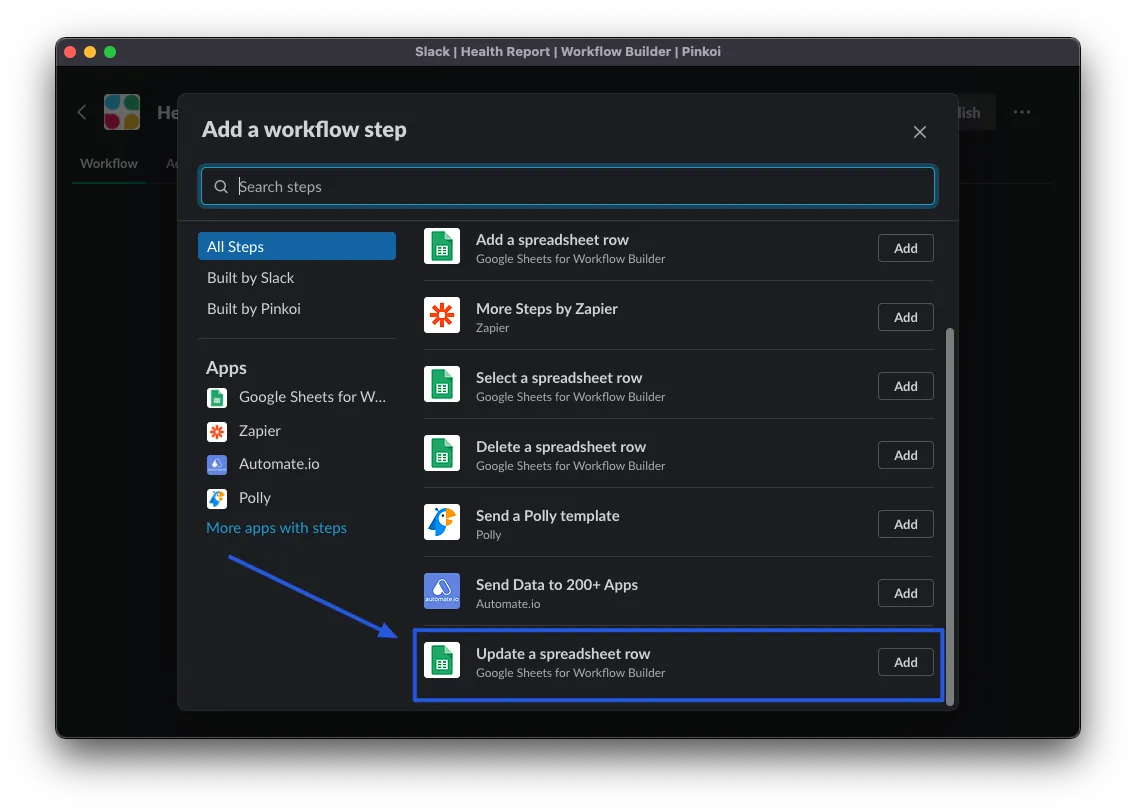
Scroll down and select “Update a spreadsheet row”
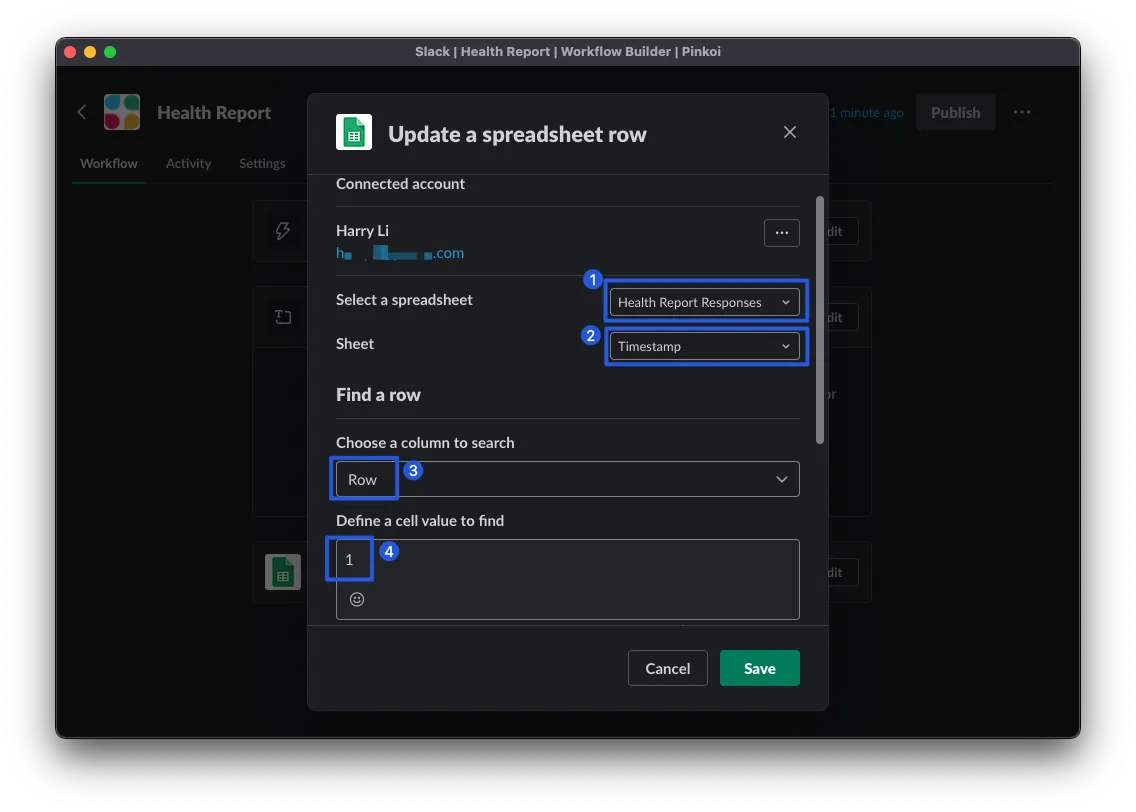
“Select a spreadsheet” choose the Sheet you just created, and for “Sheet” select the newly created “Timestamp” Sheet.
“Choose a column to search” select “Row”, Define a cell value to find enter “1”.
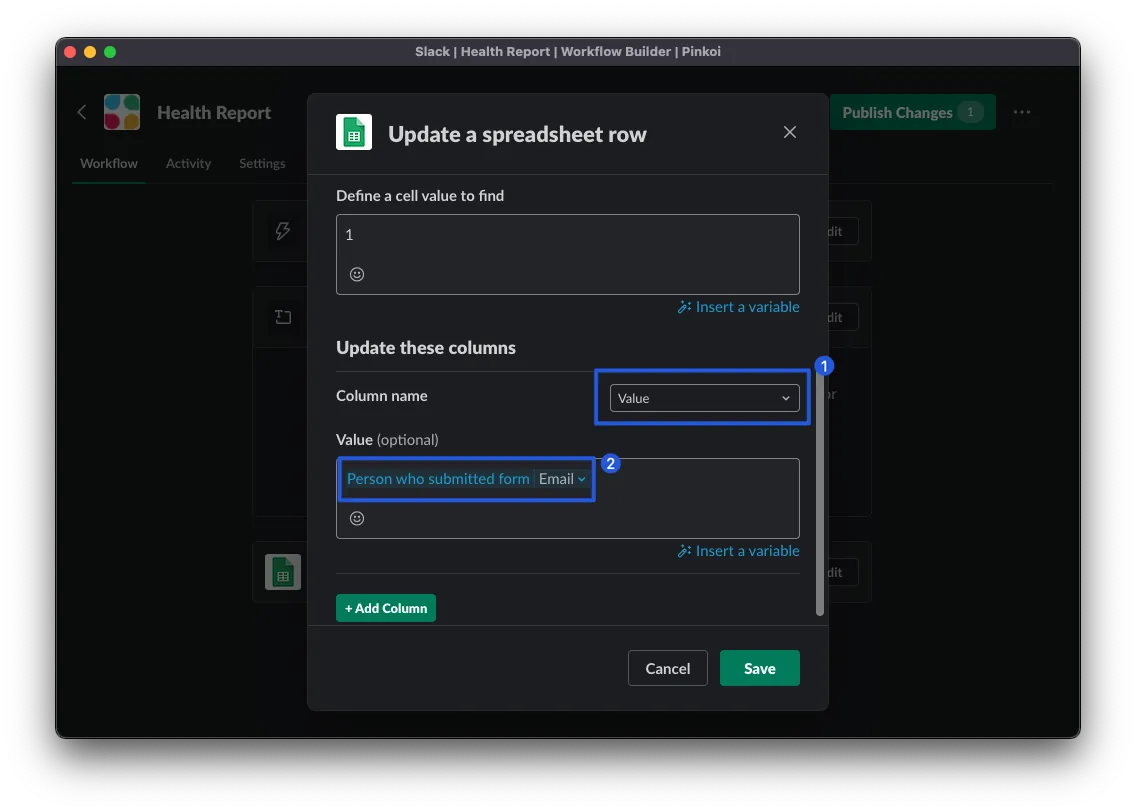
“Update these columns” select “Value”, then click “Insert variable” -> “Person who submitted” -> choose Email.
Click “Save” to finish! Now the timestamp update in the Sheet trigger is complete. Next, we’ll read it out for use.
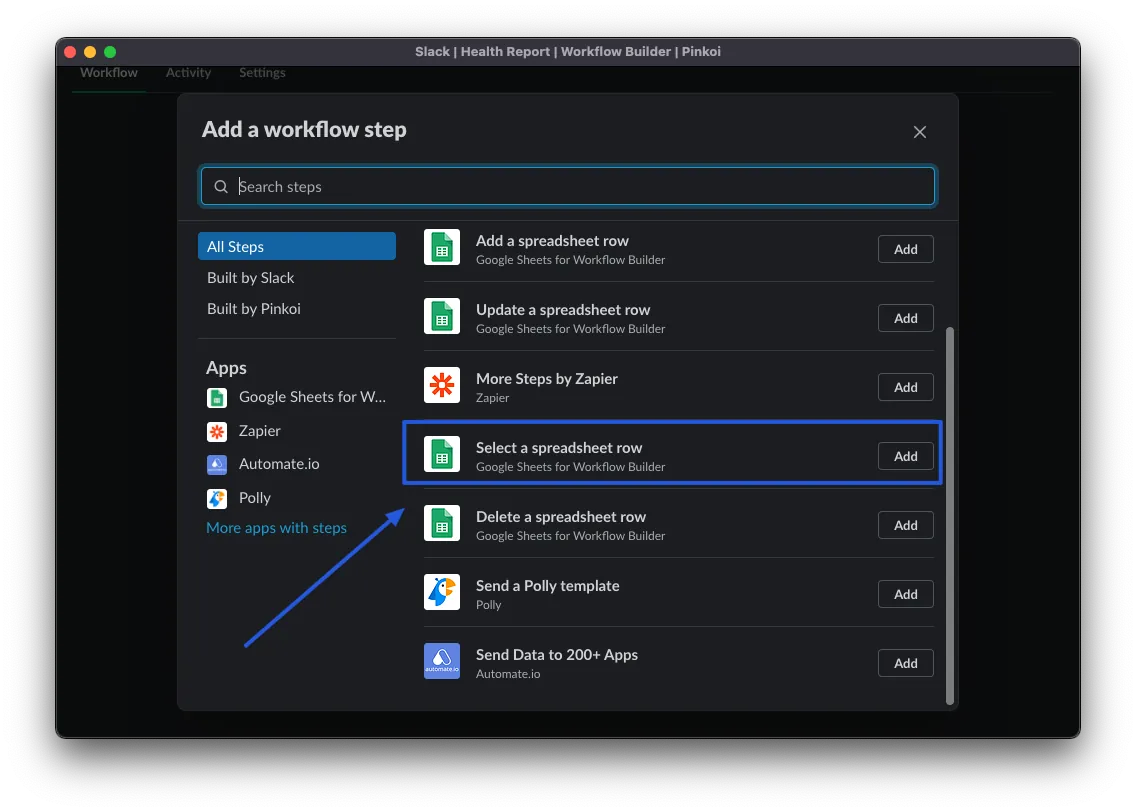
Go back to the editing page and click “Add Step” again to add a new step. This time, select “Select a spreadsheet row” to read the Timestamp.
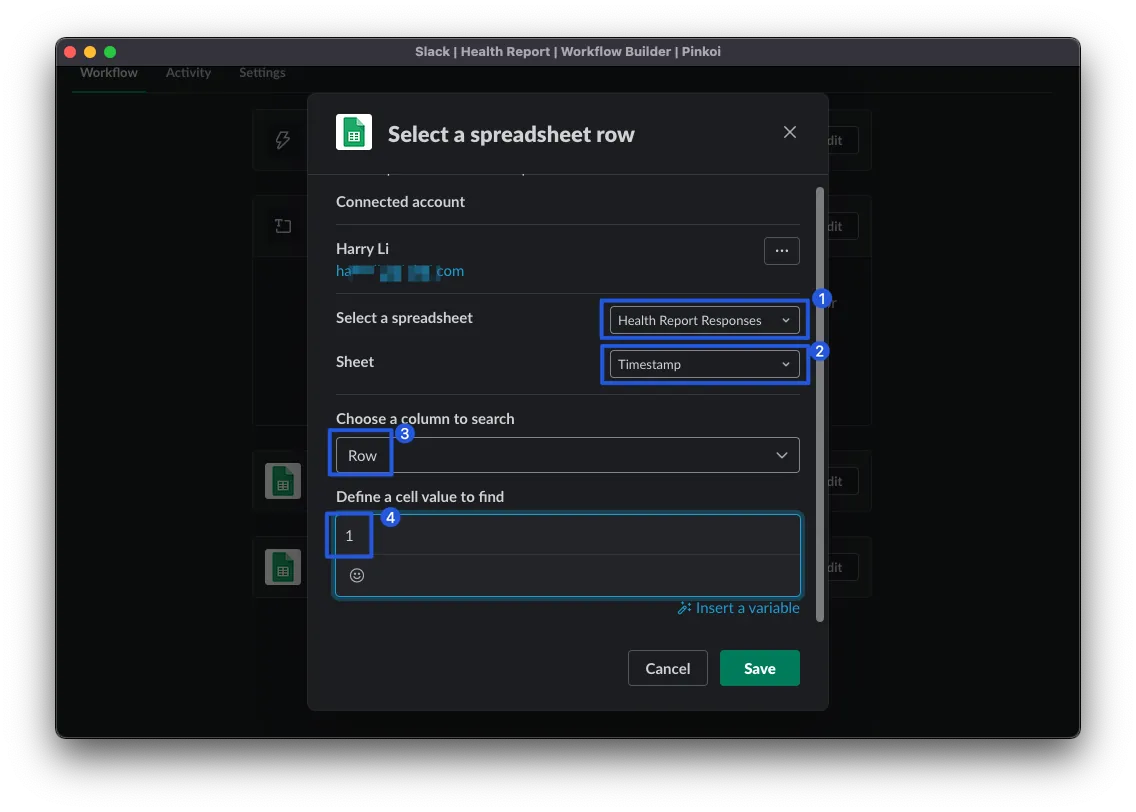
The Search section is the same as “Update a spreadsheet row.” Click “Save.”
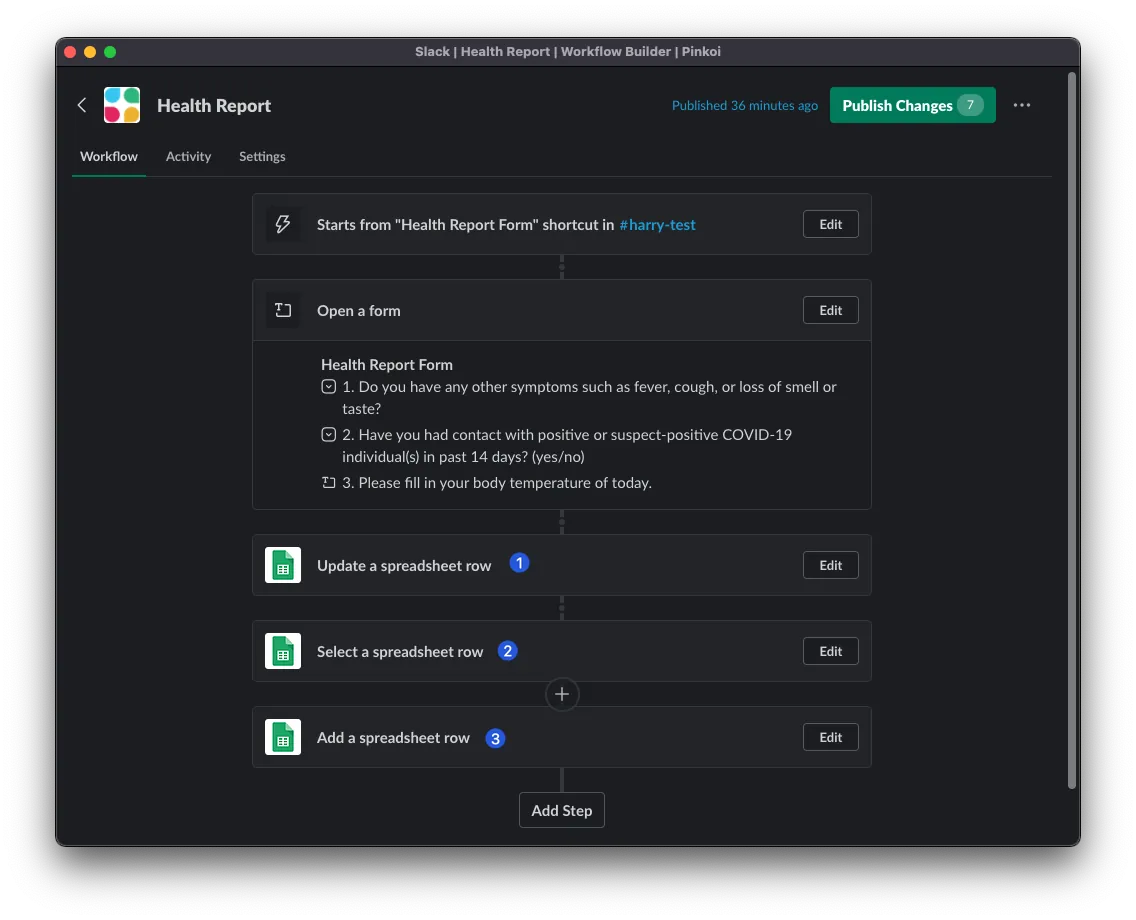
After saving and returning to the steps list page, we can drag and drop the steps to reorder them.
Change the order to “Update a spreadsheet row” -> “Select a spreadsheet” -> “Add a spreadsheet row”.
That is: Update triggers timestamp update -> read Timestamp -> use it when adding a new Row.
Click “Edit” on “Add a spreadsheet row”:
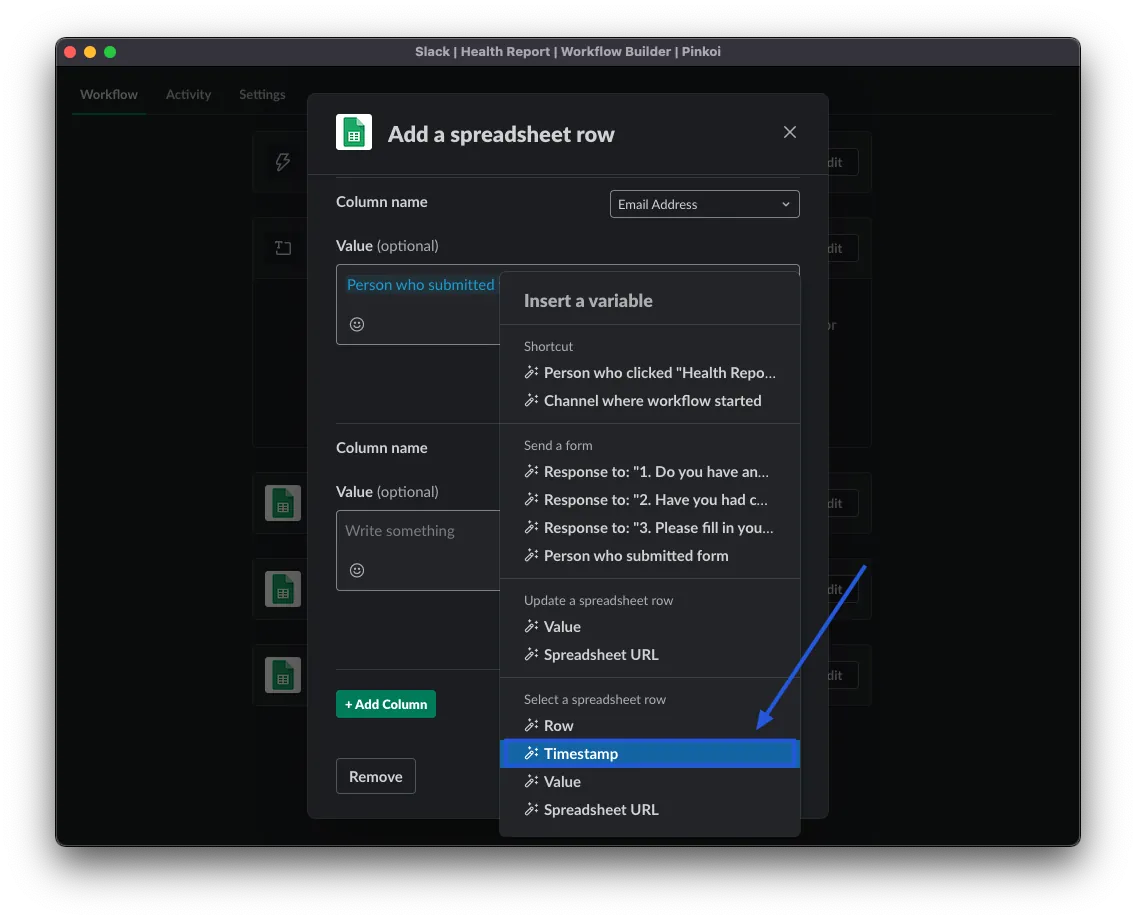
Scroll to the bottom and click “Add Column” in the lower left corner, then click “Insert a variable” in the lower right corner. Find the “Timestamp” variable under the “Select a spreadsheet” section and insert it.
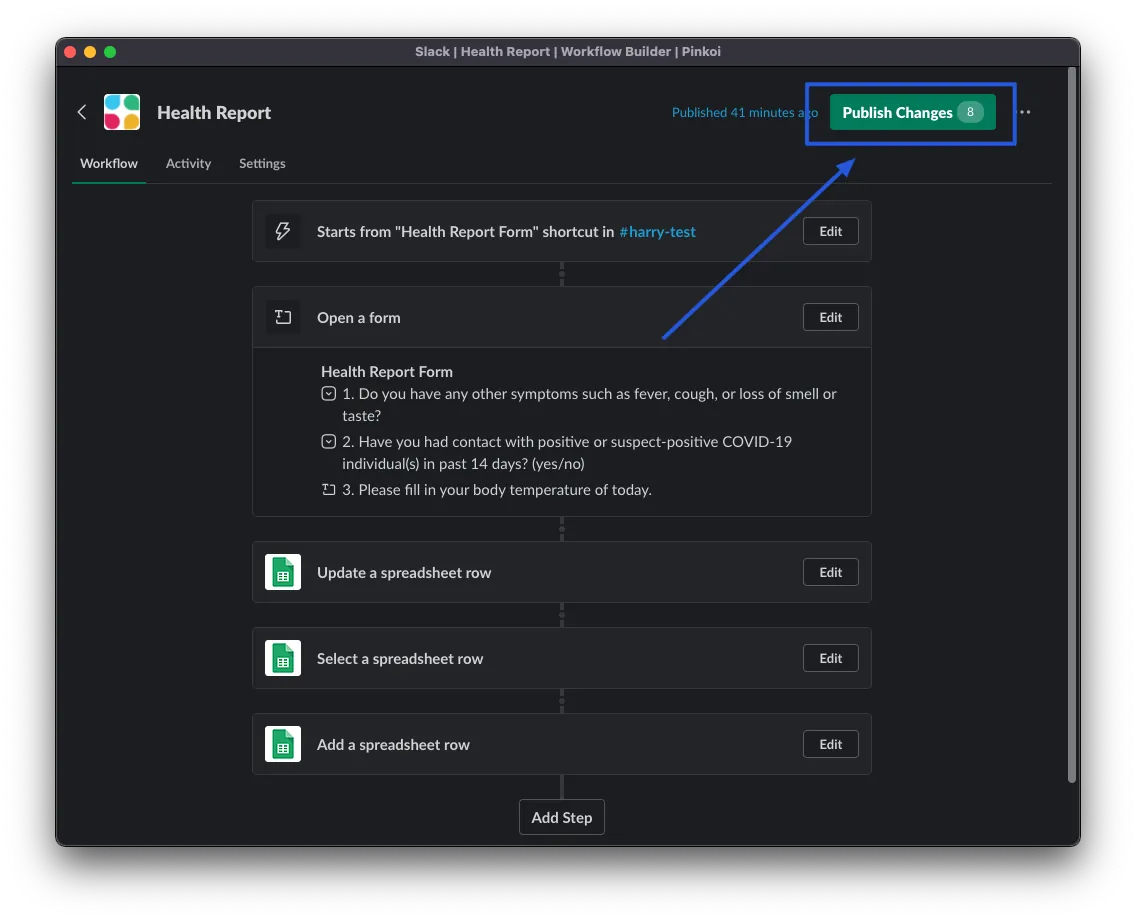
After clicking “Save” to save the step, return to the list page and click “Publish Change” at the top right to publish the changes.
Now let’s test the workflow shortcut again to see if the timestamp is correctly recorded.

Success!
Add Submission Receipt to Slack Workflow Form
Like Google Form submission receipts, Slack workflow forms can also do this.
On the editing steps page, we can add another step by clicking “Add Step”.
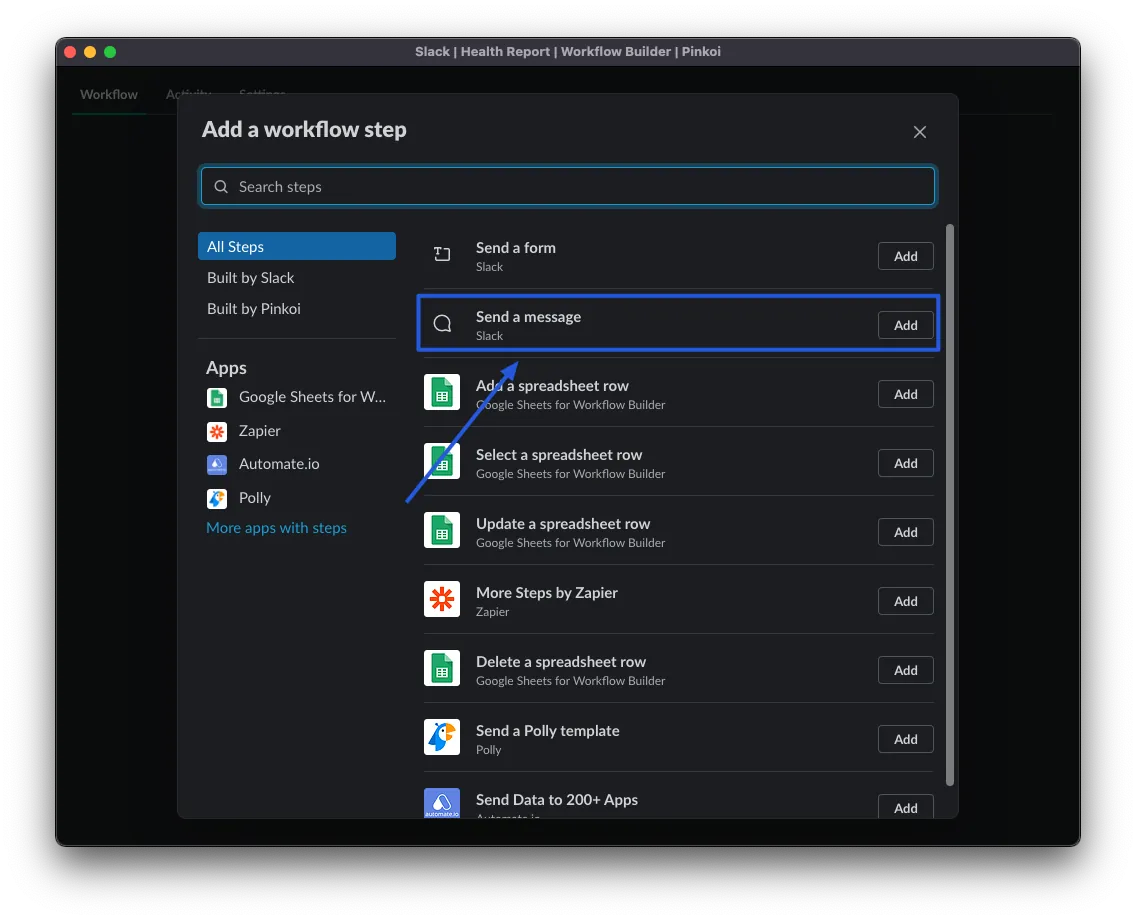
This time, choose “Send a message”

“Send this message to” select “Person who submitted form”
Enter the question title in order, select “Insert a variable” and choose “Response to question XXX,” and you can also insert “Timestamp” at the end. Click “Save” to save the step, then click “Publish Changes”!
You can also use “Send a message” to send the submission results to a specific Channel or DM.
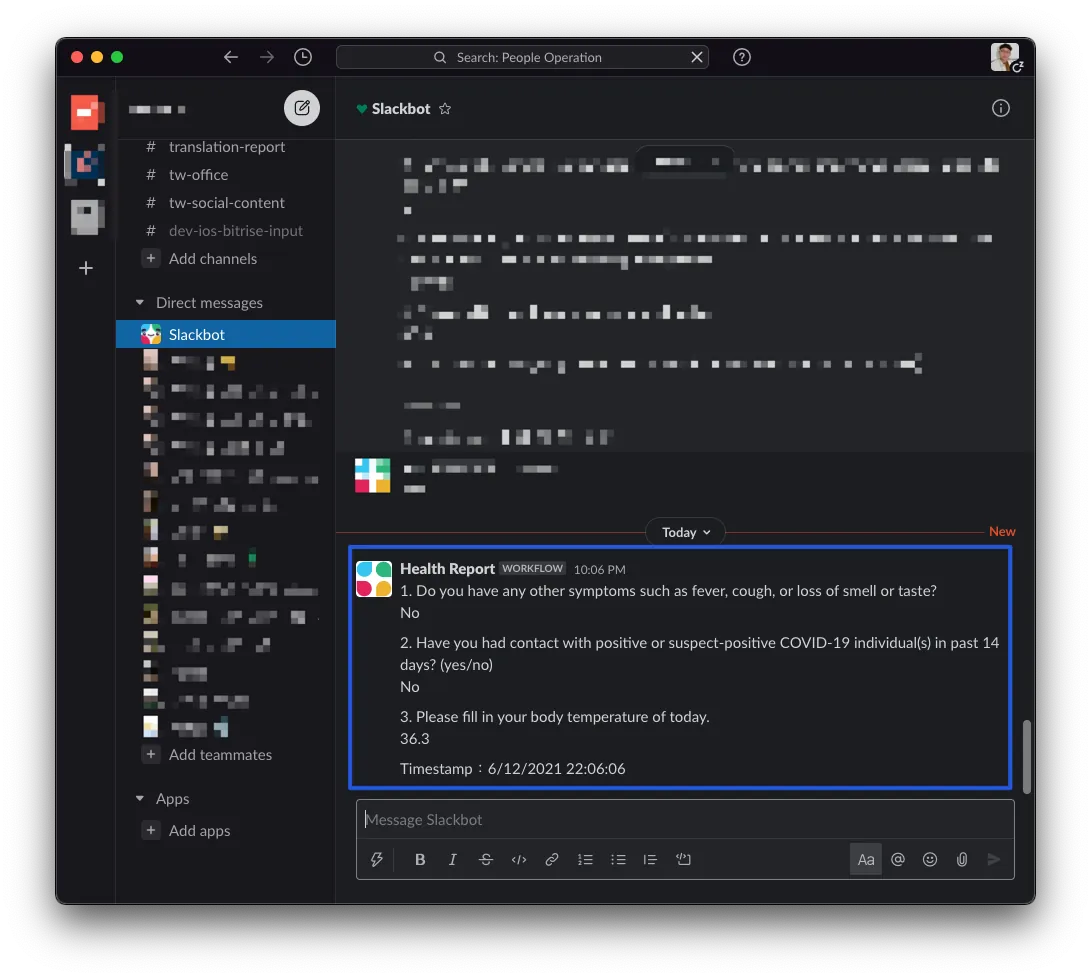
Success!
The Slack workflow form setup is basically complete. You can freely combine and customize other features as you like.
Google Sheet with App Script!
Next, we need to write the App Script to process the submitted data.
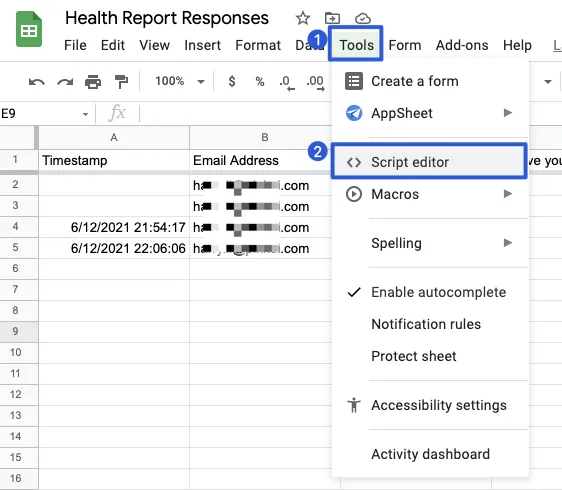
First, select “Tools” -> “Script editor” from the top toolbar in Google Sheet.
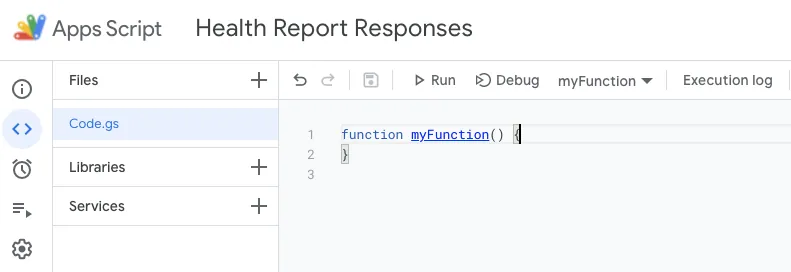
You can click the top left corner to give the project a name.
Now we can start writing the App Script! App Script is based on JavaScript, so you can directly use JavaScript code along with Google Sheet’s library.
Distribute Responses Data to Each Date’s Sheet Based on Submission Date
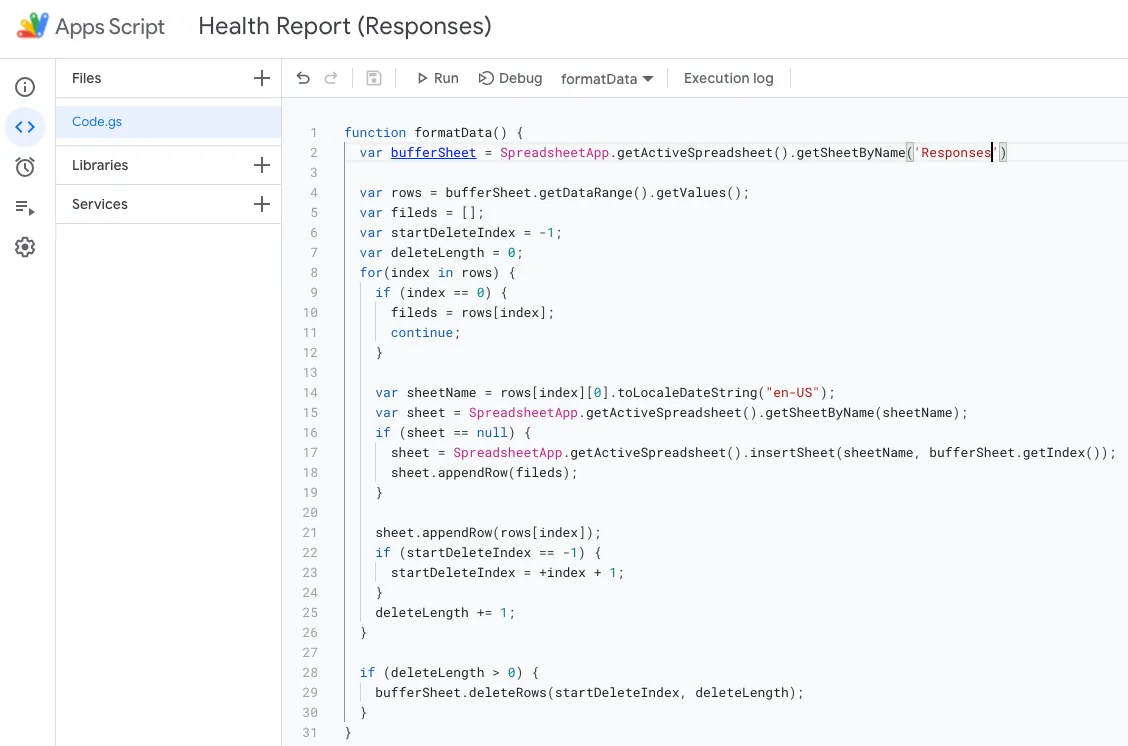
function formatData() {
  var bufferSheet = SpreadsheetApp.getActiveSpreadsheet().getSheetByName('Responses') // Sheet name storing responses

  var rows = bufferSheet.getDataRange().getValues();
  var fileds = [];
  var startDeleteIndex = -1;
  var deleteLength = 0;
  for(index in rows) {
    if (index == 0) {
      fileds = rows[index];
      continue;
    }

    var sheetName = rows[index][0].toLocaleDateString("en-US"); // Convert Date to String using US format MM/DD/YYYY
    var sheet = SpreadsheetApp.getActiveSpreadsheet().getSheetByName(sheetName); // Get MM/DD/YYYY sheet
    if (sheet == null) { // Create if not exist
      sheet = SpreadsheetApp.getActiveSpreadsheet().insertSheet(sheetName, bufferSheet.getIndex());
      sheet.appendRow(fileds);
    }

    sheet.appendRow(rows[index]); // Add data to date sheet
    if (startDeleteIndex == -1) {
      startDeleteIndex = +index + 1;
    }
    deleteLength += 1;
  }

  if (deleteLength > 0) {
    bufferSheet.deleteRows(startDeleteIndex, deleteLength); // Delete data from Responses after moving to target sheets
  }
}
Paste the above code into the Code block and press “control” + “s” to save.
Next, we need to add a trigger button in the Sheet (can only be triggered manually by pressing the button, cannot automatically trigger when data is written).
-
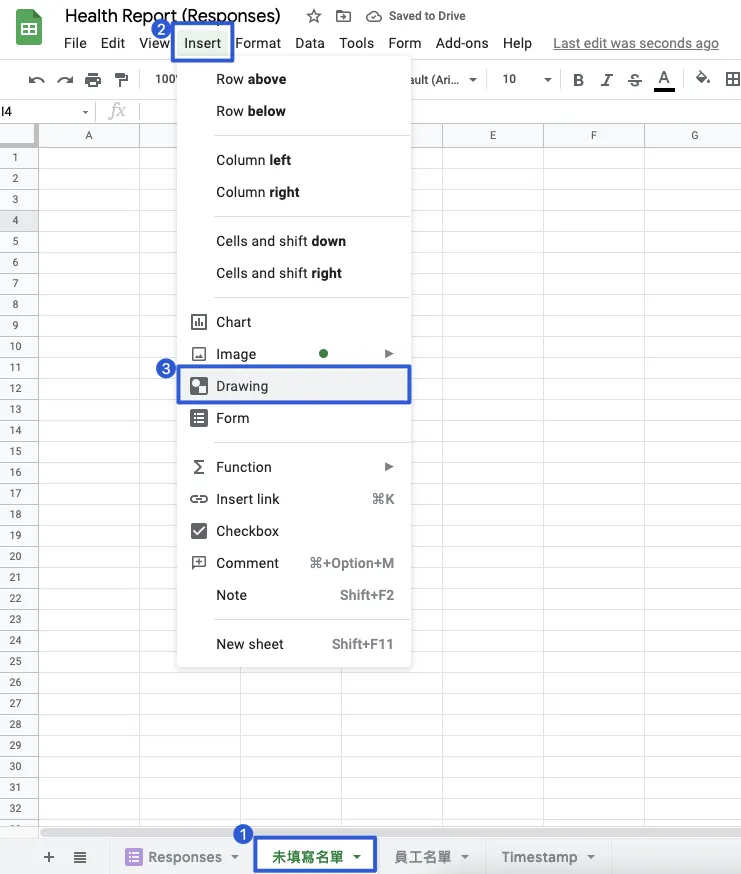
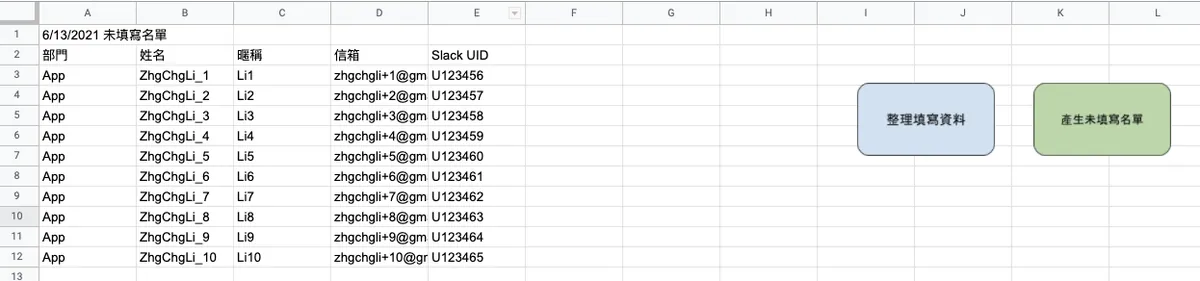
First, create a new Sheet named “未填寫名單” (Unsubmitted List).
-
Select “Insert” -> “Drawing” from the top toolbar
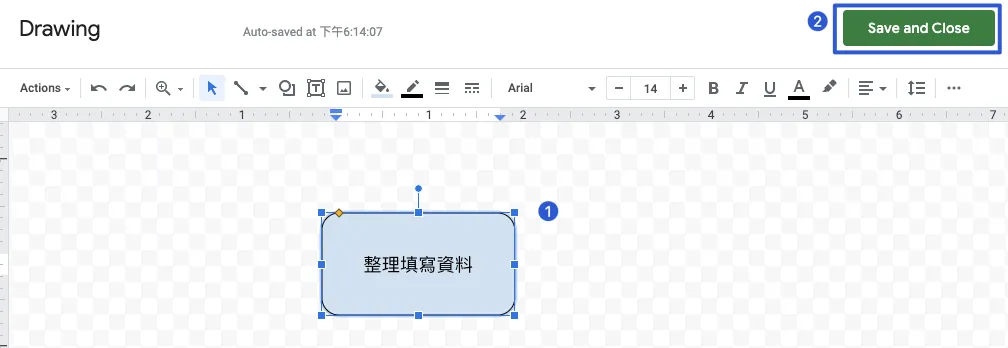
Use this interface to create a button.
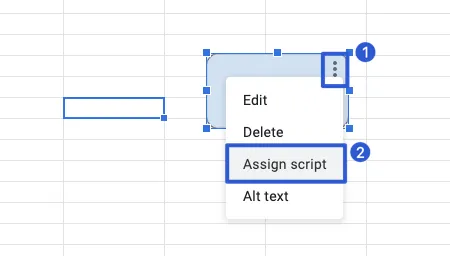
After clicking “Save and Close,” you can adjust and move the button; click the top right “…” and select “Assign script.”
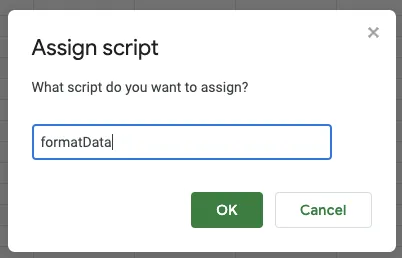
Enter the function name “formatData”.
You can click the button to try the feature
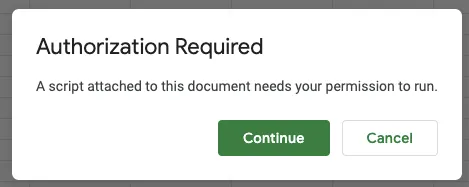
If “Authorization Required” appears, click “Continue” to complete the verification.
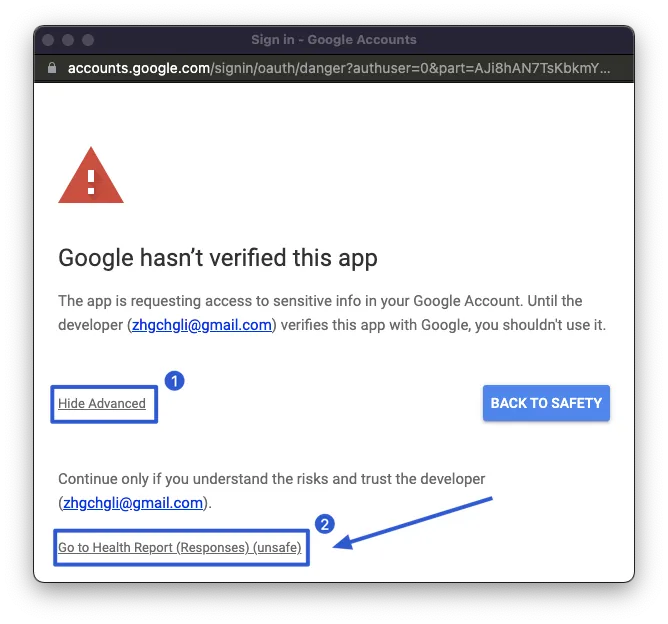
During the authentication process, the message “Google hasn’t verified this app” may appear. This is normal because the App Script we wrote has not been verified by Google. However, this is fine since it is for personal use.
You can click the bottom left corner “Advanced” -> “Go to Health Report (Responses) (unsafe)”
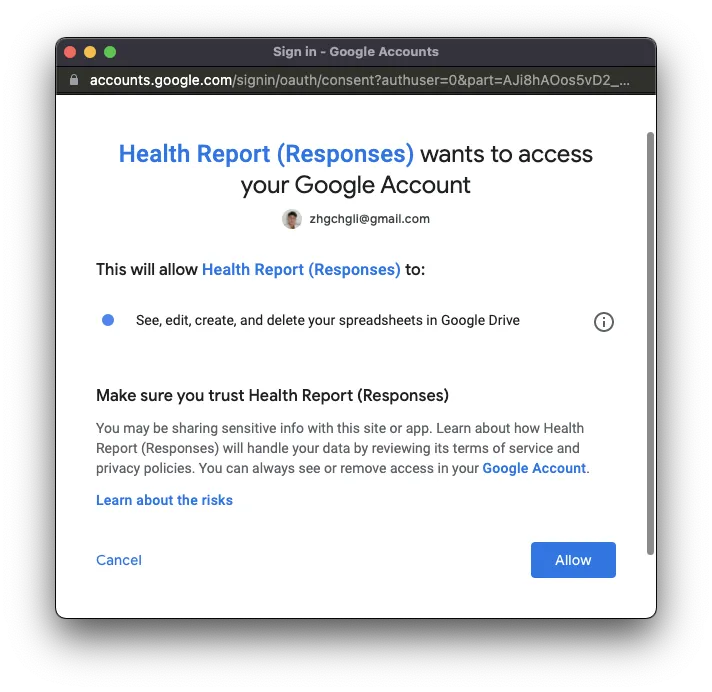
Click “Allow”
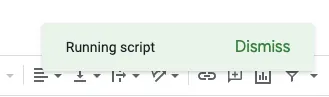
When the App Script shows “Running Script,” please do not press again to avoid duplicate execution.
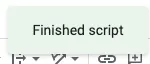
Only allow execution again after a successful run is displayed.
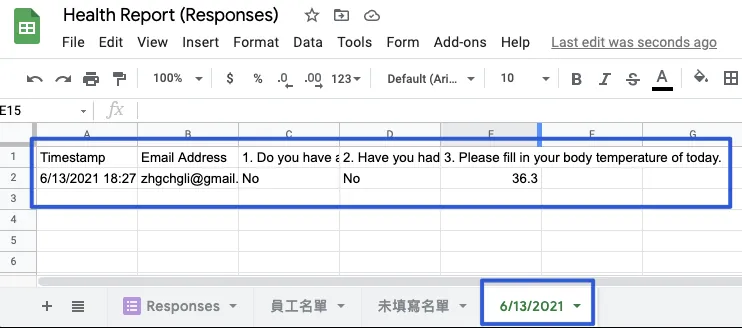
Success! Group the submitted data by date.
Get the current date’s Sheet and compare with the employee list to generate a Sheet of those who haven’t submitted data
Let’s add another piece of code:
// Compare with Employee List Sheet & Today's Filled Sheet to generate the unfilled list
function generateUnfilledList() {
  var listSheet = SpreadsheetApp.getActiveSpreadsheet().getSheetByName('員工名單') // Employee List Sheet name
  var unfilledListSheet = SpreadsheetApp.getActiveSpreadsheet().getSheetByName('未填寫名單') // Unfilled List Sheet name
  var today = new Date();
  var todayName = today.toLocaleDateString("en-US");

  var todayListSheet = SpreadsheetApp.getActiveSpreadsheet().getSheetByName(todayName) // Get today's MM/DD/YYYY Sheet
  if (todayListSheet == null) {
    SpreadsheetApp.getUi().alert('Cannot find '+todayName+' Sheet for today or please run "Organize Filled Data" first');
    return;
  }

  var todayEmails = todayListSheet.getDataRange().getValues().map( x => x[1] ) // Get Email Address column data list from today's Sheet (1 = Column B)
  // index start from 0, so 1 = Column B
  // output: Email Address,[email protected],[email protected],[email protected]...
  todayEmails.shift() // Remove the first data, which is the header "Email Address" and meaningless
  // output: [email protected],[email protected],[email protected]...

  unfilledListSheet.clear() // Clear Unfilled List... prepare to refill data
  unfilledListSheet.appendRow([todayName+" Unfilled List"]) // Show Sheet title in first row

  var rows = listSheet.getDataRange().getValues(); // Read Employee List Sheet
  for(index in rows) {
    if (index == 0) { // The first row is the header, keep it so the generated data includes header
      unfilledListSheet.appendRow(rows[index]);
      continue;
    }

    if (todayEmails.includes(rows[index][3])) { // If today's Sheet Email Address includes this employee's email, it means filled, skip... (3 = Column D)
      continue;
    }

    unfilledListSheet.appendRow(rows[index]); // Write one row of data to Unfilled List Sheet
  }
}
After saving, follow the previous method of adding code, then add a button and assign the script — “generateUnfilledList”.
After completion, you can click Test:
The list of non-respondents has been generated successfully! If no content appears, please first check:
-
Employee list has been filled, or you can enter test data first
-
First, complete the “Organize Submitted Data” step.
Read the sheet of those who haven’t filled out the form, compose a message, and send it to the specified Slack channel
First, we need to add the Incoming WebHooks App to the Slack Channel. We will use this to send messages.
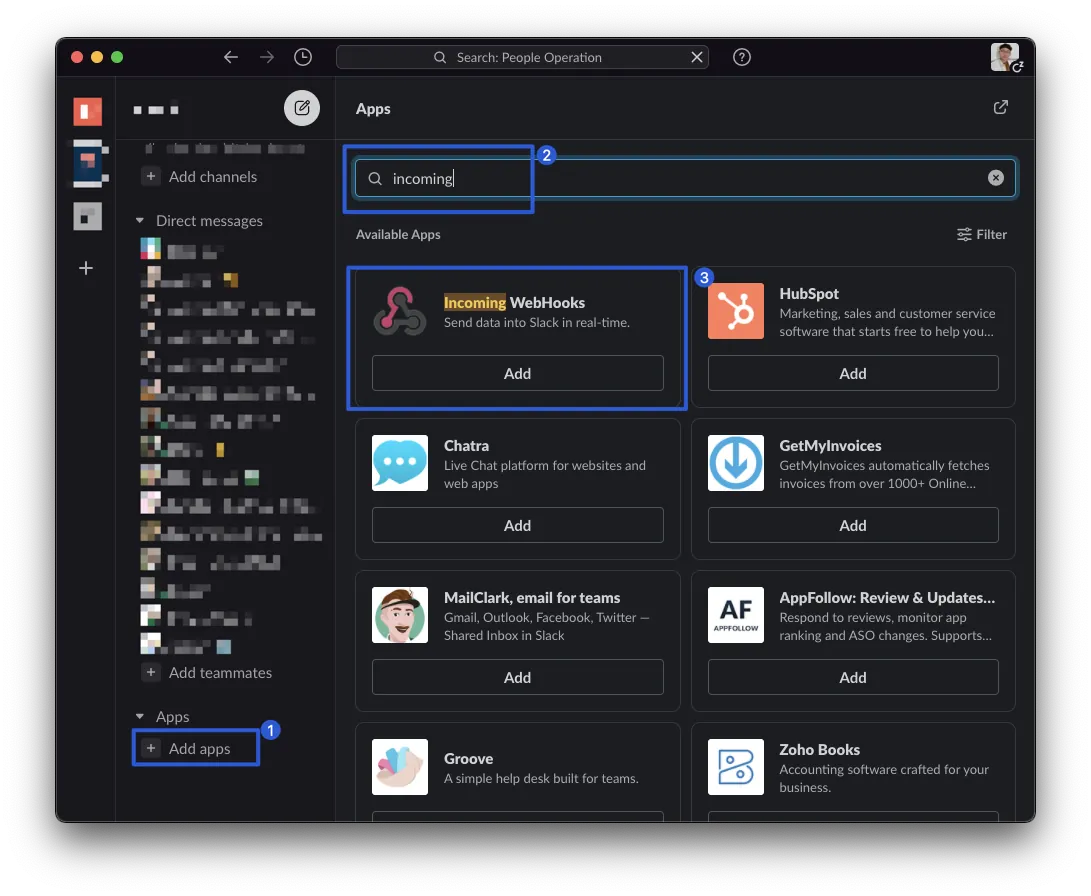
-
Slack bottom left “Apps” -> “Add apps”
-
Search “incoming” in the search box on the right side.
-
Click “Incoming WebHooks” -> “Add”
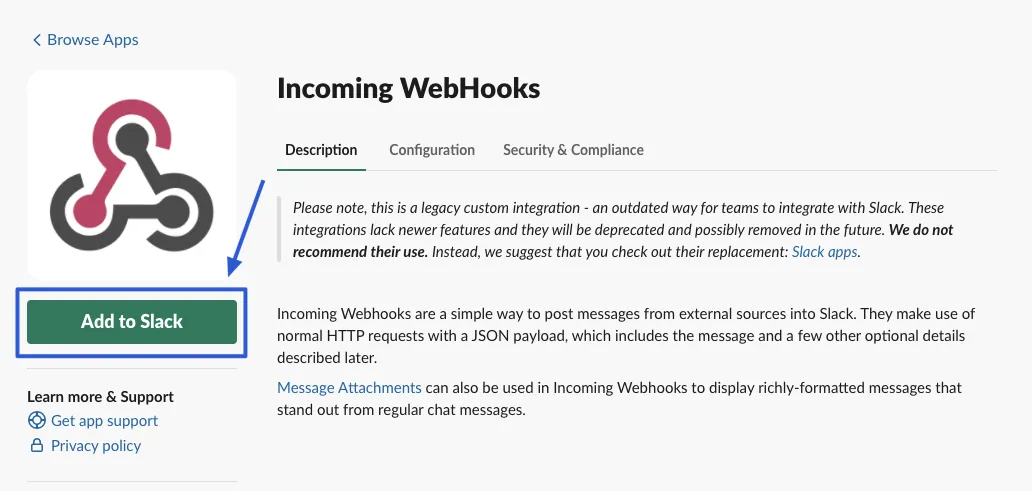
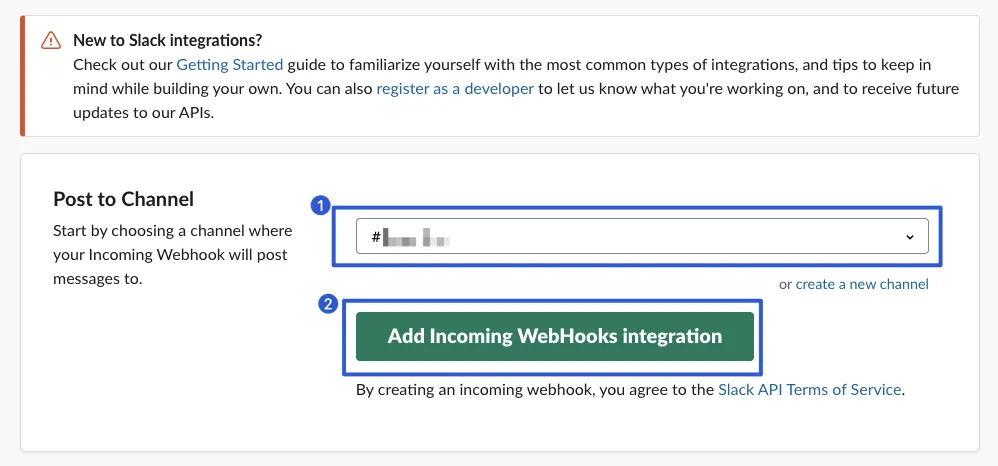
Select the channel where the reminder message for those who haven’t filled out the form will be sent.
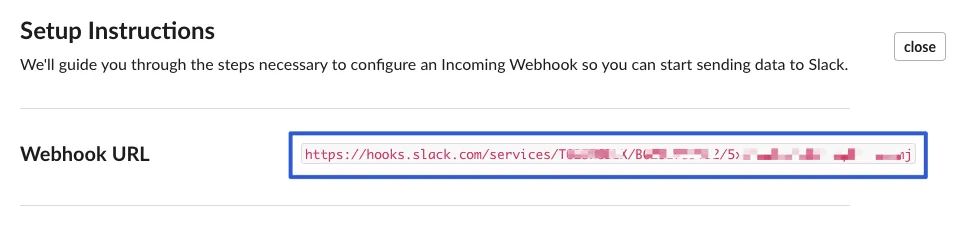
Note down the “Webhook URL” at the top.
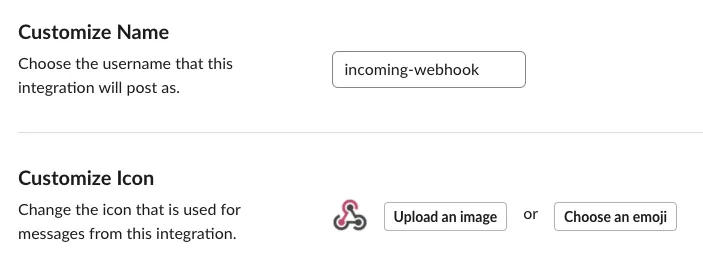
Scroll down to set the bot’s display name and avatar for sending messages; remember to click “Save Settings” after making changes.
Back to our Google Sheet Script
Add another Code block:
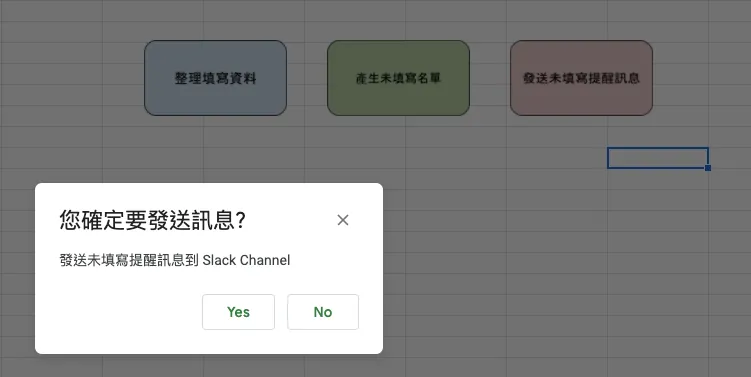
function postSlack() {
  var ui = SpreadsheetApp.getUi();
  var result = ui.alert(
     'Are you sure you want to send the message?',
     'Send reminder message for unfilled forms to Slack Channel',
      ui.ButtonSet.YES_NO);
  // Ask for confirmation to avoid accidental triggers

  if (result == ui.Button.YES) {
    var unfilledListSheet = SpreadsheetApp.getActiveSpreadsheet().getSheetByName('未填寫名單') // Sheet name for unfilled list
    var rows = unfilledListSheet.getDataRange().getValues();
    var persons = [];
    for(index in rows) {
      if (index == 0 \\|\\| index == 1) { // Skip the title and header rows
        continue;
      }

      var person = (rows[index][4] == "") ? (rows[index][2]) : ("<@"+rows[index][4]+">"); // Mention target: use slack uid if available, else show nickname; 2 = Column C / 4 = Column E
      if (person == "") { // Ignore if no valid data
        continue;
      }
      persons.push("• "+person+'\n') // Add target to array
    }

    if (persons.length <= 0) { // If no one to mention, all have filled, cancel message sending
      return;
    }

    var preText = "*[Health Report Announcement:loudspeaker:]*\nThe company cares about everyone's health. Please remember to fill out your daily health status report. Thank you :wink:\n\nToday's list of unfilled health status reports\n\n" // Message header content...
    var postText = "\n\nFilling out the health status report helps the company understand everyone's condition. Please make sure to fill it out daily >< Thank you all :woman-bowing::skin-tone-2:" // Message footer content...
    var payload = {
      "text": preText+persons.join('')+postText,
      "attachments": [{
          "fallback": "Place Google Form link here",
          "actions": [
            {
                "name": "form_link",
                "text": "Go to Health Status Report",
                "type": "button",
                "style": "primary",
                "url": "Place Google Form link here"
            }
          ],
          "footer": ":rocket:Tip: Click the “:zap:️lightning” under the input box -> “Shortcut Name” to fill out directly."
        }
      ]
    };
    var res = UrlFetchApp.fetch('Enter your slack incoming app Webhook URL here',{
      method             : 'post',
      contentType        : 'application/json',
      payload            : JSON.stringify(payload)
    })
  }
}
After saving, follow the previous method of adding code, then add a button and assign the script — “postSlack”.
After completion, you can click Test:

Success!!! (The reason @U123456 didn’t tag the person correctly is because I made up the ID)
The main features have now been completed!
Note
Please note that the official recommendation is to use the new Slack APP API chat.postMessage to send messages. The simpler Incoming Webhook method will be deprecated in the future. This guide uses the simpler method for convenience, but when following the next chapter “Import Employee List,” you will need to adjust to the new Slack App API method.

Import Employee List
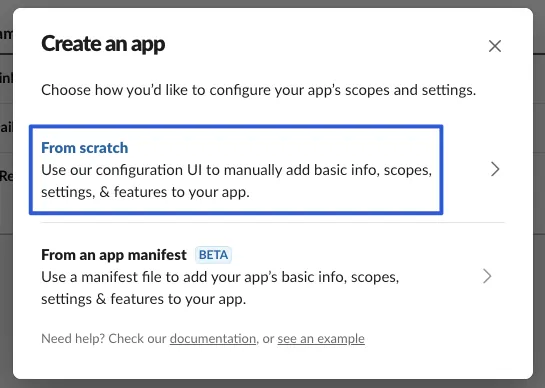
Here, we will need to create a Slack APP.
-
Click “Create New App” at the top right corner

- Choose “From scratch”
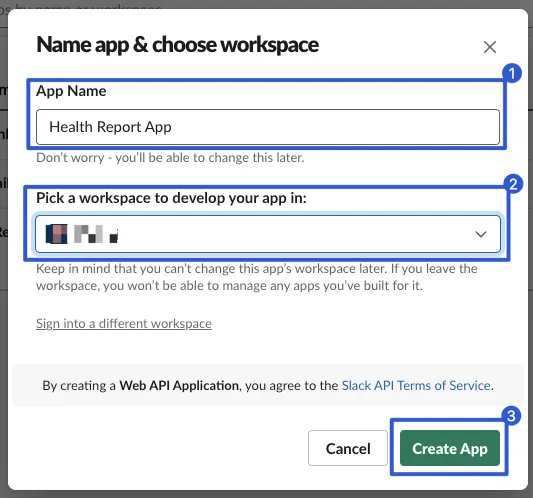
- Enter the “App Name” and the Workspace you want to add.
- After creation, select the “OAuth & Permissions” settings page from the left menu
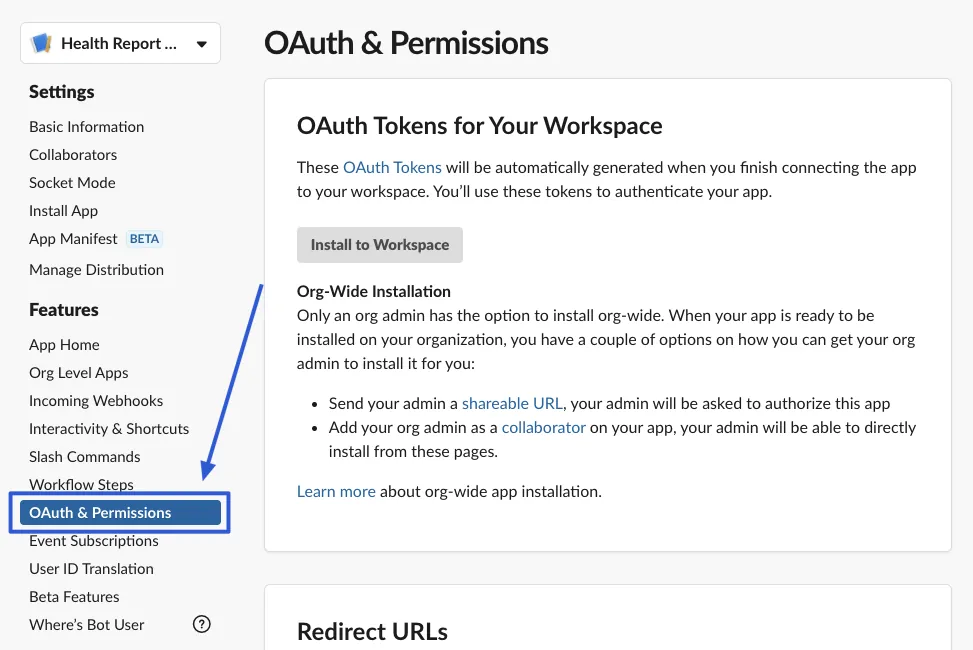
- Scroll down to the Scopes section
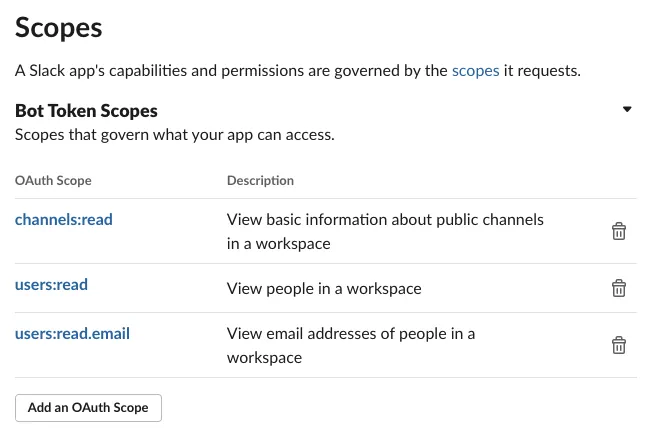
Add the following items under “Add an OAuth Scope” in order:
-
If you want to switch to sending messages via an APP, you can add chat.postMessage here.
- Go back to the top and click “Install to workspace” or “Reinstall to workspace”
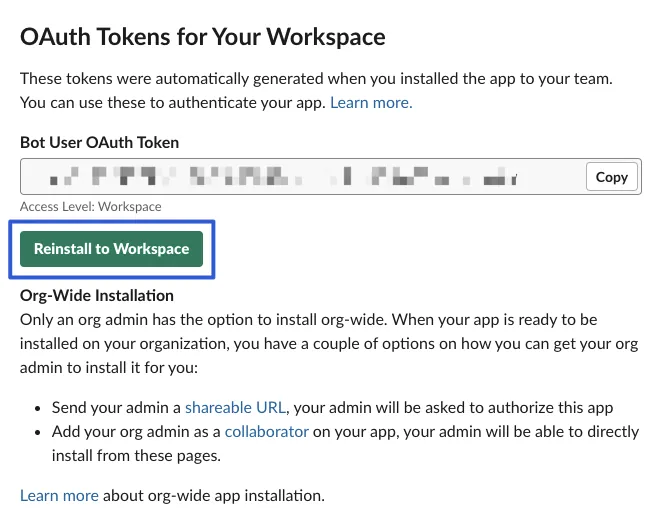
If new Scopes are added, you must come back here to reinstall.
-
After installation, obtain and copy the
Bot User OAuth Token -
Open the desired channel for importing the list using Slack Web.
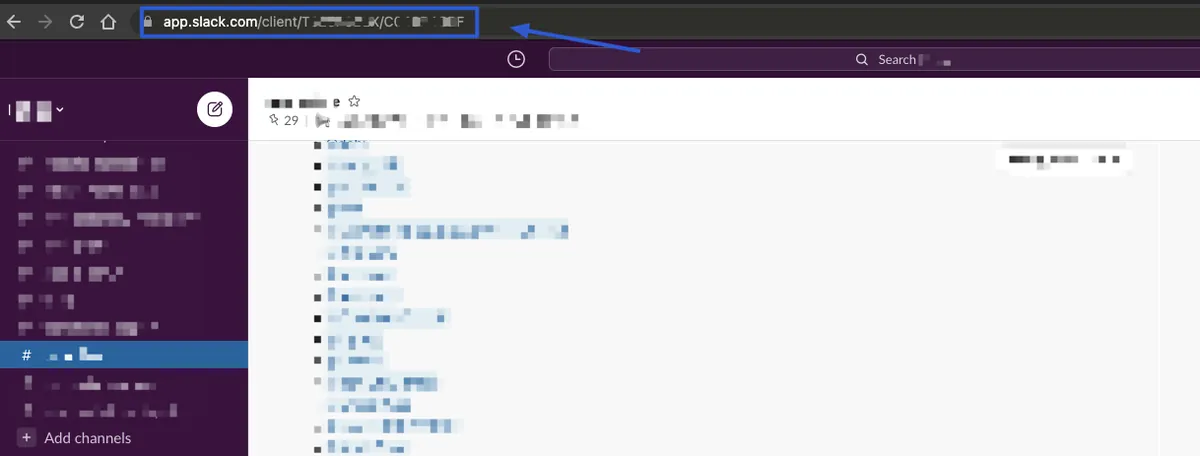
Get the URL from the browser:
https://app.slack.com/client/TXXXX/CXXXX
The CXXXX is the Channel ID for this channel, make a note of this message.
10.
Back to our Google Sheet Script
Add another Code block:
function loadEmployeeList() {
  var formData = {
    'token': 'Bot User OAuth Token',
    'channel': 'Channel ID',
    'limit': 500
  };
  var options = {
    'method' : 'post',
    'payload' : formData
  };
  var response = UrlFetchApp.fetch('https://slack.com/api/conversations.members', options);
  var data = JSON.parse(response.getContentText());
  for (index in data["members"]) {
    var uid = data["members"][index];
    var formData = {
      'token': 'Bot User OAuth Token',
      'user': uid
    };
    var options = {
      'method' : 'post',
      'payload' : formData
    };
    var response = UrlFetchApp.fetch('https://slack.com/api/users.info', options);
    var user = JSON.parse(response.getContentText());

    var email = user["user"]["profile"]["email"];
    var real_name = user["user"]["profile"]["real_name_normalized"];
    var title = user["user"]["profile"]["title"];
    var row = [title, real_name, real_name, email, uid]; // Fill in columns accordingly

    var listSheet = SpreadsheetApp.getActiveSpreadsheet().getSheetByName('員工名單'); // Employee list sheet name
    listSheet.appendRow(row);
  }
}
But this time, we don’t need to add a button since the import is only needed once; just save and run directly.
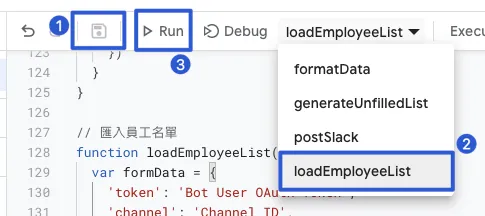
First, press “control” + “s” to save the file. In the dropdown menu above, select “loadEmployeeList,” then click “Run” to start importing the list into the Employee List sheet.
Manually Add New Employee Data
For any new employees joining later, you can directly add a row in the employee list Sheet and fill in the information. The Slack UID can be found directly on Slack:
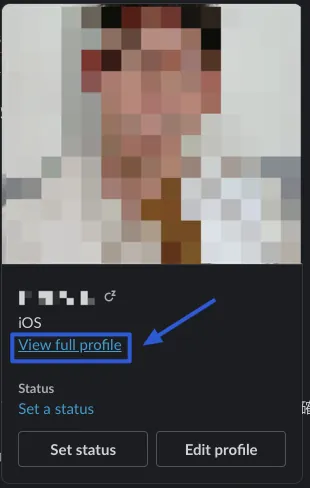
Click the person whose UID you want to see, then click “View full profile”
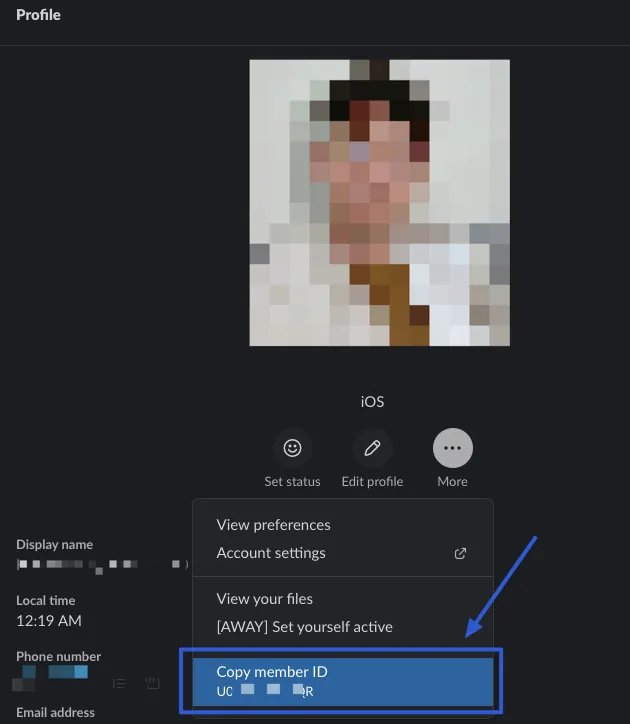
Click “More” and select “Copy member ID” to get the UID. UXXXXX
DONE!
All the above steps have been completed, and you can now start automated tracking of employees’ health status.
The completed file can be copied directly from the following Google Sheet for modification and use:
Supplement
- If you want to use Scheduled date & time to send form messages regularly, note that the form can only be filled out once in this case, so it’s not suitable to use here… (at least in the current version). Therefore, scheduled reminder messages still have to be plain text plus a Google Form link.

-
Currently, it is not possible to use a hyperlink to open the Form via Shortcut.
-
Google Sheet App Script to Prevent Duplicate Execution:
To prevent accidental repeated execution during runtime, you can add the following at the beginning of the function:
if (PropertiesService.getScriptProperties().getProperty('FUNCTIONNAME') == 'true') {
  SpreadsheetApp.getUi().alert('Busy... Please try again later');
  return;
}
PropertiesService.getScriptProperties().setProperty('FUNCTIONNAME', 'true');
Add the following at the end of the function execution:
PropertiesService.getScriptProperties().setProperty('FUNCTIONNAME', 'true');
Replace FUNCTIONNAME with the target function name.
Control execution with a global variable.
Applications Related to iOS Development
Can be used to integrate CI/CD, wrapping the original ugly command operations with a GUI. For example, combined with the Slack Bitrise APP, use Slack Workflow forms to trigger Build commands:
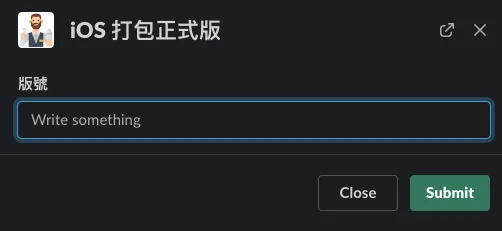
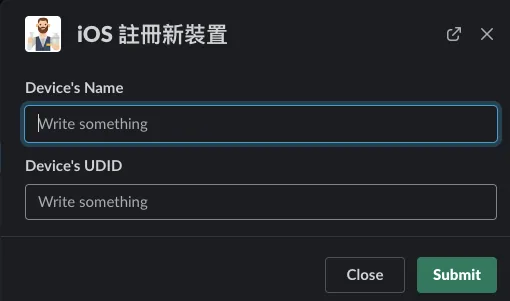
After submission, a command will be sent to the private channel with the Bitrise APP, e.g.:
bitrise workflow:app_store\\|branch:develop\\|ENV[version]:4.32.0

This can trigger Bitrise to run the CI/CD flow.
Further Reading
-
Automate Routine Tasks with Python + Google Cloud Platform + Line Bot
-
Crashlytics + Big Query Build a More Real-Time and Convenient Crash Tracking Tool
-
Crashlytics + Google Analytics Automatic Query for App Crash-Free Users Rate
If you have automation-related optimization needs, feel free to contact me. Thank you.

Comments