
10-Minute Quick Migration from Line Notify to Telegram Bot Notifications
Step-by-step Guide to Migrating Line Notify Personal Notification Service to the Also Free and More Powerful Telegram Bot

Photo by Lana Codes
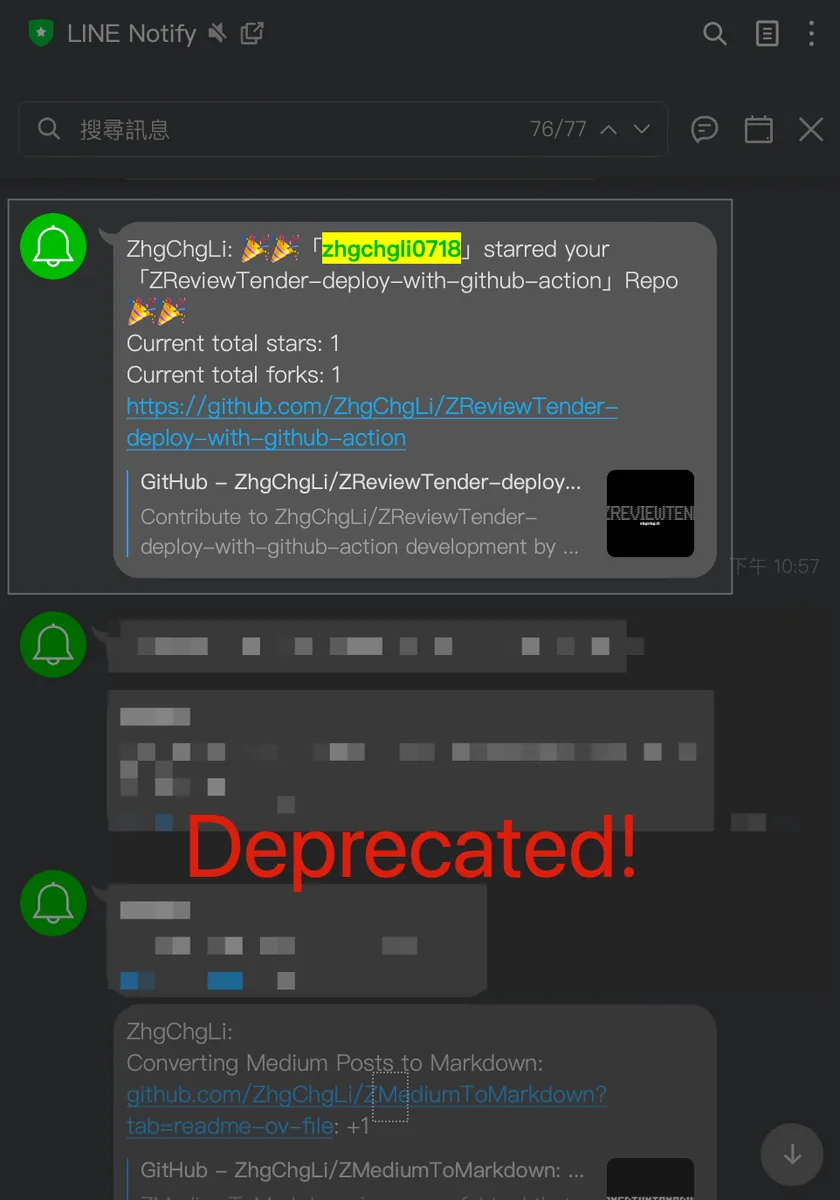
LINE Notify Service Termination Announcement
Thank you for using LINE Notify for a long time.
Since its launch in September 2016, LINE Notify has been dedicated to serving developers. To provide better service and focus resources on similar future products, we have decided to end this service on March 31, 2025. We sincerely thank all users who have supported and used LINE as a notification integration service over the years.
If you still need to send notifications to users via LINE, it is recommended to switch to the more feature-rich Messaging API.
Excerpted from Line Notify official website, Line announced on 2024/10/08 that Line Notify will be completely shut down on 2025/04/01. To continue using Line for message notifications, only the paid Message API is available.
The advantage of Line Notify is its ease of integration, making it very convenient for personal notification bots. Some Line Bots or third-party services also use Line Notify for notifications (e.g., Louisa, your order notification feature). However, it has several drawbacks, such as limited message content, no group segmentation (all messages are sent to the same Line Notify Bot), and message length restrictions.
With Line Notify announcing its termination, it also gave me an opportunity to migrate to other communication and notification services:
-
Slack: The free version only stores messages for 30 days. Since my notifications are mostly personal, using Slack feels like overkill. (For sending messages with Slack, you can refer to my previous article: Slack & ChatGPT Integration )
-
Discord: My notifications are more personal, so it’s a bit overkill.
-
Telegram: Free and Almost Unlimited Use.
For me, Telegram’s messaging service better fits my original Line Notify usage needs. I need a channel that can receive notifications, preferably with different channels for different needs. The more diverse the acceptable content and formats, the better, and it should be quick and easy to integrate. Telegram meets all these requirements and also supports interactive features with the Bot.
Results
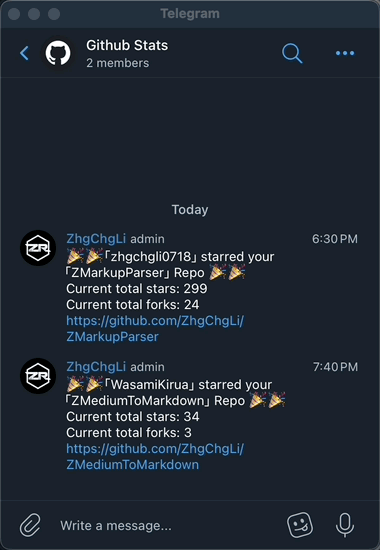
First, here is the final result image (using Github Star notification and Repo Stats notification as examples):
-
✅ When someone stars the repo, a webhook triggers -> Google Apps Script -> Telegram Bot sends a notification to the Telegram — Github Stats Group
-
✅ Google Apps Script daily schedule -> fetch Github Repo Stats -> Telegram Bot sends notification to Telegram — Github Stats Group
-
✅ Use the
/updateTelegram Bot Command to trigger fetching Github Repo Stats status -> Telegram Bot sends notification to Telegram — Github Stats Group
Compared to the original Line Notify

-
❌ All messages cannot be categorized or grouped and are sent to Line Notify.
-
❌ Cannot set special options for individual messages (such as notification sound, mute, etc.)
-
❌ Unable to input message interaction
Table of Contents
-
Setting up Telegram Bot
-
Migrate Line Notify Message Sending to Telegram Bot (Google Apps Script)
-
Interacting with Telegram Bot (Command) x Using Google Apps Script
(1/2) Setting up Telegram Bot
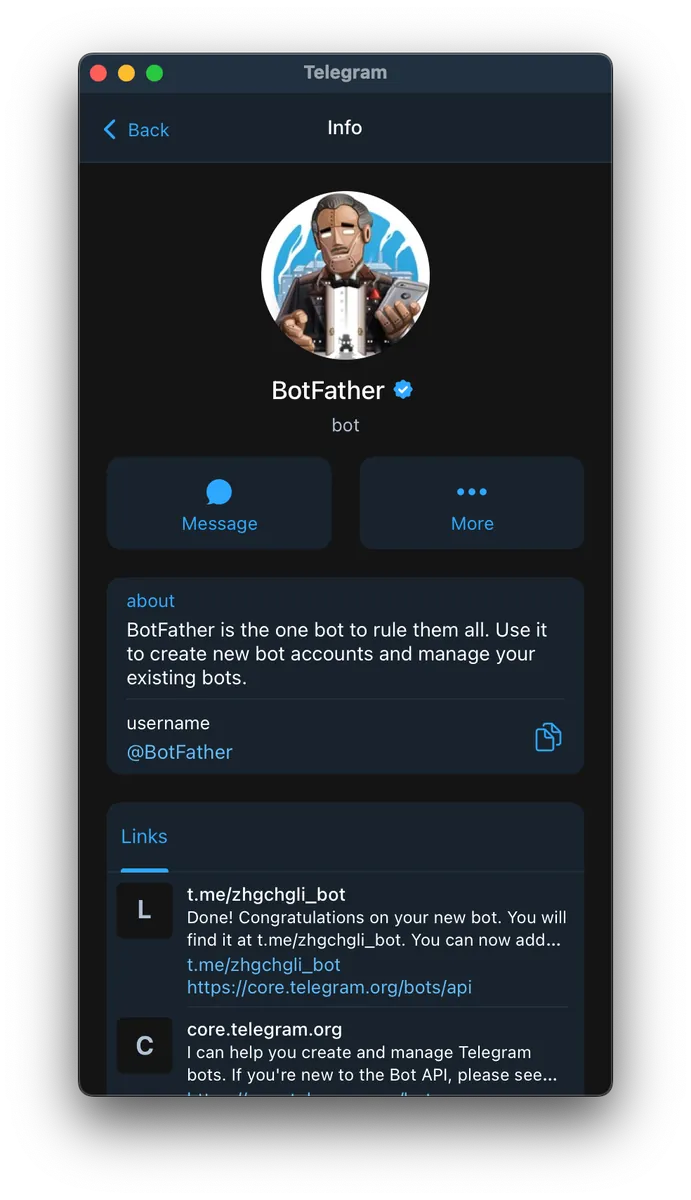
Applying for a Telegram Bot is very simple; you don’t even need to open a webpage. Just interact with the official BotFather bot.
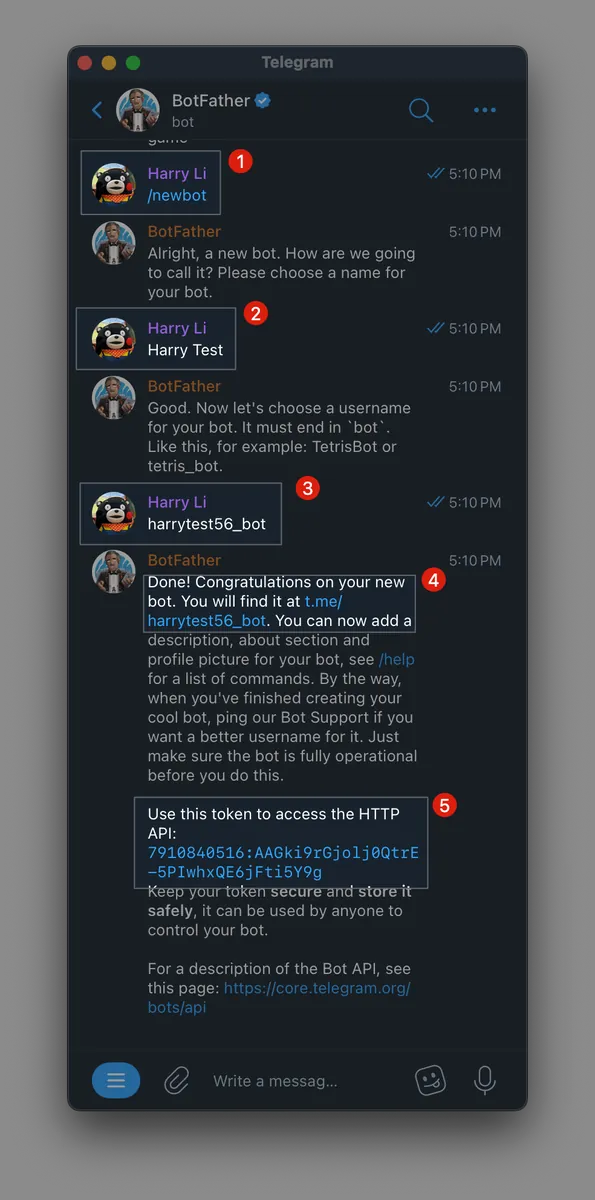
Step 1. Apply for a Telegram Bot
After installing and registering for the Telegram service, click to add BotFather bot as a friend.
-
Open and join the BotFather bot
-
After joining, send the message
/newbotto create your bot. -
Enter your bot name.
-
Enter your bot username (must be unique and end with
bot, for example, myzhgchgli_bot). -
Your Bot link, click to start using (e.g. t.me/harrytest56_bot).
-
Get your
YOUR_BOT_API_Token, please keep it safe ⚠️⚠️⚠️
Click the Bot link obtained in step 4 to start using the Bot:
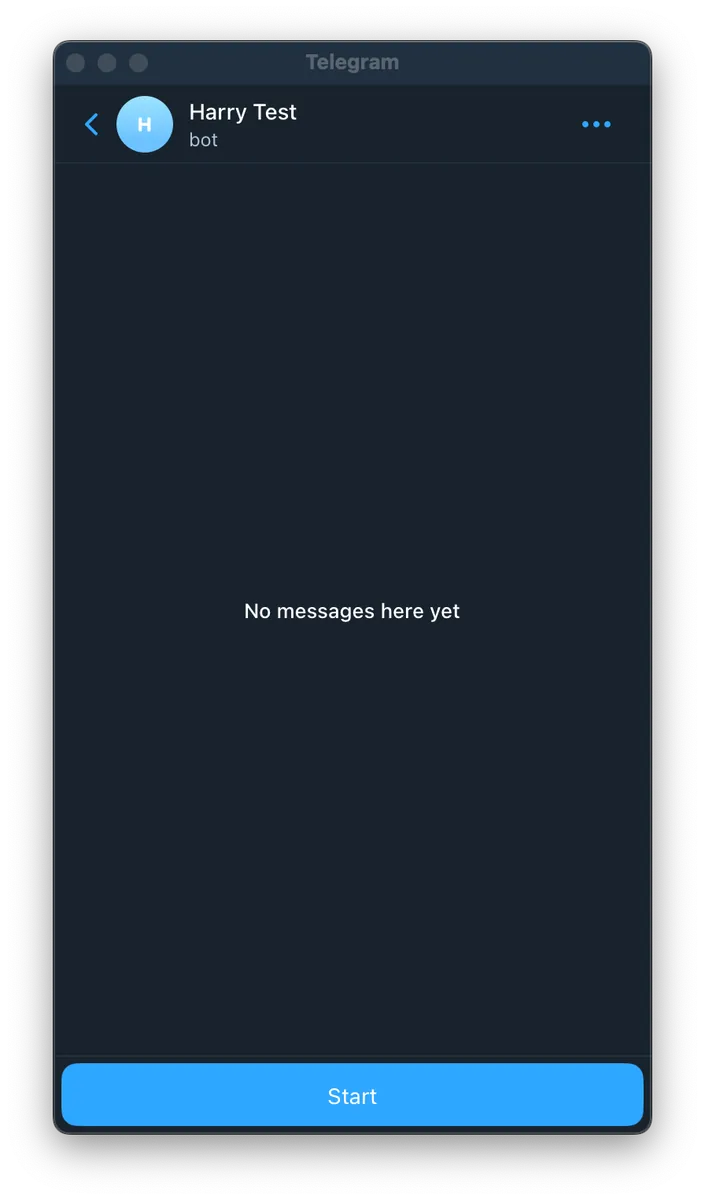
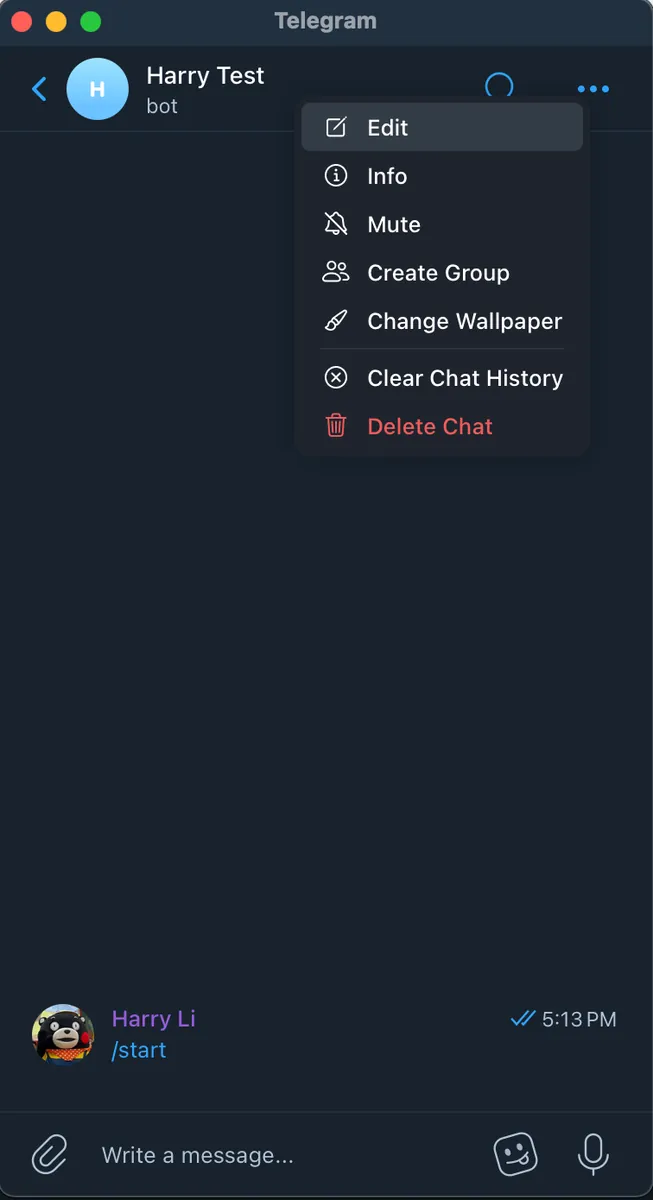
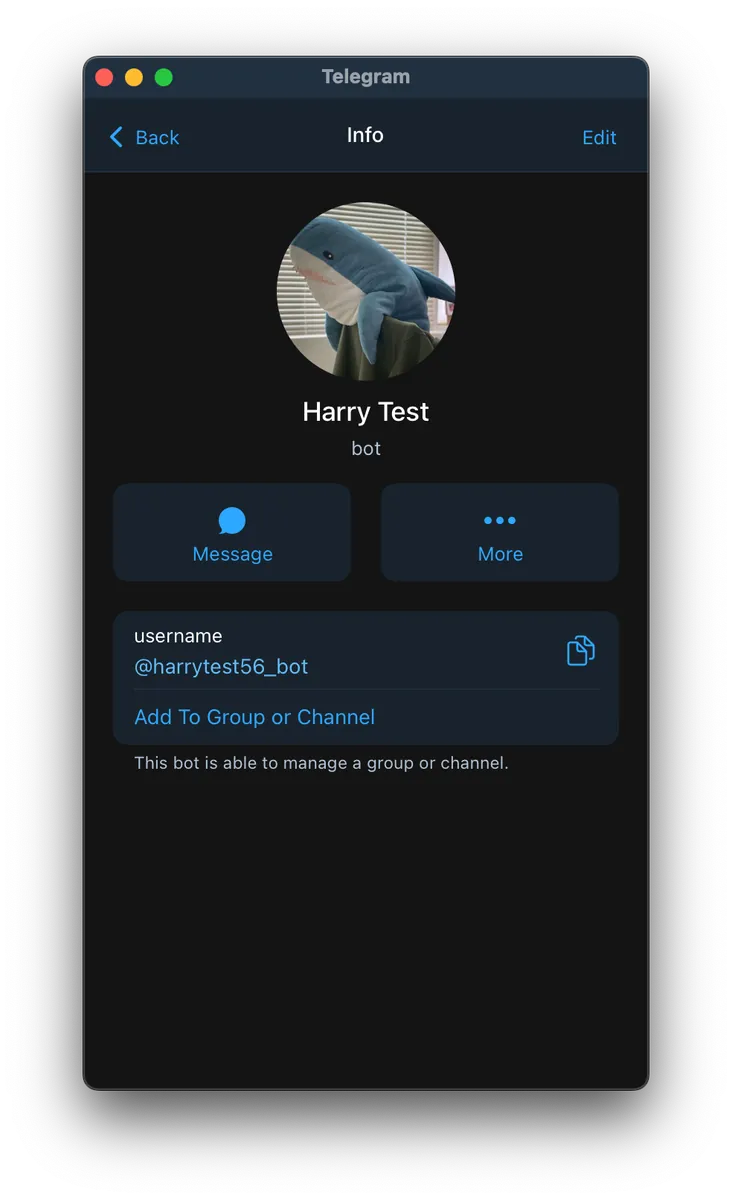
Currently, there are no features available. You can tap the Info button at the top right to edit the name or upload a profile picture.
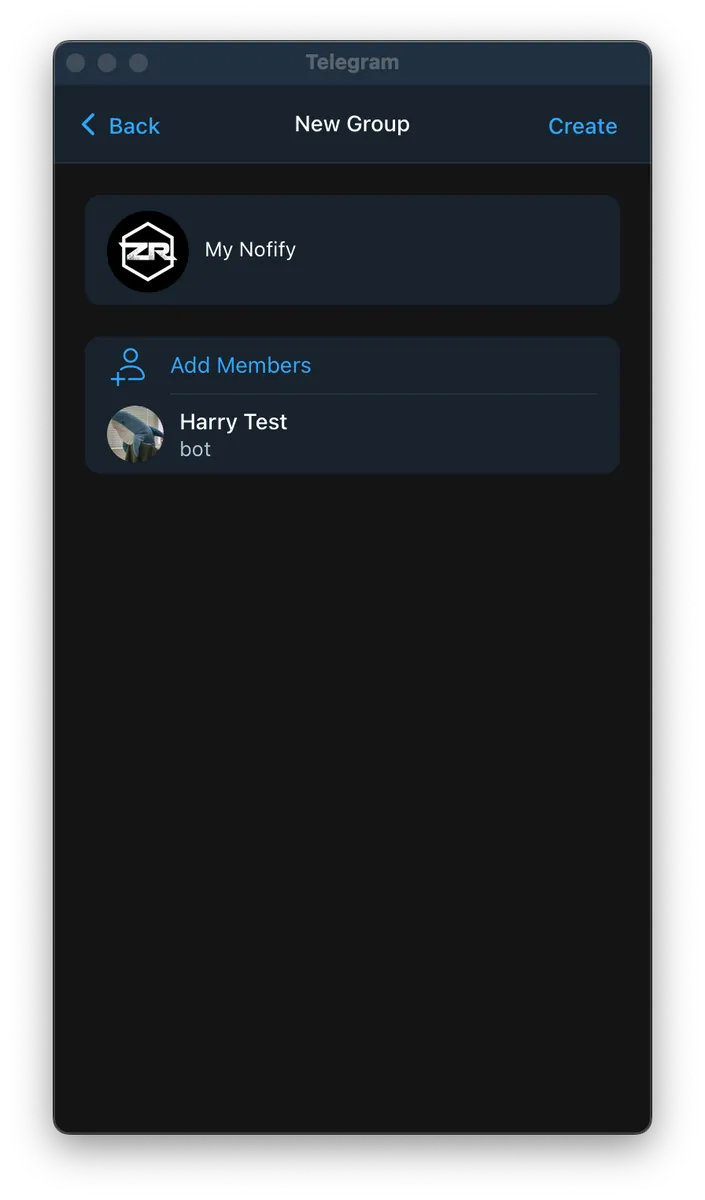
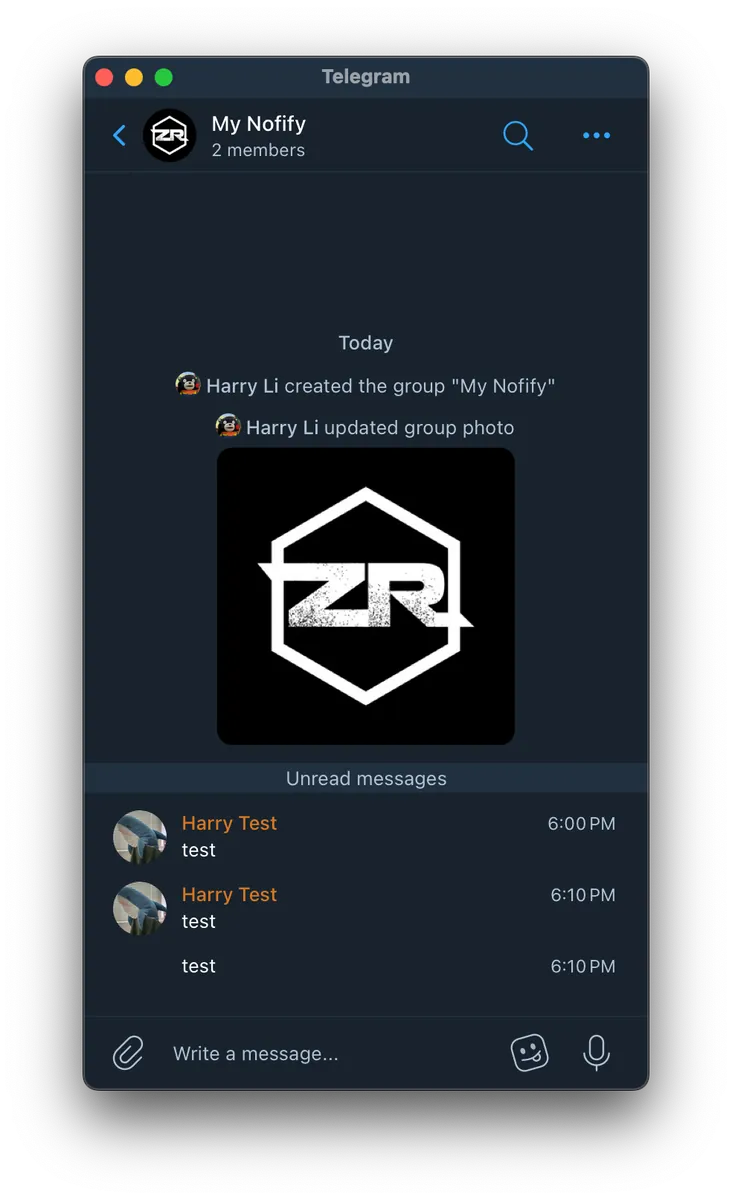
Step 2. Create a Telegram Notification Group & Add the Bot Account
I want different types of personal notifications to be sent to different Groups, but only one My Notify Group is created here for the demo.
You can create different groups based on your actual needs and follow the steps to add and configure the bot.
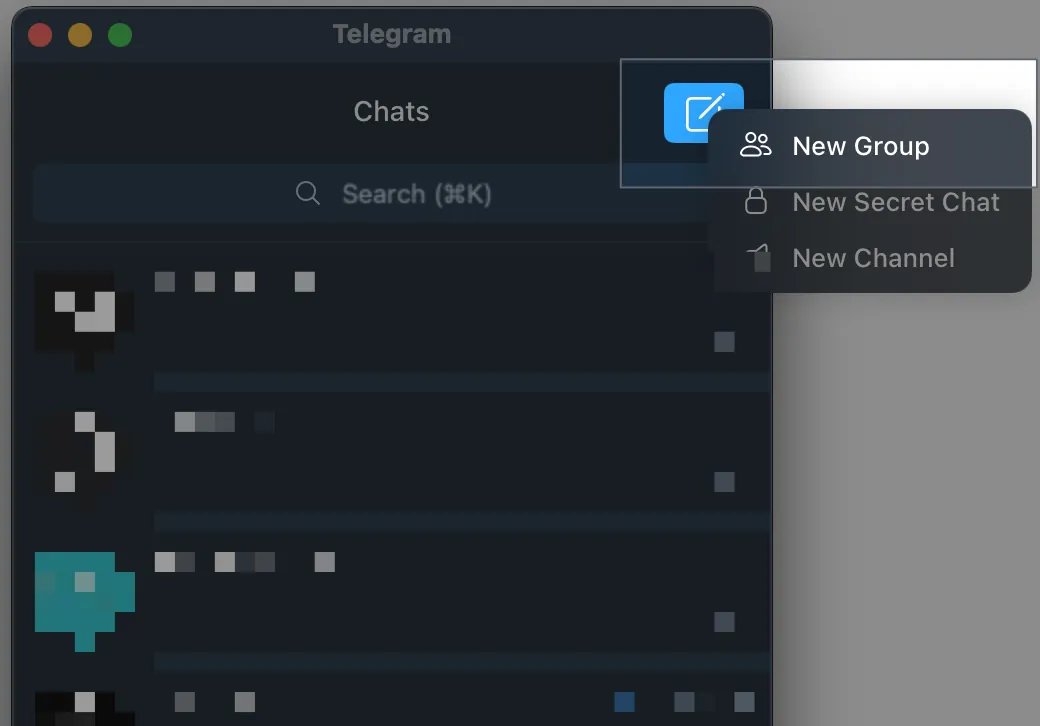
-
New Group
-
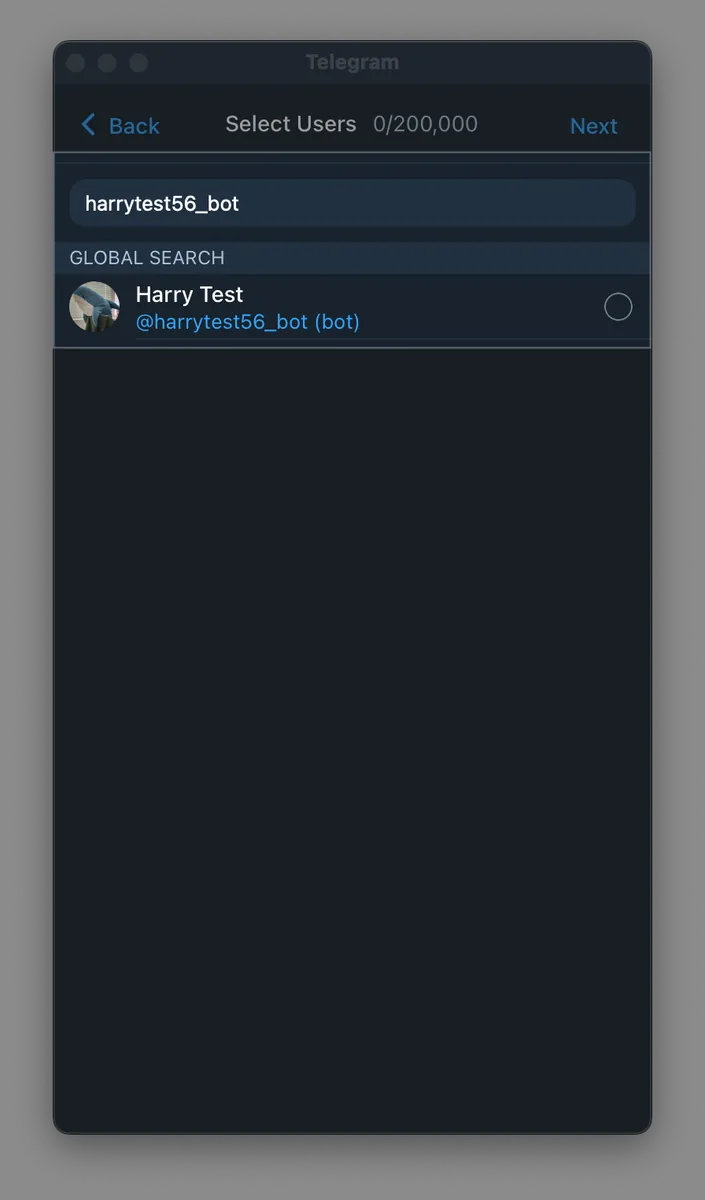
Search for your bot account & click Join
-
Set Group Name and Avatar
Step 3. Get Group Chat ID
Telegram Bot API does not provide an endpoint to directly get the list of Groups or Group Chat IDs. You can only obtain them by using /getUpdates to fetch the bot’s message list and find the Group Chat ID from there:
Request:
curl 'https://api.telegram.org/botYOUR_BOT_API_TOKEN/getUpdates'
-
The Telegram API format is
https://api.telegram.org/botyour_BOT_API_Token/getUpdates. The BOT API Token string must be prefixed with thebotstring. -
Example:
curl 'https://api.telegram.org/bot7814194578:AAEWpPJvKn06ID7D9FjV65aDKQLkGkz8cc8/getUpdates'
Response:
{
    "ok": true,
    "result": [
        {
            "update_id": 706454235,
            "my_chat_member": {
                "chat": {
                    "id": -4532420331,
                    "title": "My Nofify",
                    "type": "group",
                    "all_members_are_administrators": false
                },
                "from": {
                    "id": 986128250,
                    "is_bot": false,
                    "first_name": "Harry",
                    "last_name": "Li",
                    "username": "zhgchgli"
                },
                "date": 1728726861,
                "old_chat_member": {
                    "user": {
                        "id": 7814194578,
                        "is_bot": true,
                        "first_name": "Harry Test",
                        "username": "harrytest56_bot"
                    },
                    "status": "left"
                },
                "new_chat_member": {
                    "user": {
                        "id": 7814194578,
                        "is_bot": true,
                        "first_name": "Harry Test",
                        "username": "harrytest56_bot"
                    },
                    "status": "member"
                }
            }
        },
        {
            "update_id": 706454236,
            "message": {
                "message_id": 1,
                "from": {
                    "id": 986128250,
                    "is_bot": false,
                    "first_name": "Harry",
                    "last_name": "Li",
                    "username": "zhgchgli"
                },
                "chat": {
                    "id": -4532420331,
                    "title": "My Nofify",
                    "type": "group",
                    "all_members_are_administrators": true
                },
                "date": 1728726861,
                "group_chat_created": true
            }
        },
        {
            "update_id": 706454237,
            "message": {
                "message_id": 2,
                "from": {
                    "id": 986128250,
                    "is_bot": false,
                    "first_name": "Harry",
                    "last_name": "Li",
                    "username": "zhgchgli"
                },
                "chat": {
                    "id": -4532420331,
                    "title": "My Nofify",
                    "type": "group",
                    "all_members_are_administrators": true
                },
                "date": 1728726864,
                "new_chat_photo": [
                    {
                        "file_id": "AgACAgUAAxkBAAMCZwpHUEaLZSvFFYu8GiO-8qI_jVYAApfAMRu0B1BUJP-4u2wF6scBAAMCAANhAAM2BA",
                        "file_unique_id": "AQADl8AxG7QHUFQAAQ",
                        "file_size": 5922,
                        "width": 160,
                        "height": 160
                    },
                    {
                        "file_id": "AgACAgUAAxkBAAMCZwpHUEaLZSvFFYu8GiO-8qI_jVYAApfAMRu0B1BUJP-4u2wF6scBAAMCAANiAAM2BA",
                        "file_unique_id": "AQADl8AxG7QHUFRn",
                        "file_size": 15097,
                        "width": 320,
                        "height": 320
                    },
                    {
                        "file_id": "AgACAgUAAxkBAAMCZwpHUEaLZSvFFYu8GiO-8qI_jVYAApfAMRu0B1BUJP-4u2wF6scBAAMCAANjAAM2BA",
                        "file_unique_id": "AQADl8AxG7QHUFQB",
                        "file_size": 37988,
                        "width": 640,
                        "height": 640
                    }
                ]
            }
        }
    ]
}
You can find the nested JSON data with the corresponding Group Name + type=group in the response, where the id is the Group Chat ID:
"chat": {
  "id": -4532420331,
  "title": "My Notify",
  "type": "group",
  "all_members_are_administrators": false
}
Group Chat Id=-4532420331
⚠️⚠️⚠️️ If your Response is empty
{ "ok": true, "result": [] }, please try sending a message (e.g.Hello) in your Group and then call the API again. It should work.
Step 4. Send Messages
We can use /sendMessage to send messages to a Group.
Request:
curl 'https://api.telegram.org/botYOUR_BOT_API_Token/sendMessage' \
--form 'chat_id="Group Chat Id"' \
--form 'text="Message content"'
Example:
curl 'https://api.telegram.org/bot7814194578:AAEWpPJvKn06ID7D9FjV65aDKQLkGkz8cc8/sendMessage' \
--form 'chat_id="-4532420331"' \
--form 'text="test"'
Response & Result:
{
  "ok": true,
  "result": {
    "message_id": 5,
    "from": {
      "id": 7814194578,
      "is_bot": true,
      "first_name": "Harry Test",
      "username": "harrytest56_bot"
    },
    "chat": {
      "id": -4532420331,
      "title": "My Nofify",
      "type": "group",
      "all_members_are_administrators": true
    },
    "date": 1728727847,
    "text": "test"
  }
}
- Message sent successfully, received the above response
- Replying in the Telegram Group will display the content of the message just sent.
(2/2) Migrating Line Notify Message Sending to Telegram Bot (Google Apps Script)
My personal notification bot service is implemented using Google Apps Script, so the conversion example is based on Google Apps Script (similar to JavaScript).
Original Line Notify Sending Code:
const lineToken = "XXXX";

function sendLineNotifyMessage(message) {
  var url = 'https://notify-api.line.me/api/notify';

  var options = {
    method: 'post',
    headers: {
      'Authorization': 'Bearer '+lineToken
    },
    payload: {
      'message': message
    }
  };
  const response = UrlFetchApp.fetch(url, options);
  Logger.log(response.getContentText());
}
You can see it is very simple, convenient, and easy to use…
Migration to Telegram Bot Sending Code:
const telegramToken = "your_BOT_API_Token";
const TelegramChatId = {
  GA: -123456,
  GITHUB: -123457,
  MEDIUM: -123458
};

function sendNotifyMessage(message, chatId) {
  var url = "https://api.telegram.org/bot"+telegramToken+"/sendMessage";

  const payload = {
    "chat_id": chatId,
    "text": message,
    "parse_mode": "Markdown"
  }
  const options = {
    'method': 'post',
    'contentType': 'application/json',
    'muteHttpExceptions': true,
    'payload': JSON.stringify(payload)
  };

  const response = UrlFetchApp.fetch(url, options);
  Logger.log(response.getContentText());
}
Information obtained from the previous Telegram Bot setup steps.
-
telegramToken=your_BOT_API_Token -
TelegramChatIdhere is a custom method I defined myself because, in practice, I want different notifications sent to different groups. Therefore, I created a structure to manage target groups and theirGroup Chat Id.
/sendMessage API parameters, for more parameters and details refer to the official documentation, below are the parameters I commonly use:
-
text: Message content (required)
-
chat_id: Target Group Chat Id (required)
-
parse_mode: The message content parsing mode, here I specify
Markdown -
disable_web_page_preview: Whether to disable link previews in the message content. Setting this to
truedisables previews, making the message display cleaner.
Usage:
sendNotifyMessage("Hello", TelegramChatId.MEDIUM) // Send Hello message to MEDIUM Group Chat Id
sendNotifyMessage("Hello", -1234) // Send Hello message to -1234 Group Chat Id
Results
Using my Github Repo Star Notifier Bot as an example:
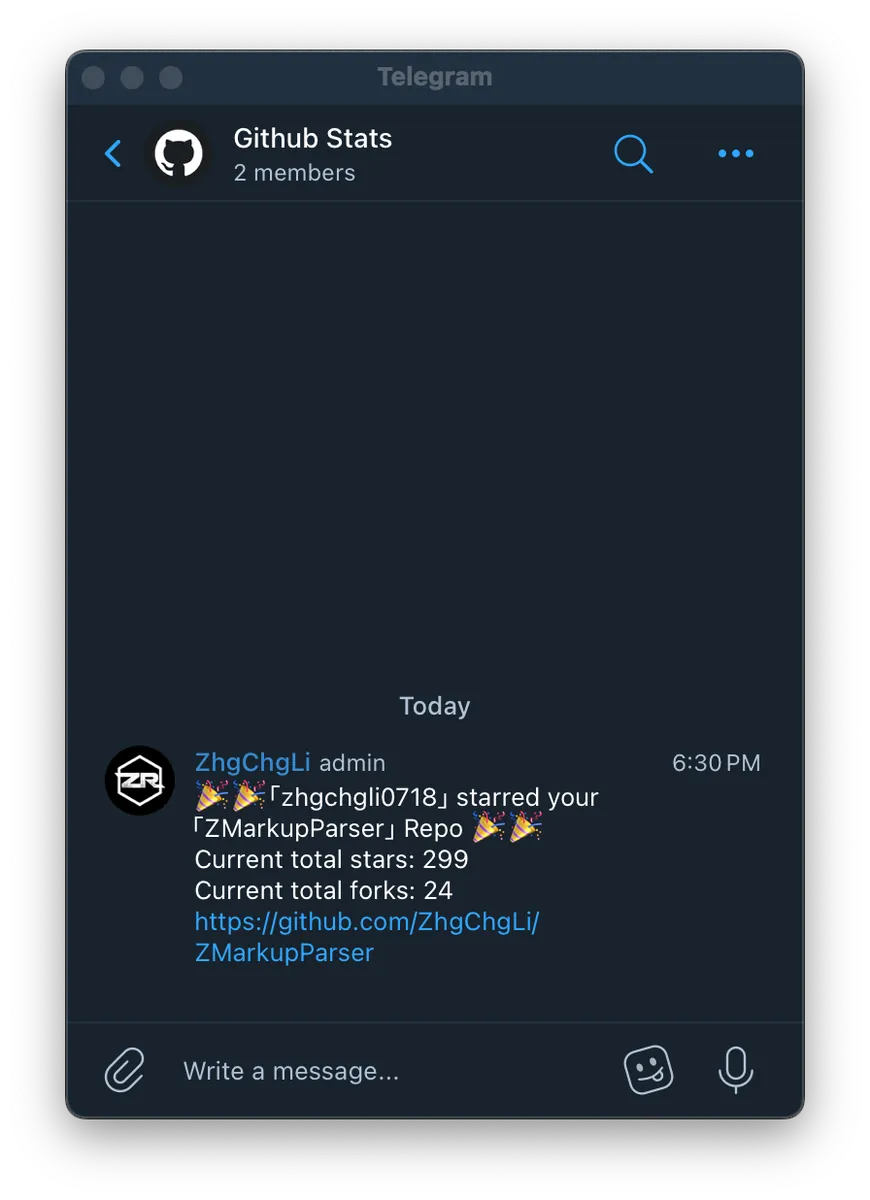
-
Verification successful! Notifications are correctly sent to the Telegram Group when someone stars my Repo! 🎉🎉🎉
-
You can refer to my previous article “Using Google Apps Script to Create a Free Github Repo Star Notifier in Three Steps” for the setup process.
Set Custom Sounds or Mute
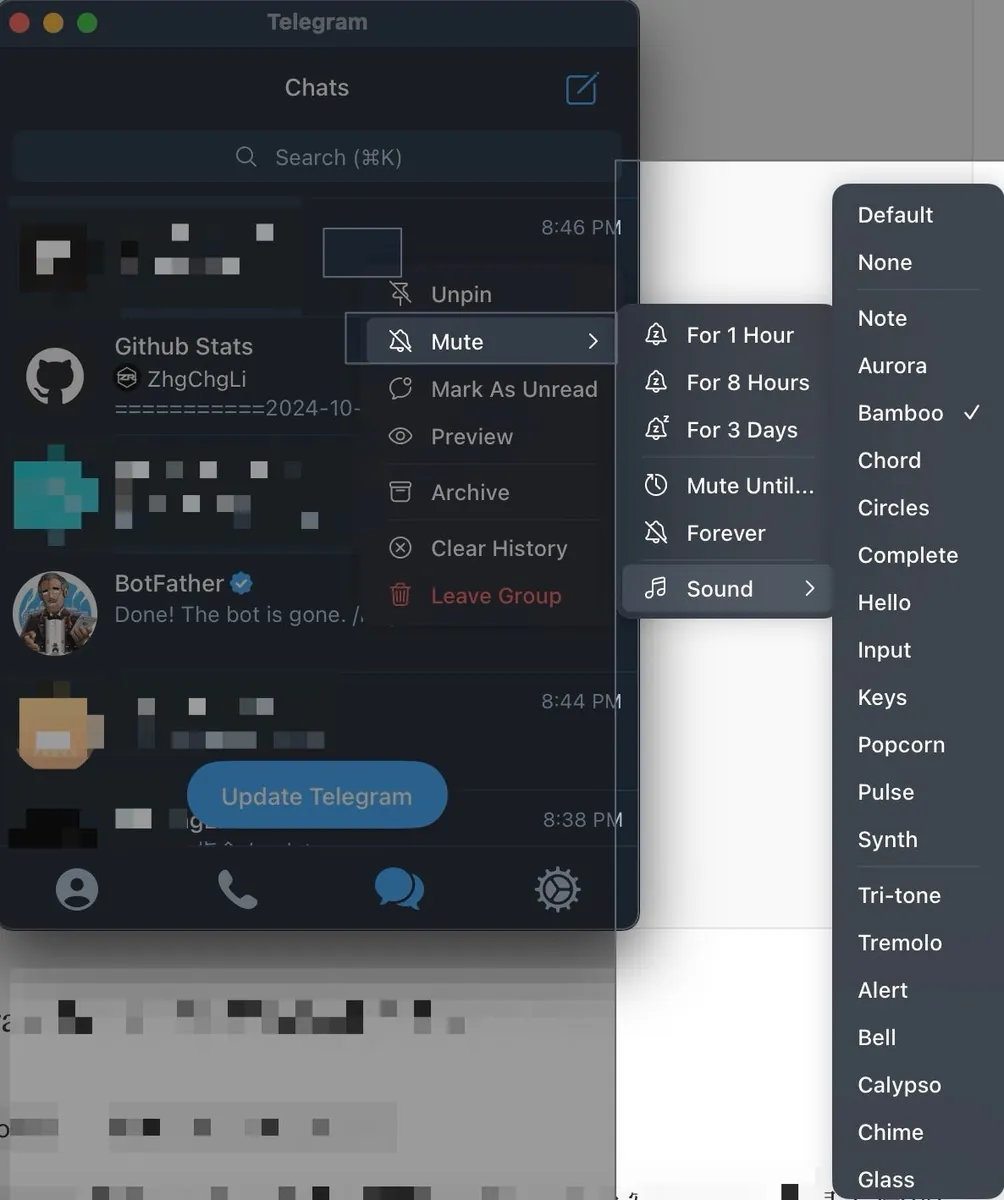
Even better than Line Notify, we can set different notification sounds or mute settings for different groups.
Interacting with Telegram Bot (Command) x Using Google Apps Script
Besides replacing the Notify function, Telegram Bot can also easily implement interactive features with users — Telegram Bot Command.
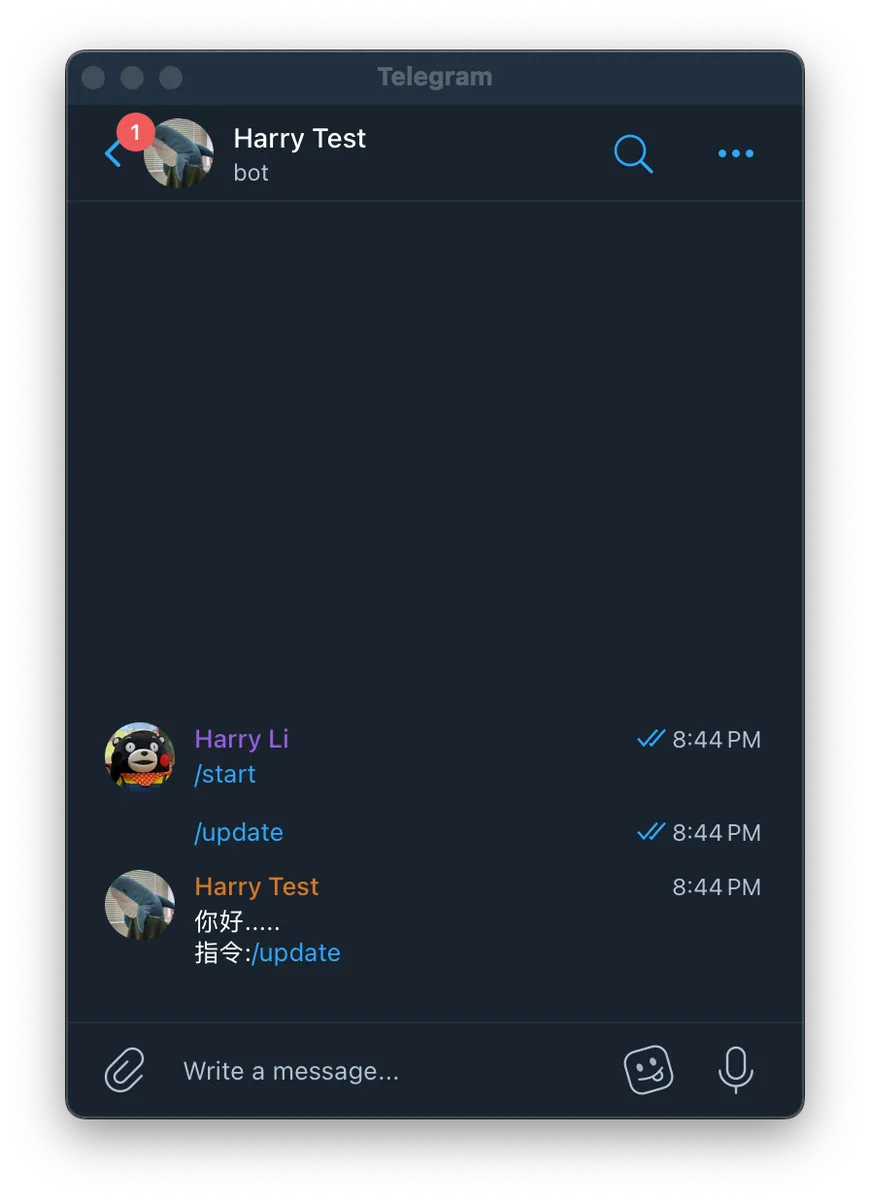
Back to my use case, my bot sends notification messages to me either on a schedule or triggered by a webhook; but sometimes I also want to manually trigger the bot to get the current result immediately. Previously, Line Notify didn’t have this feature. Using Google Apps Script, the only option was to crudely set up a URL that triggers the bot whenever opened, which is not very user-friendly.
Telegram Bot Command allows me to directly enter command messages, making the bot immediately perform the actions I want.
This article uses Google Apps Script as an example. For a detailed introduction to Google Apps Script, please refer to my previous article “Automating Google Services RPA with Google Apps Script”.
Step 1. Implement Command Handling Logic Using Google Apps Script
-
Go to the Google Apps Script homepage
-
Click “Create New Project” at the top left
-
Click “Untitled Project” and enter the project name, e.g.
Telegram -
Paste the basic code:
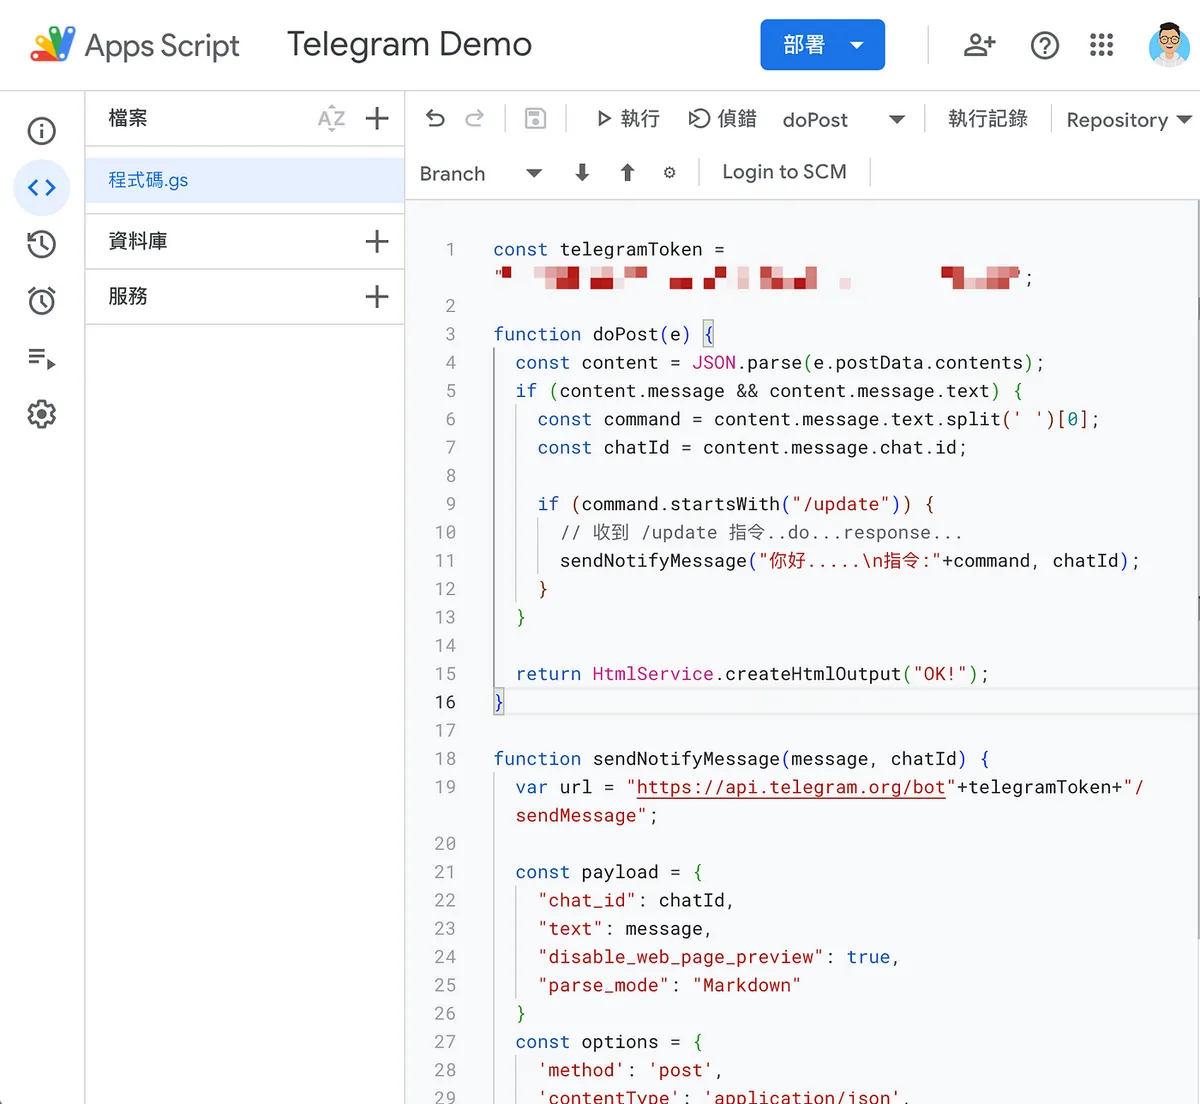
const telegramToken = "your_BOT_API_Token";

function doPost(e) {
  const content = JSON.parse(e.postData.contents);
  if (content.message && content.message.text) {
    const command = content.message.text.split(' ')[0];
    const chatId = content.message.chat.id;

    if (command.startsWith("/update")) {
      // Received /update command
      // Handle what you want to do here... then respond...
      sendNotifyMessage("Hello.....\nCommand:"+command, chatId);
    }
  }

  return HtmlService.createHtmlOutput("OK!");
}

function sendNotifyMessage(message, chatId) {
  var url = "https://api.telegram.org/bot"+telegramToken+"/sendMessage";

  const payload = {
    "chat_id": chatId,
    "text": message,
    "disable_web_page_preview": true,
    "parse_mode": "Markdown"
  }
  const options = {
    'method': 'post',
    'contentType': 'application/json',
    'muteHttpExceptions': true,
    'payload': JSON.stringify(payload)
  };

  const response = UrlFetchApp.fetch(url, options);
  Logger.log(response.getContentText());
}
-
telegramToken=your_BOT_API_Token -
In the above demo code, when receiving a POST request with the Command parameter equal to
/update, it responds withHello…to simulate handling the command and replying.
Step 2. Complete Google Apps Script Web Deployment
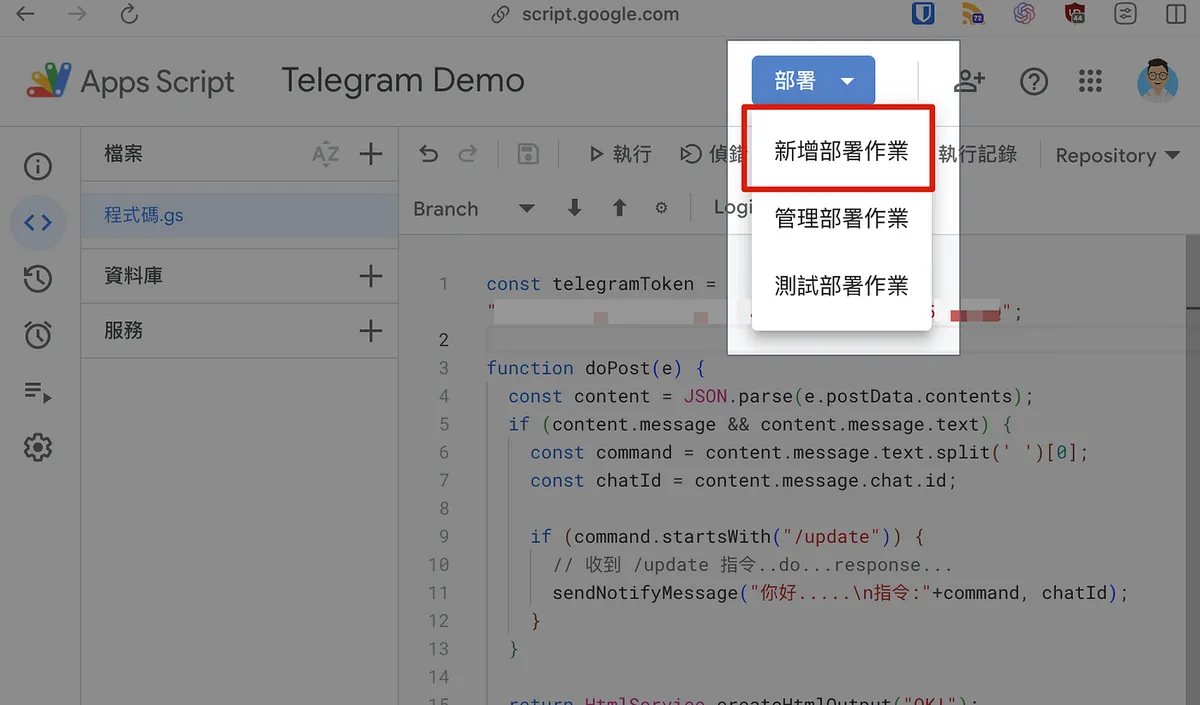

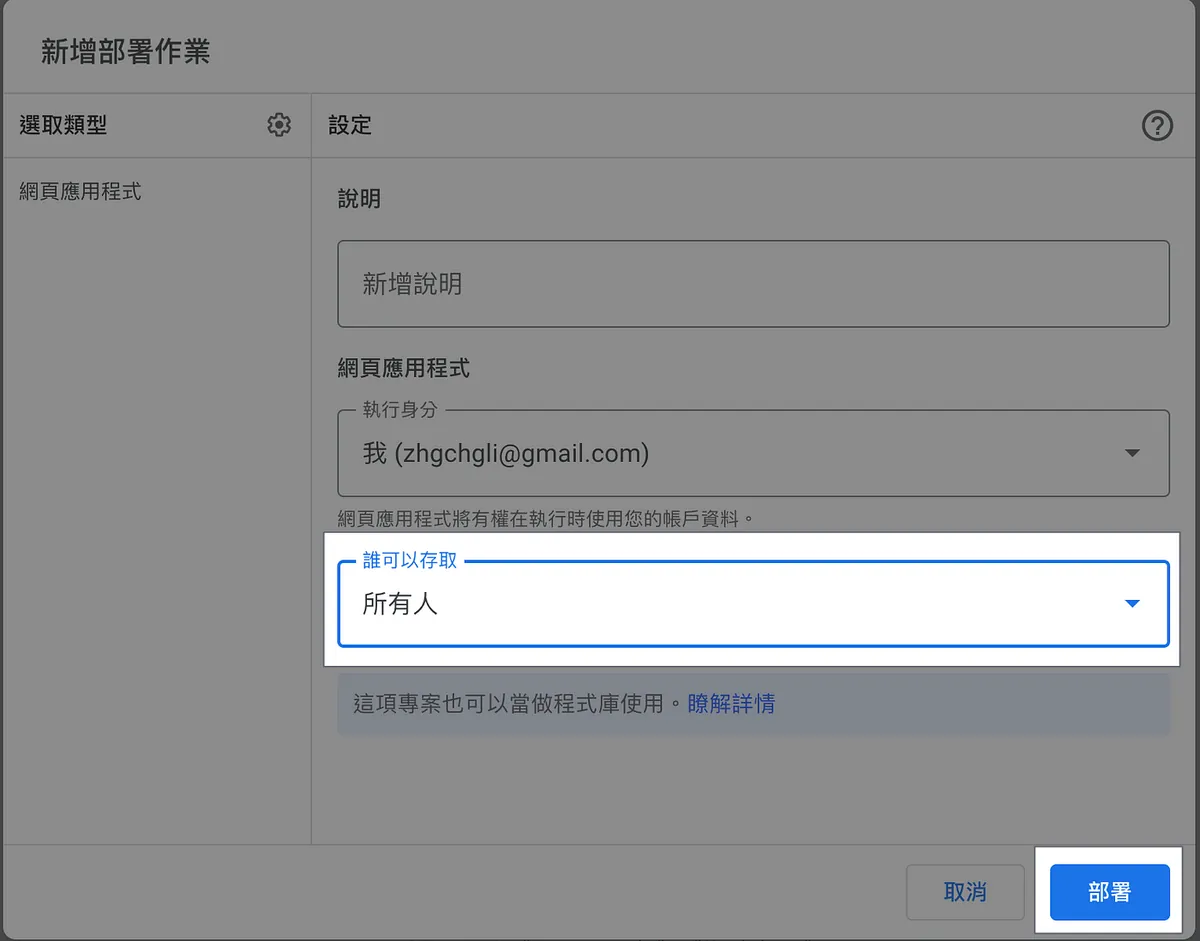
-
Top right corner “Deploy” -> “New deployment”
-
Top-left corner “Settings” -> “Web App”
-
Who can access: Select “Everyone”
-
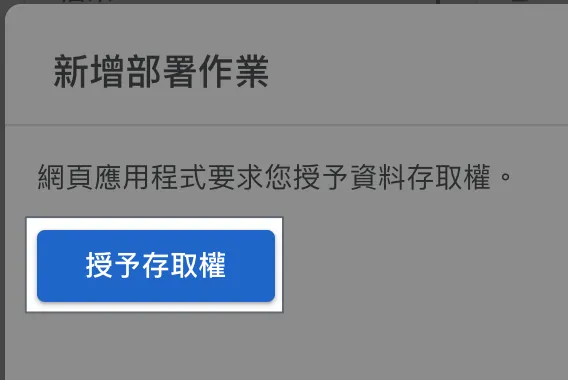
Add a new deployment task and select “Grant access”
-
A pop-up window will appear; select your Google login account.
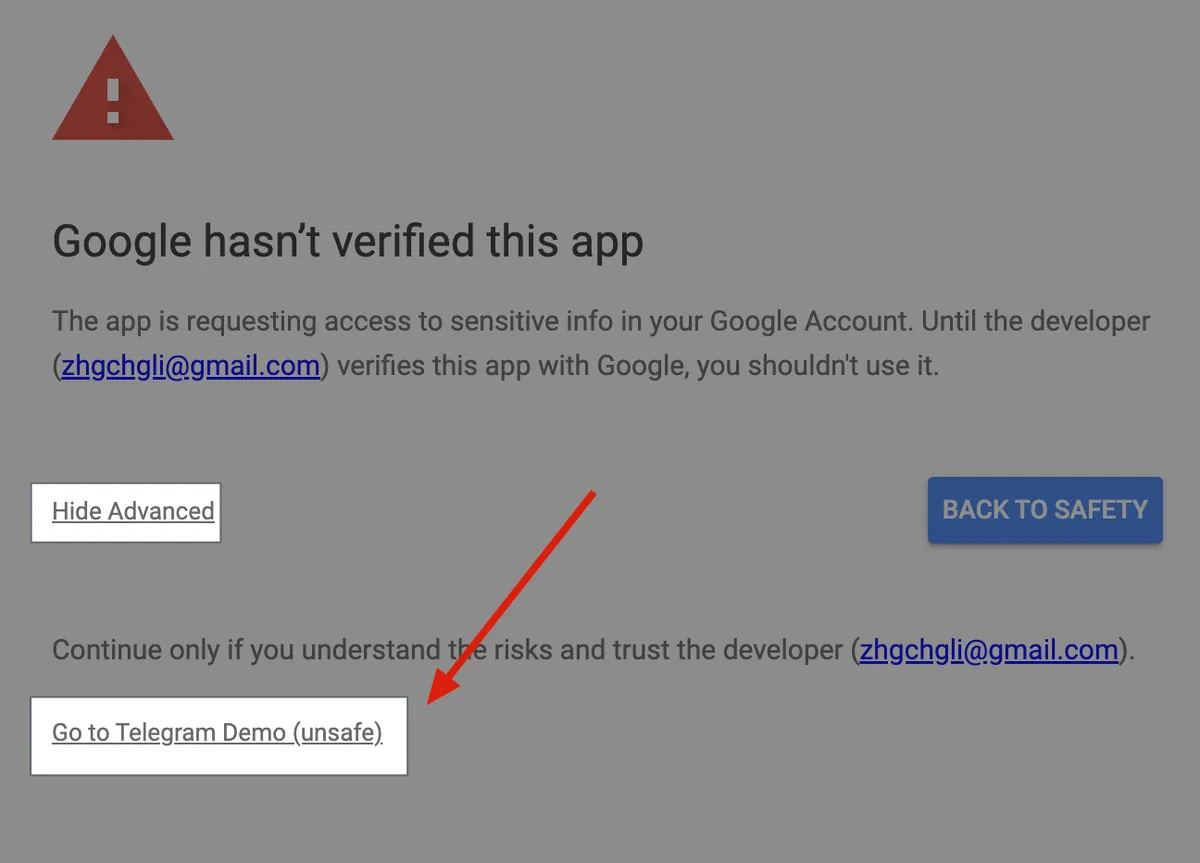
-
A warning window will pop up. Select “Advanced” -> “Go to
project name(unsafe)” -
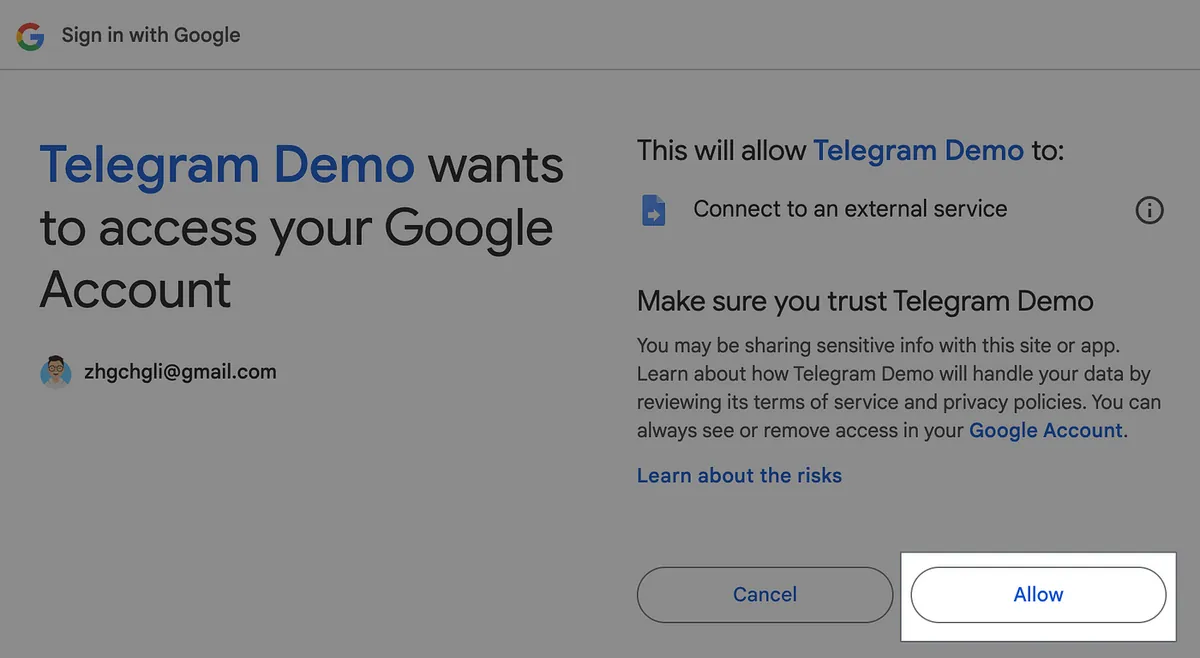
Select “Allow”
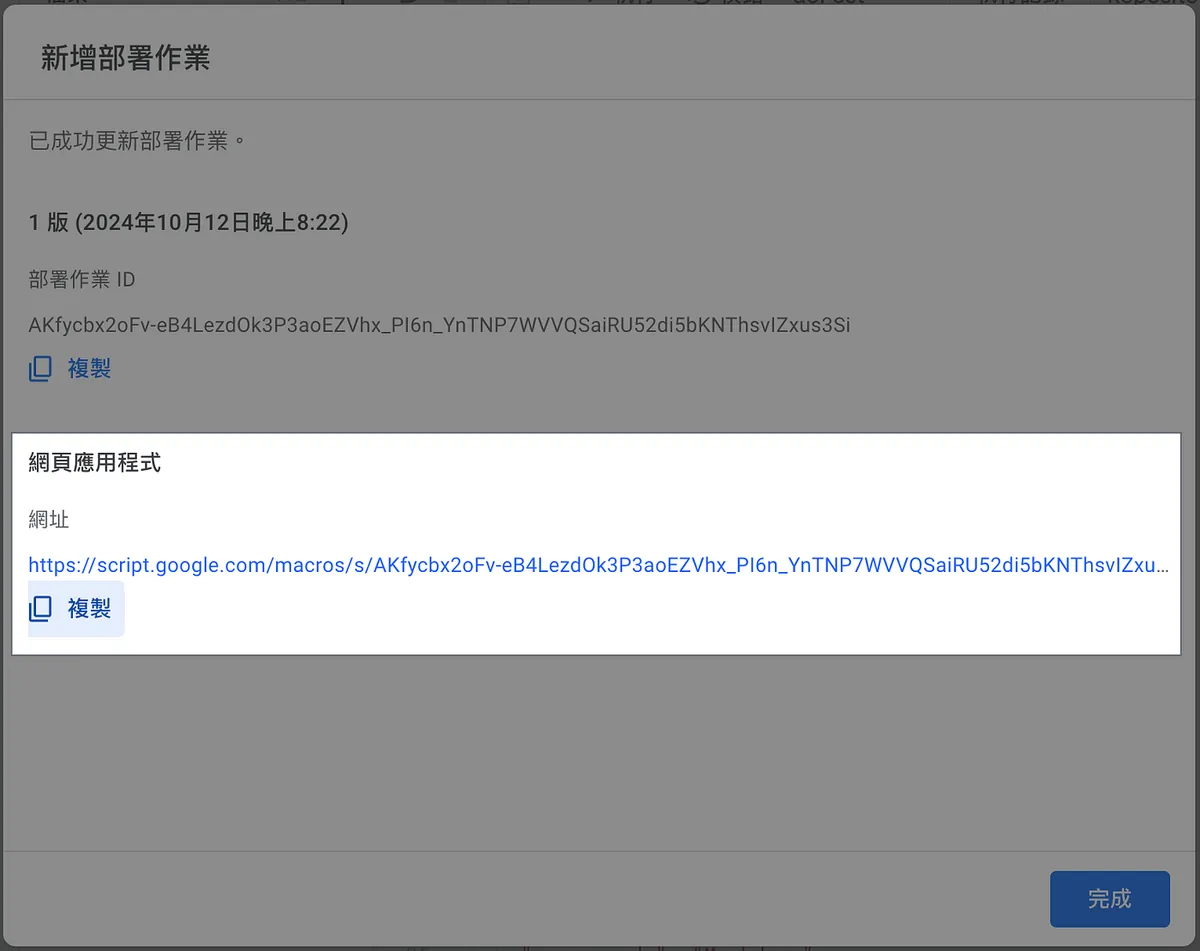
- Web application URL:
Your Webhook URL.
Copy it.
e.g.https://script.google.com/macros/s/AKfycbx2oFv-eB4LezdOk3P3aoEZVhx_PI6n_YnTNP7WVVQSaiRU52di5bKNThsvIZxus3Si/exec
For deploying, updating, using, and debugging Google Apps Script web applications, please refer to my previous article “Automating Google Services with Google Apps Script RPA”.
⚠️⚠️⚠️ Please note, if you make changes to the Google Apps Script code, you must click Deploy -> Manage Deployments -> Select Create New Version for the changes to take effect. For details, refer to the article above.
⚠️⚠️⚠️Please note, if you make changes to the Google Apps Script code, you must click Deploy -> Manage Deployments -> Select Create New Version for the changes to take effect. For details, please refer to the article above.
⚠️⚠️⚠️Please note, if you make changes to the Google Apps Script code, you must click Deploy -> Manage Deployments -> Select Create New Version for the changes to take effect. For details, please refer to the article above.
Step 3. Register Webhook
Use the Telegram API /setWebhook to register your Webhook URL.
Request:
curl --location 'https://api.telegram.org/你的_BOT_API_Token/setWebhook' \
--form 'url="Your Webhook URL"'
Response:
{
    "ok": true,
    "result": true,
    "description": "Webhook was set"
}
Test
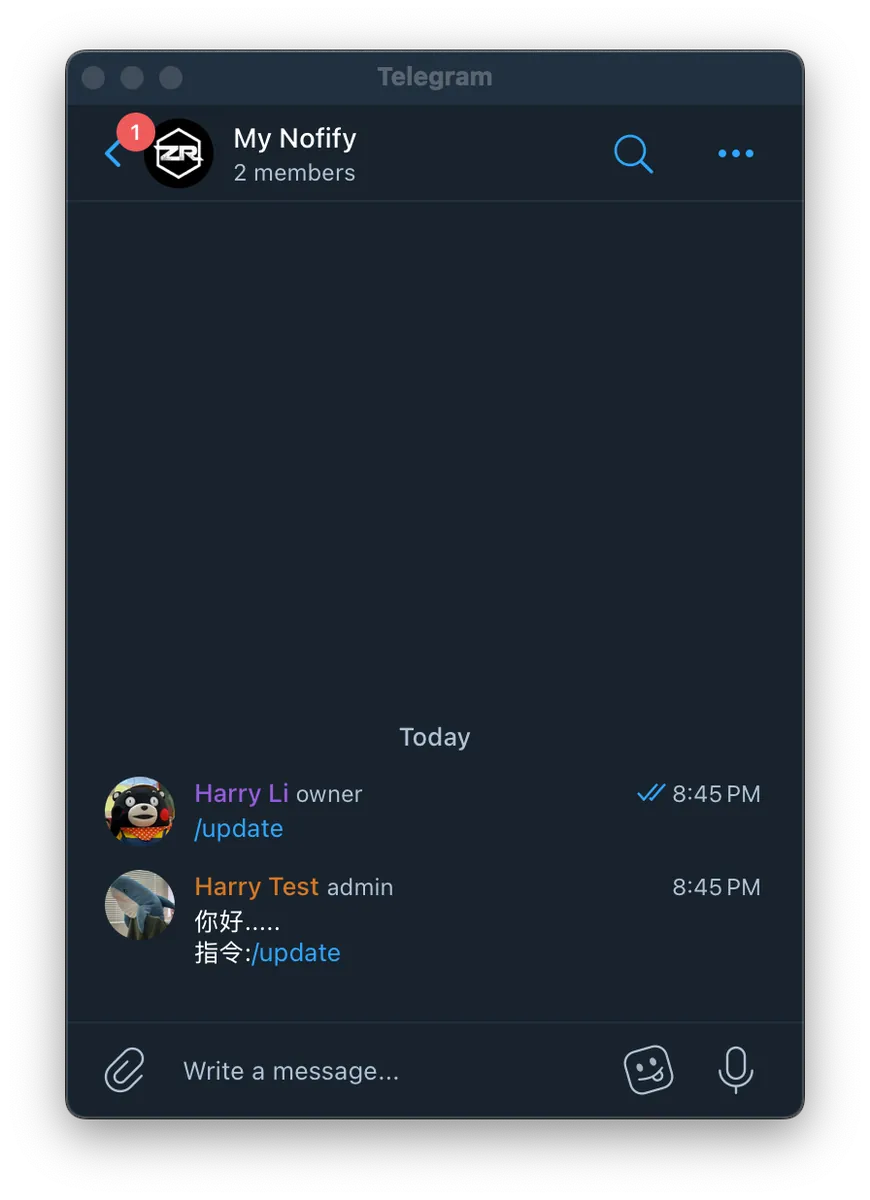
-
We will respond based on different Chat IDs, so the bot can reply in both 1:1 chats and group chats where the bot is present.
-
Success 🎉🎉🎉
Next:
Other Google Apps Script Automation Articles
Note
This is also my 100th article on Medium (first one published in 2018/10 here, six years ago). I will keep persevering and working hard. I’ll share detailed insights and data once I reach 1000 followers (currently 925 as of 2024/10) or a total of 1,000,000 views (currently 984,549 as of 2024/10).

Comments