
What can you do to commemorate when an App product reaches its end?
Using mitmproxy + Apple Configurator to Keep an App Forever in Its Pre-Removal State
Preface

Jujutsu Kaisen
After working for a long time and handling many products, I’ve started to face products I once worked on reaching their end point (discontinuation). Developing a product from scratch is like nurturing a new life; the team worked hard for 3–4 months to bring it to life. Although later it was handed over to other caretakers (engineers) for continued development, hearing that it’s about to reach the end of its product life cycle still brings some regret.
Life is the same; we never know if the sun will rise first or if an accident will come first tomorrow. The only thing we can do is cherish the present and do things well.
Remembrance
Wherever we go, traces are left behind. We hope to do something before the product reaches its end, giving everyone a chance to remember and at least leaving proof that it existed. The following methods all require the app to still be online; if it has already been removed, only memories remain.
Non-technical Method — Screen Recording
Besides using the iPhone’s built-in screen recording feature directly, we can also connect the iPhone to a Mac and use QuickTime Player to record and export the video on the computer.
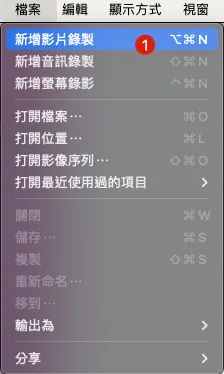
- Open the QuickTime Player app on your Mac
- In the top-left toolbar, select “File” -> “New Movie Recording”
- After exiting the recording interface, click the “v” next to the 🔴, then select your connected iPhone for both screen and speaker.

- At this point, the recording interface will display the phone screen.

Click the “🔴” to start recording, then return to your phone to perform the actions you want to record.

During recording, the current video size will be displayed. To stop recording, press the “🔴” button again.
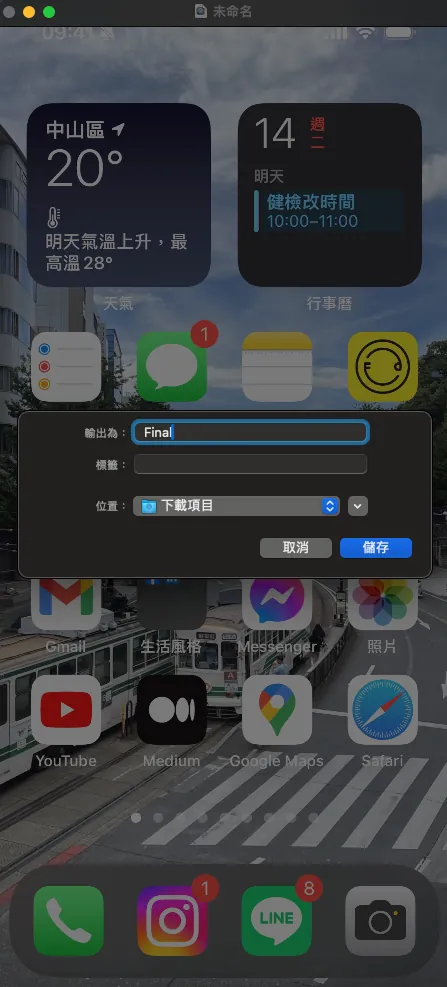
You can easily trim the video using the QuickTime Player toolbar, then press “Command” + “s” to export and save the video to a chosen location, completing the recording for remembrance.
The advantage of video keepsakes is that they make it easier to connect memories than pictures. The deeper you record, the more detailed the documentation. If you want to turn specific scenes into images, you can simply take screenshots, which is very convenient.
Technical Methods
App technical backup can be divided into two directions: the “bones,” which is the App itself as a framework, and the “flesh,” composed of API Response Data, which forms the core content of the App.
-
The “bones” disappear when the App is removed from the App Store.
-
The “meat” disappears as the API host and servers shut down.
Therefore, we also divide the backup into two technical methods: the skeleton and the flesh.
Disclaimer
This article is for technical research sharing only and does not encourage any illegal or infringing activities.
[Bone] Backup .ipa App Installation File
After an app is removed from the store, it will remain on any device that has already downloaded it, as long as the user does not delete it. When switching phones, the app will also be transferred through the device migration process.
But if we accidentally delete the App or switch phones without transferring it, then it’s really goodbye forever; at this point, having a manual backup of the store’s .ipa file allows you to revive it again.
A long time ago, the reverse engineering article mentioned this, but this time we only need to simply back up the .ipa file without cracking it, all done using Apple’s official tools.
1. Install Apple Configurator 2
First, go to the Mac App Store to download and install Apple Configurator 2
2. Connect your iPhone to your Mac and tap Trust This Computer
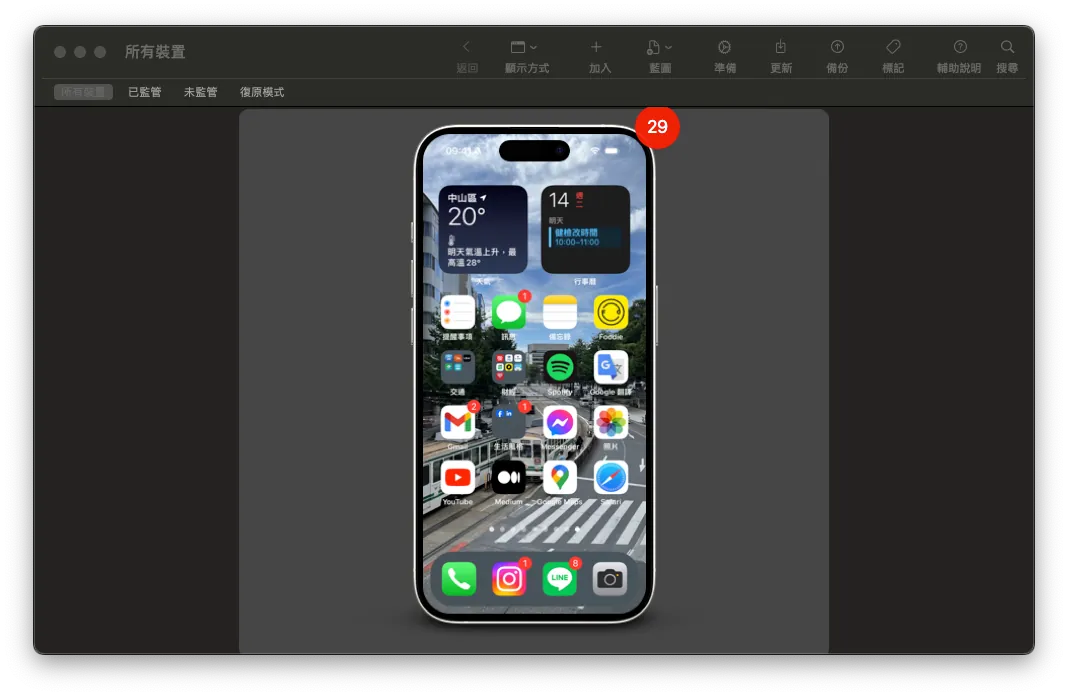
After a successful connection, the iPhone home screen will appear.
3. Confirm that your phone has the App installed for the .ipa file you want to back up

We need to capture the replacement screen in Apple Configurator 2 to obtain the .ipa file downloaded to the cache. Therefore, we must first ensure the target app is installed on the iPhone.
4. Back to Apple Configurator 2 on Mac
Double-click the iPhone home screen shown above to enter the information page.

Switch to “Apps” -> Top right corner “+ Add” -> “App”
After signing in to your App Store account, you can access the list of apps you have previously purchased.
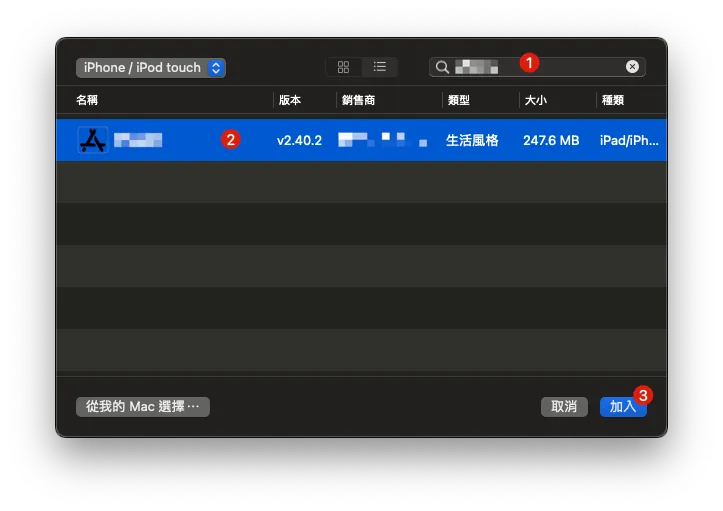
Search for the target App you want to back up, then select it and click “Add”.
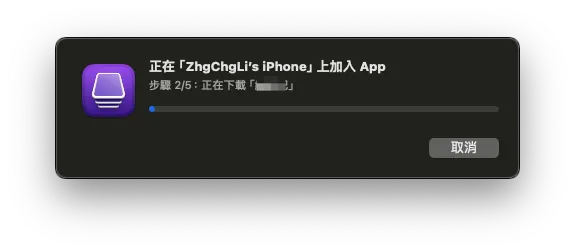
A waiting window will appear, showing “Adding App on XXX” and “Downloading ‘XXX’.”
5. Extracting the .ipa File
After waiting for the download to complete, a prompt will appear asking whether to replace the currently installed app.
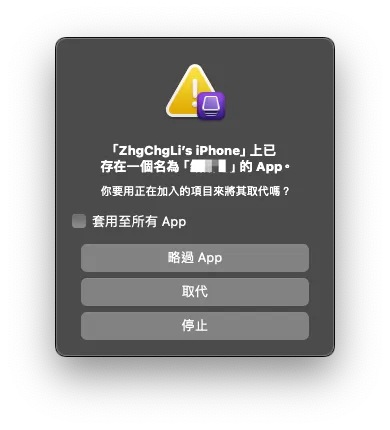
Do not press any buttons at this time. Do not press any buttons at this time. Do not press any buttons at this time.
We open a Finder:
In the top-left toolbar, select “Go” -> “Go to Folder”
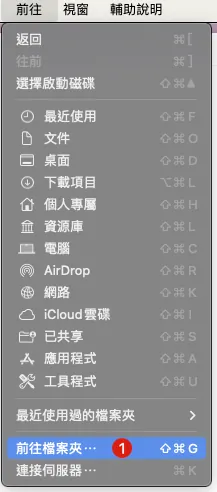
Paste the following path:
~/Library/Group Containers/K36BKF7T3D.group.com.apple.configurator/Library/Caches/Assets/TemporaryItems/MobileApps
You can find the target App .ipa file that is downloaded and ready to be installed:
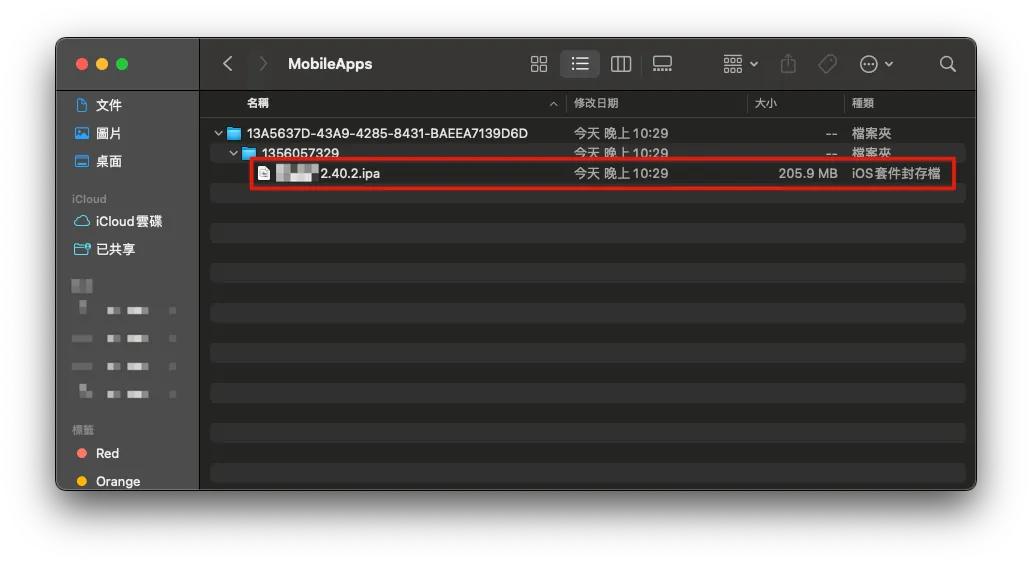
Simply copying it completes the backup of the App .ipa file.
After completing the file copy, go back to Apple Configurator 2 and click Stop to terminate the operation.
[Bone] Restore .ipa App Installation File
Similarly, connect the iPhone with the App to be restored to the Mac and open Apple Configurator 2, then go to the Add Apps interface.
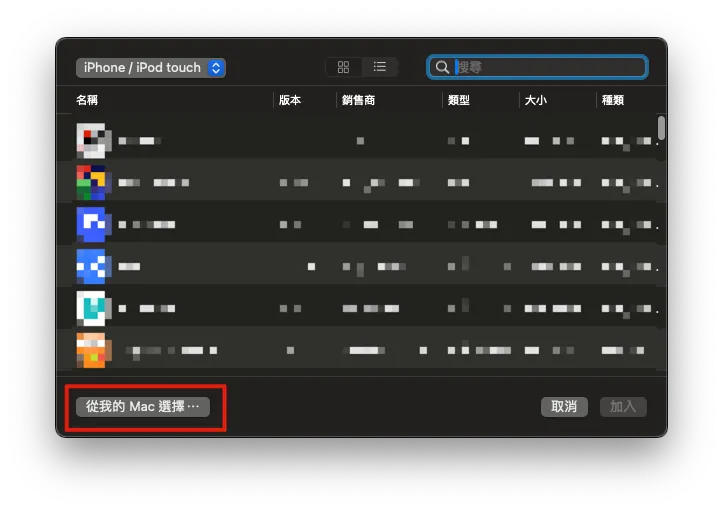
To restore, select “Choose from my Mac…” at the bottom left.

Select the App .ipa file to back up, then click “Add”.
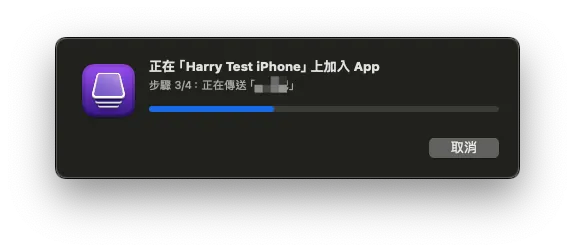
Wait for the transfer and installation to complete. Then, you can reopen the App on your phone—successfully revived!
[Meat] Backing Up the Final API Response Data
Here we will use the method and the open-source project from the previous article App End-to-End Testing Local Snapshot API Mock Server (refer to it for detailed principles):
Similar to the previous technique of recording API Request & Response for E2E Testing, we can also use it to capture the final API Request & Response Data before an App is taken down or shut off.
1. Install mitmproxy
brew install mitmproxy
mitmproxy is an open-source man-in-the-middle attack and network request sniffing tool.
If you are not familiar with how Mitmproxy man-in-the-middle works, you can first refer to my previous article: “APP有用HTTPS傳輸,但資料還是被偷了。” or the Mitmproxy official documentation.
For pure network request sniffing, if you find the mitmproxy interface uncomfortable, you can switch to using Proxyman. Refer to the usage in the previous article.
2. Complete mitmproxy Certificate Setup
For HTTPS encrypted connections, we need to use root certificate replacement to perform a man-in-the-middle attack. Therefore, the first time you use it, you must download and enable the root certificate on the mobile device.
If your App & API Server implement SSL Pinning, you also need to add the pinning certificate to mitmproxy.
-
First, ensure that the iPhone and Mac are connected to the same network environment.
-
If there is no WiFi and the computer is connected to a physical network, you can also enable Mac’s WiFi sharing feature to let your phone connect to the Mac’s network.
Start mitmproxy or mitmweb (Web GUI version) in the Terminal.
mitmproxy
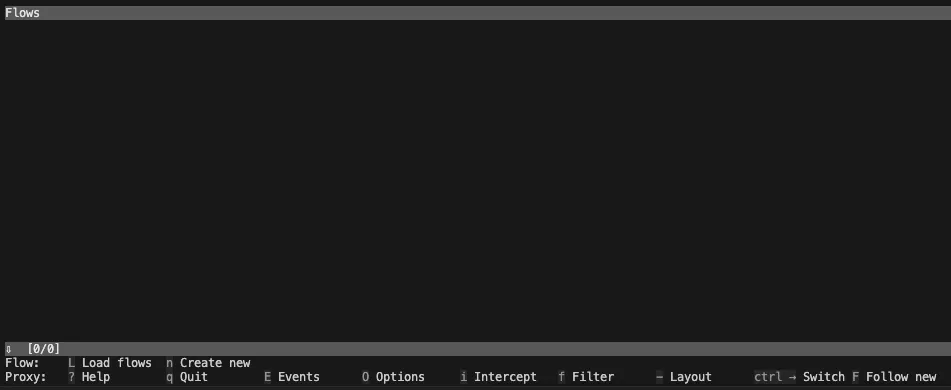
Seeing this screen means the mitmproxy service has started. There is no traffic yet, so it is empty. Keep this Terminal window open and do not close it.
- Check the Mac’s IP address in the Mac Network Settings
Go back to the phone’s WiFi settings and tap the “i” to enter detailed settings. Find the “Configure Proxy” option at the bottom:
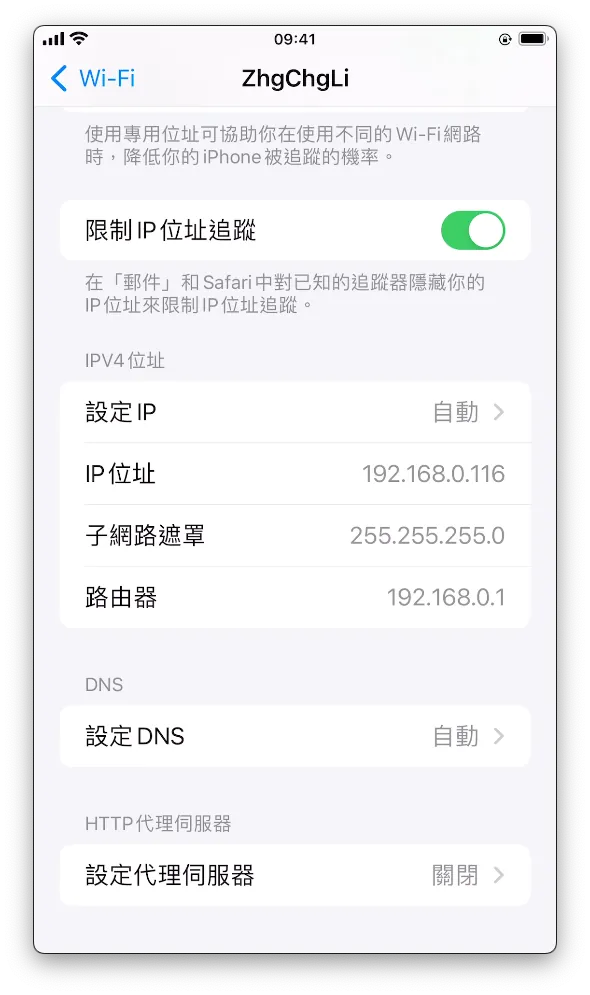
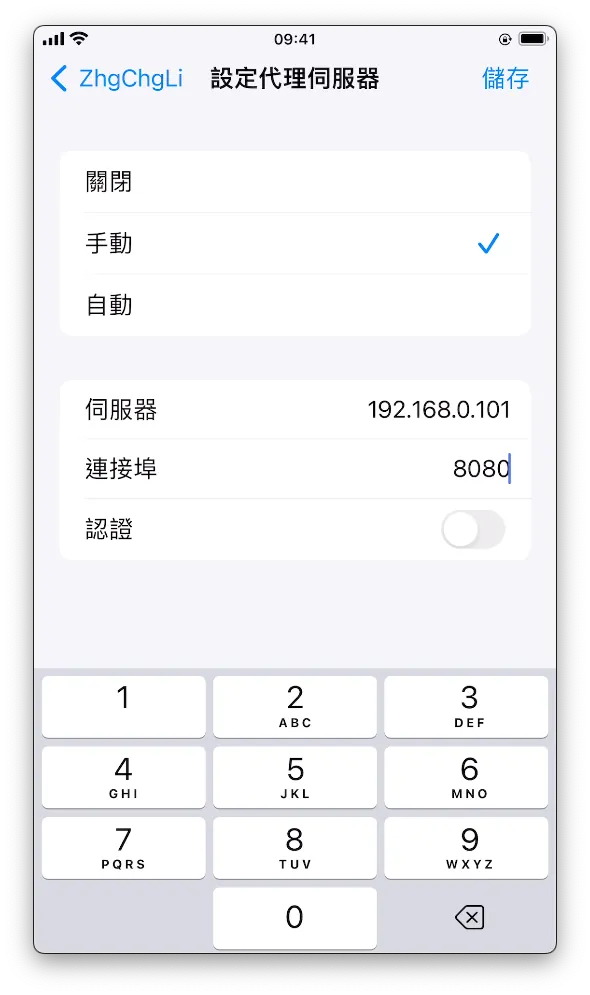
-
Enter the Mac computer’s IP address on the server
-
Enter port 8080
-
Save
Open Safari on your phone and enter: http://mitm.it/
If the following appears:
// If you can see this, traffic is not passing through mitmproxy.
This indicates that the phone’s network proxy server is not set up correctly or that mitmproxy is not running on the Mac.
Under normal circumstances, the following will appear:
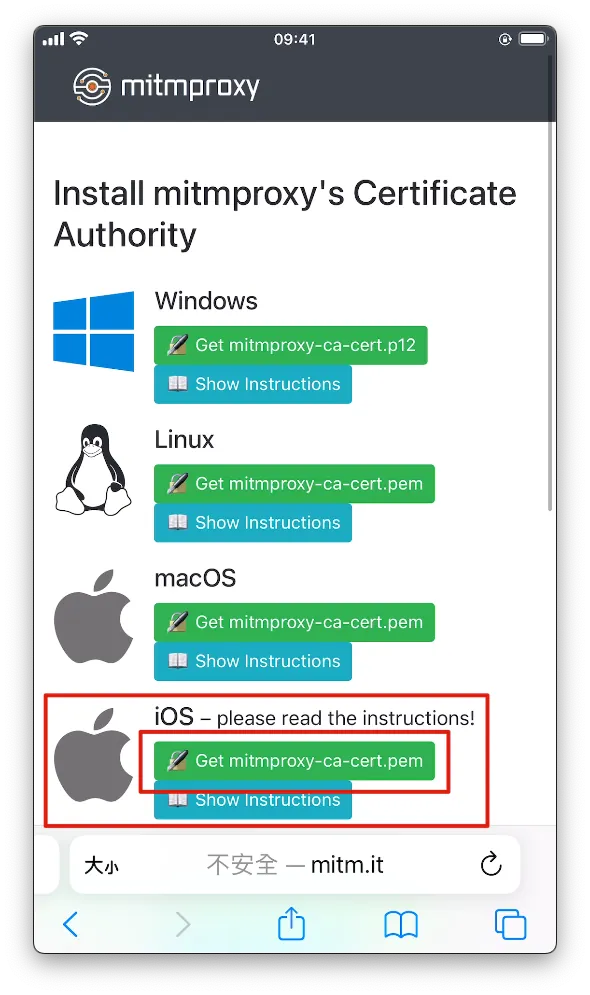
At this point, only HTTP traffic can be sniffed; HTTPS traffic will cause errors. We will continue with the setup.
Indicates a successful connection. We locate the iOS section and click “Get mitmproxy-ca-cert.pem”.
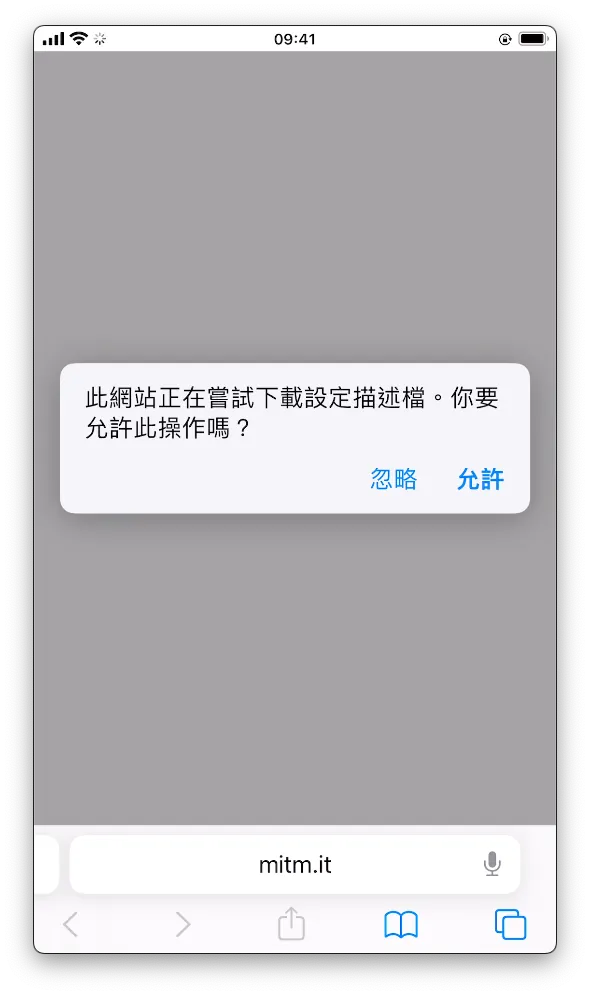
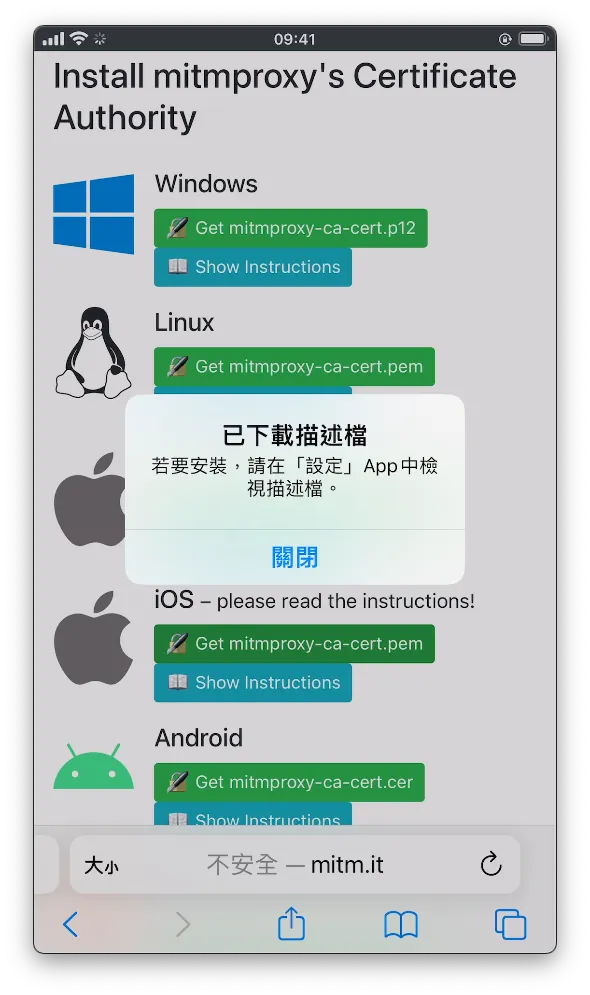
- Click “Allow”
After downloading, go to the phone’s Settings, where you will see “Profile Downloaded.” Tap to enter.
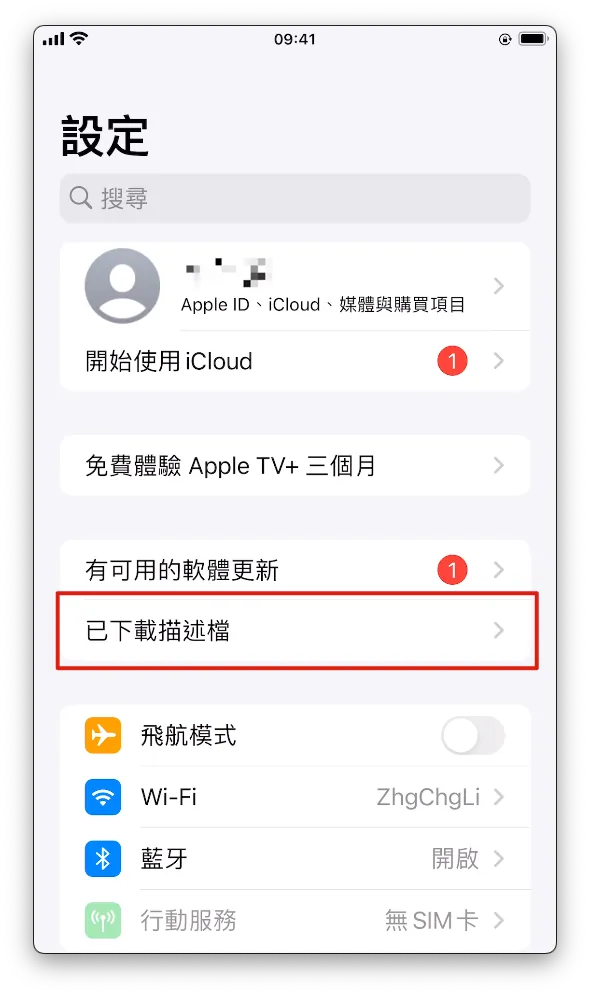
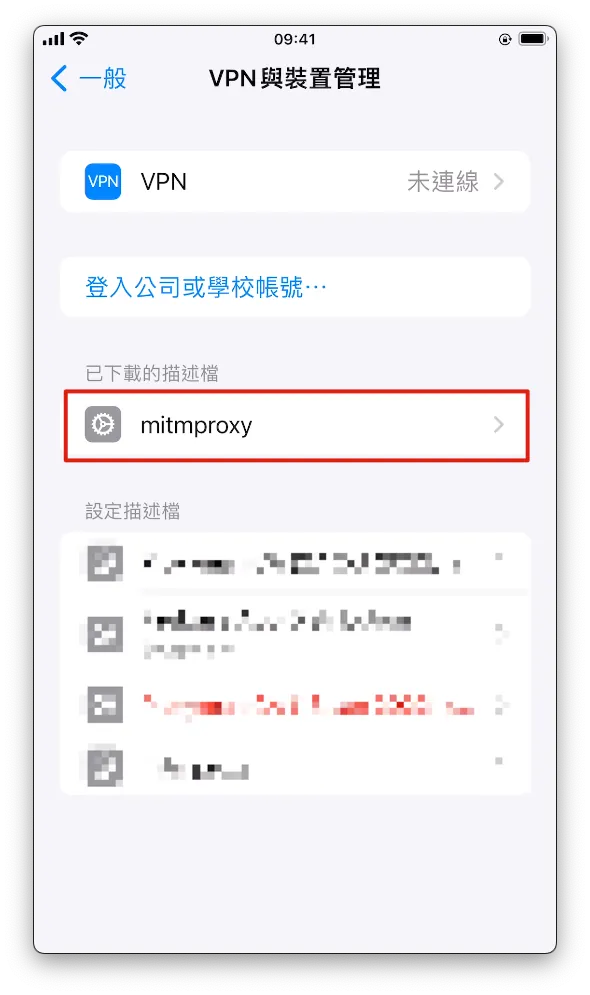
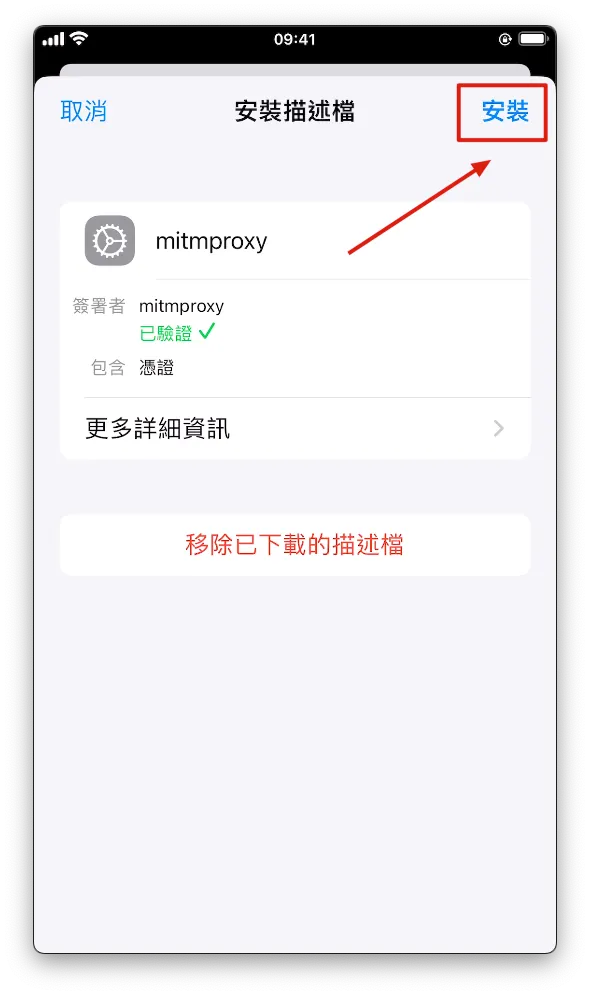
- Click to enter, tap “Install” at the top right, and enter your phone password to complete the installation.
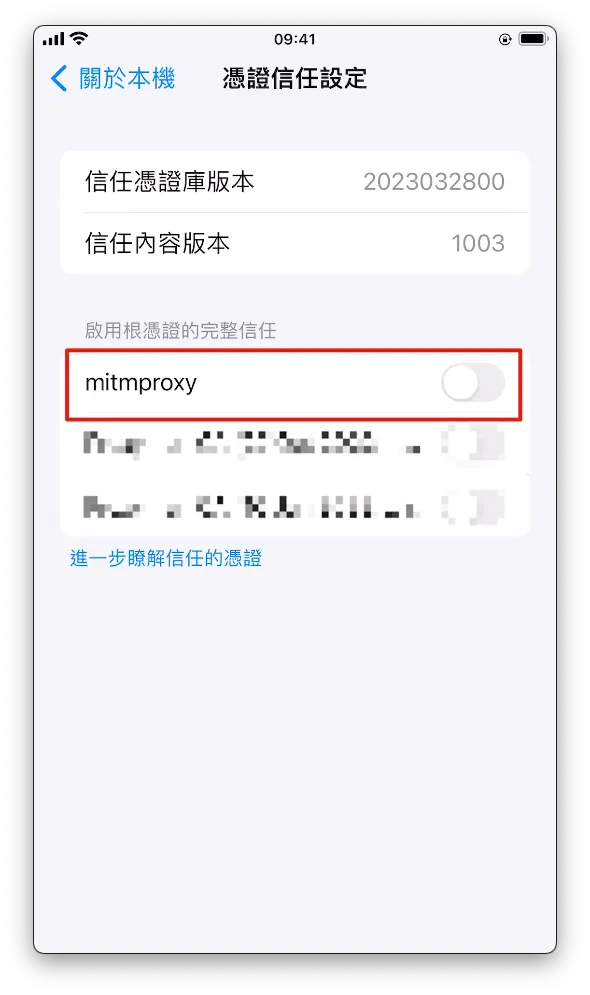
Go to Settings -> “General” -> “About” -> Scroll down to “Certificate Trust Settings” -> Enable “mitmproxy”.
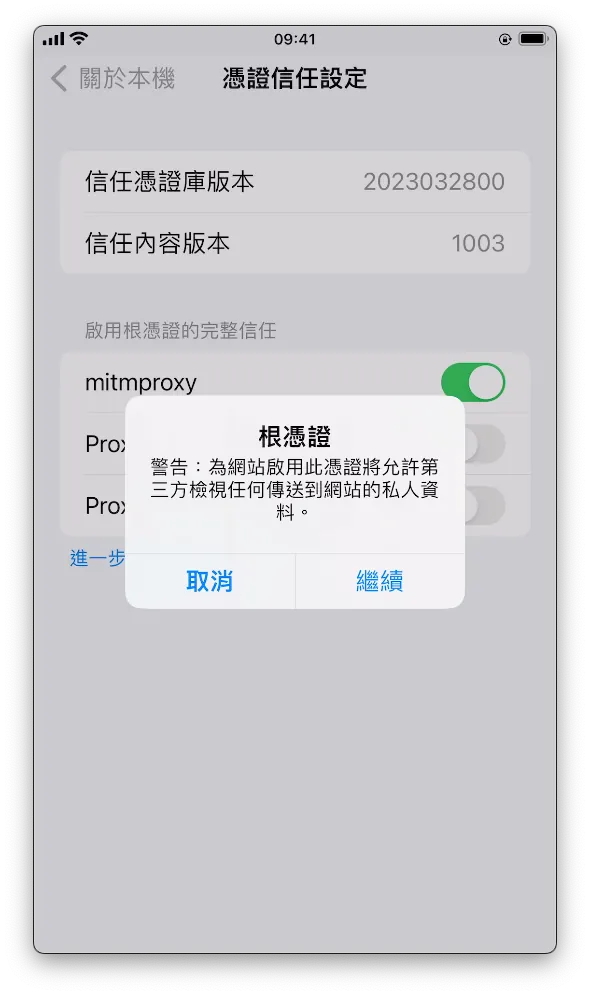
- Click “Continue” to complete activation.
At this point, we have completed all the preparatory work for the man-in-the-middle attack.
Remember that all the traffic from your phone will go through the proxy on your Mac. After finishing, make sure to turn off the proxy server setting in your phone’s network settings, otherwise the phone’s WiFi will not connect to the internet.
Back in the Terminal mitmproxy, you can see all the captured API request logs while operating the App on your phone.
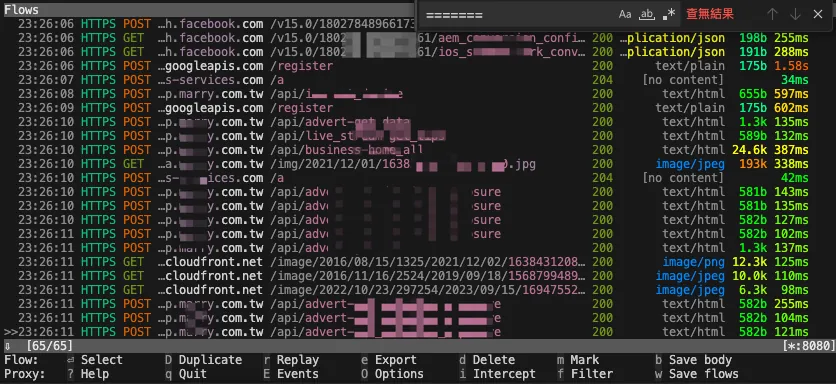
Each request allows you to view detailed Request & Response content:
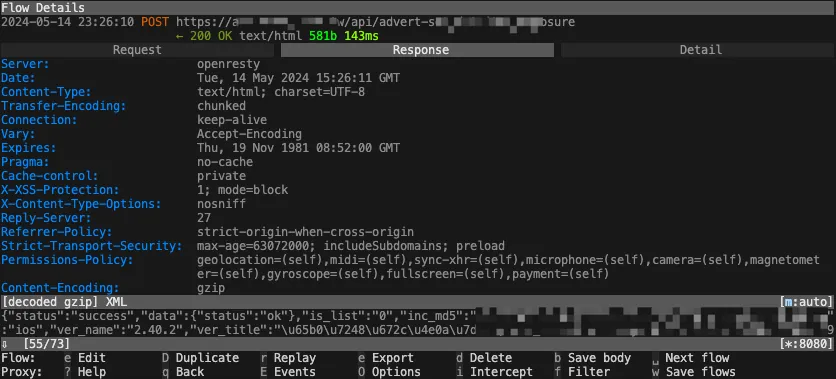
The above covers the basic setup and actual operation of mitmproxy.
3. Sniffing and Understanding the API Structure
Next, use mitmproxy’s mitmdump service combined with my previously developed mitmproxy-rodo addons to record and replay requests.
My implementation principle is to hash the request parameters, and during playback, hash the request again. If a matching hash is found locally, the backup response is returned. If multiple requests have the same hash, they are stored and played back in order.
We can first sniff the App’s API using the methods above (or use Proxyman) to observe which fields may affect Hash Mapping. These can be recorded and excluded in later settings. For example, some APIs always include a ?ts parameter that doesn’t affect the response content but changes the Hash calculation, causing the local backup to be missed. We need to identify and exclude such parameters in later configurations.
4. Set up mitmproxy-rodo :
Use the open-source recording and playback script I wrote.
For detailed parameter settings, please refer to the documentation of the open-source project.
git clone [email protected]:ZhgChgLi/mitmproxy-rodo.git
cd mitmproxy-rodo
Fill the parameters selected in step 3 into the config.json configuration file:
{
  "ignored": {
    "*": {
      "*": {
        "*": {
          "iterable": false,
          "enables": [
            "query",
            "formData"
          ],
          "rules": {
            "query": {
              "parameters": [
                "ts",
                "connect_id",
                "device_id",
                "device_name",
              ]
            },
            "formData": {
              "parameters": [
                "aidck",
                "device_id",
                "ver_name",
              ]
            }
          }
        }
      }
    }
  }
}
These parameters are excluded when calculating the Hash value, and specific exclusion rules can be set for individual Endpoint paths.
5. Enable recording, then run the following in Terminal:
mitmdump -s rodo.py --set dumper_folder=zhgchgli --set config_file=config.json --set record=true "~d zhgchg.li"
-
The ending
"~d zhgchg.li"means to only capture traffic for *.zhgchg.li. -
dumper_folder: Output destination directory name
6. Return to the phone and operate the target App to perform the process path you want to record
-
It is recommended to restart and reinstall the App to begin with the cleanest setup.
-
It is recommended to record the screen to help recall the reproduction steps.
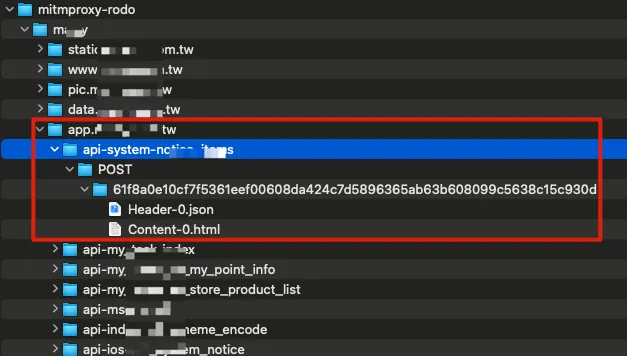
While operating, you can see the output directory contains many captured API Response Data, stored following Domain -> API Path -> HTTP Method -> Hash Value -> Header-X / Content-X (if the same Hash request occurs twice, they will be saved in order).
-
Re-recording can be done by simply deleting the output directory to allow re-capturing.
-
If the returned data contains personal information, please make sure to anonymize the captured content.
[Meat] Replay Captured API Response Data
After recording, be sure to try playback once to test if the data is correct. If the Hash Hit is very low (almost no matching Response found during playback), you can repeat the sniffing process to find the variable that changes each time the App runs and affects the Hash value, then exclude it.
Playback Execution:
mitmdump -s rodo.py --set dumper_folder=zhgchgli --set config_file=config.json
-
dumper_folder: Output destination directory name -
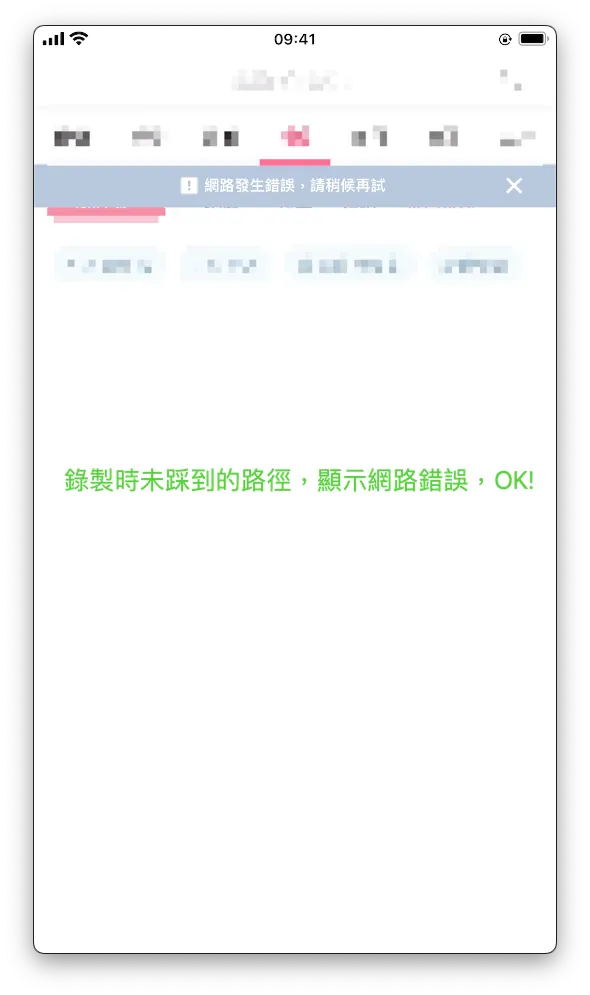
By default, local Response Data without Hash Mapping will return a 404, leaving the App blank. This helps verify if the captured data is valid.

-
The recorded captured path pages can be replayed and displayed again: OK!
-
Recording captures paths not previously visited, playback shows network error: OK!
Remembrance
By now, we can restore the “bones” and the final “flesh” ourselves to recreate the last moments of the App before it reached its end, cherishing the time when everyone worked together to create it.
This article is dedicated to the team of my first job and my journey of transitioning from web backend development to iOS App development through learning on the job. Within a short 3–4 months, I independently built the product from scratch and successfully launched it together with Android developers, designers, PMs, managers, and backend colleagues. Although the product is now approaching the end of its life cycle, I will always remember the bittersweet experiences and the excitement of seeing it go live and being used for the first time.
“Thank you”
Contributions Welcome
If you share the same regret, I hope this article can help you. The tool mitmproxy-rodo was initially developed as a proof-of-concept. Contributions, bug reports, or PRs to fix bugs are welcome.


Comments