
Plane.so Docker Self-Hosted Setup Record
Plane Self-Hosted Docker Setup, Backup, Restore, and Nginx Domain Reverse Proxy Configuration Guide
️⚠️️️️⚠️️️️⚠️️️️2025 Update️ ⚠️️️️⚠️️️️⚠️️️️
Plane.so is no longer recommended because it initially grew by relying on open-source projects and self-hosting support, but later versions moved many features into paid plans. Even self-hosting requires purchasing licenses to enable features, and there are user limits for self-hosted setups, which no longer matches the original expectations. Additionally, the pricing plans are very confusing, with lifetime, Pro, Business options… It’s uncertain whether new plans will be introduced, locking new features behind them even after payment.
Preface
Plane.so is a free, open-source, self-hosted project management tool similar to Asana, Jira, and ClickUp. It was founded in 2022, with the first version released in 2023, and is still in development.
For detailed usage and development processes, please refer to the previous article “Plane.so Free Open-Source and Self-Hosted Asana/Jira-like Project Management Tool”. This article only documents the process of self-hosting Plane.so using Docker.
Self-Hosted Plane
![]()
-
Supports Docker, K8s / Cloud, and private on-premise installation
-
Self-Hosted is the Community Edition (officially abbreviated as CE) version
-
Self-Hosted may not include all features of the Cloud version
-
The Self-Hosted version’s features are set to match the Cloud free version by default, but upgrading to a paid plan is still required to use additional features.
-
This article uses Docker + private local installation as an example
-
Currently, the official version does not support exporting from Cloud and importing into the Self-Hosted version; you can only achieve this through API integration yourself.
-
Official Notice: Upgrade Machine Performance for Over 50 Users
We have seen performance degradation beyond 50 users on our recommended 4 GB, 2vCPU infra. Increased infra will help with more users. -
Open-sourced under the AGPL-3.0 license, the first version was released in January 2023. It is still under active development and does not have an official release version yet.
-
Please note that open source and support for Self-Hosted do not mean free of charge.
-
A complete example configuration repo is provided at the end.
Docker Installation
This article will not cover the introduction. Please refer to the official Docker installation guide to complete the local Docker environment setup. The following example uses Docker on macOS.
Plane @ Docker Installation
Refer to the official manual.
- Create Directory & Download Installation Script
mkdir plane-selfhost

cd plane-selfhost

curl -fsSL -o setup.sh https://raw.githubusercontent.com/makeplane/plane/master/deploy/selfhost/install.sh

chmod +x setup.sh
- Ensure Docker is installed and running, then execute the script
./setup.sh
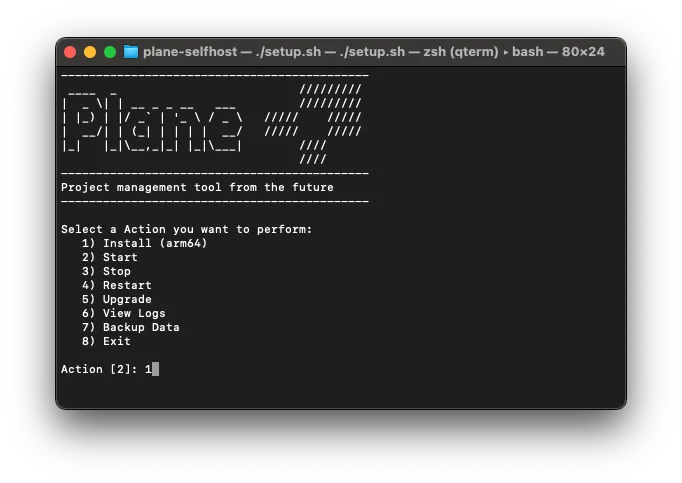
- Enter
1to install (download Images)

- Waiting for all Plane-related images to be fully pulled
- After images are pulled, go to the
./plane-appfolder and open the.envconfiguration file.
APP_RELEASE=stable

WEB_REPLICAS=1
SPACE_REPLICAS=1
ADMIN_REPLICAS=1
API_REPLICAS=1

NGINX_PORT=80
WEB_URL=http://localhost
DEBUG=0
SENTRY_DSN=
SENTRY_ENVIRONMENT=production
CORS_ALLOWED_ORIGINS=http://localhost

#DB SETTINGS
PGHOST=plane-db
PGDATABASE=plane
POSTGRES_USER=plane
POSTGRES_PASSWORD=plane
POSTGRES_DB=plane
POSTGRES_PORT=5432
PGDATA=/var/lib/postgresql/data
DATABASE_URL=

# REDIS SETTINGS
REDIS_HOST=plane-redis
REDIS_PORT=6379
REDIS_URL=

# Secret Key
SECRET_KEY=60gp0byfz2dvffa45cxl20p1scy9xbpf6d8c5y0geejgkyp1b5

# DATA STORE SETTINGS
USE_MINIO=1
AWS_REGION=
AWS_ACCESS_KEY_ID=access-key
AWS_SECRET_ACCESS_KEY=secret-key
AWS_S3_ENDPOINT_URL=http://plane-minio:9000
AWS_S3_BUCKET_NAME=uploads
MINIO_ROOT_USER=access-key
MINIO_ROOT_PASSWORD=secret-key
BUCKET_NAME=uploads
FILE_SIZE_LIMIT=5242880

# Gunicorn Workers
GUNICORN_WORKERS=1

# UNCOMMENT `DOCKER_PLATFORM` IF YOU ARE ON `ARM64` AND DOCKER IMAGE IS NOT AVAILABLE FOR RESPECTIVE `APP_RELEASE`
# DOCKER_PLATFORM=linux/amd64
-
By default, the Plane service starts on port
:80. You can change the port if there is a conflict. -
Complete the setup adjustments (directly modifying
docker-compose.ymlis not recommended because future Plane updates will overwrite this file)
Plane @ Docker Startup
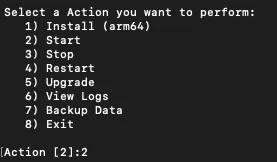
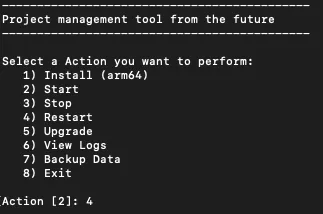
- Run ./setup.sh again
- Enter
2to start Plane:
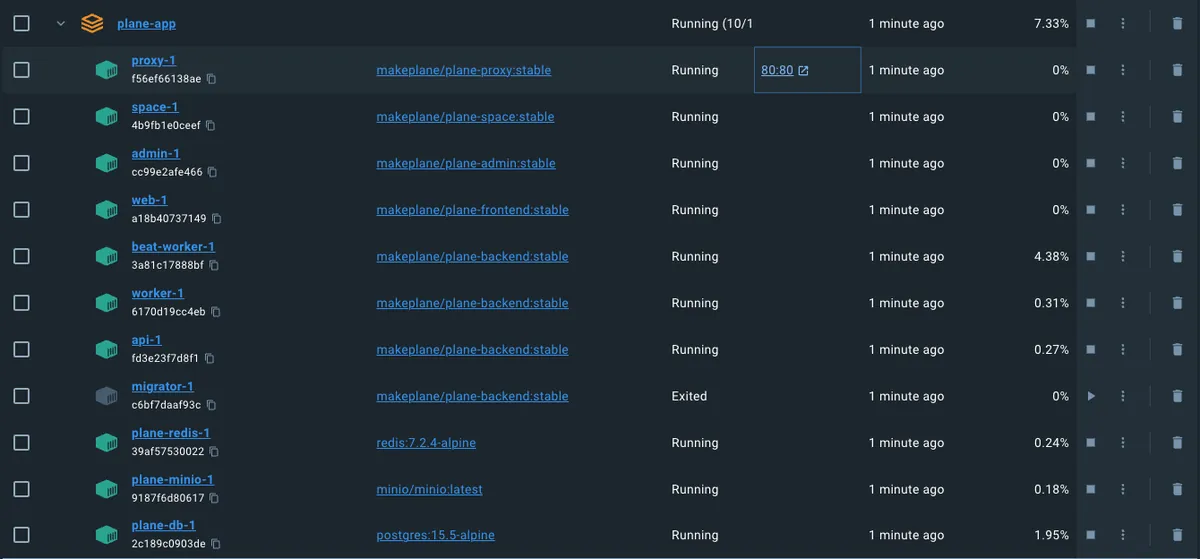
- After startup is complete and all services are confirmed running, open the URL
/god-mode/to perform the initial setup:
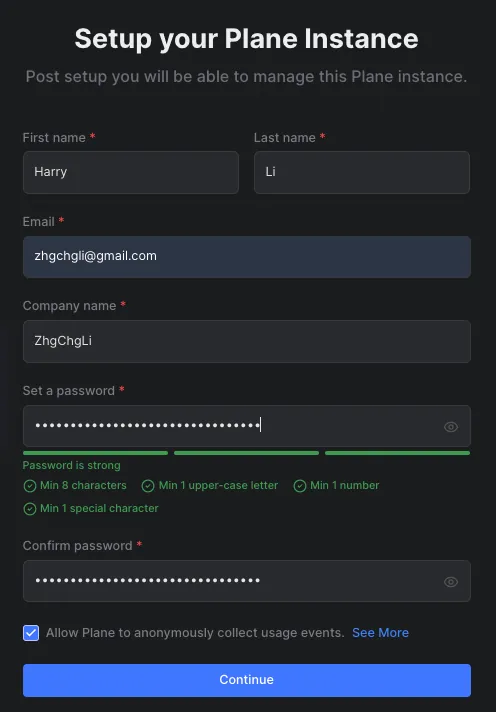
-
The account credentials set here have the highest administrative privileges (God/Admin Mode).
-
For security reasons, the password must include special characters, be longer than 8 characters, and contain numbers, uppercase, and lowercase letters; otherwise, it cannot be submitted.
-
If this step is not configured, the homepage login will display
Instance not configured. Please contact your administrator.
Plane God/Admin Mode Management Backend
You can access the Plane service settings at the /god-mode/ URL. This is where you configure the entire Plane environment.
General Settings:
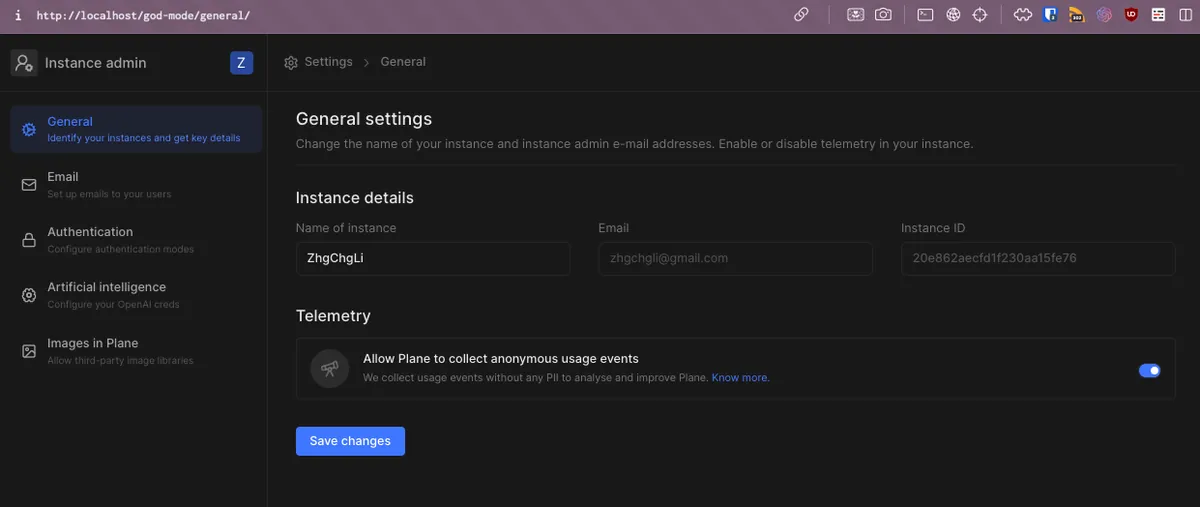
General Settings.
Email:
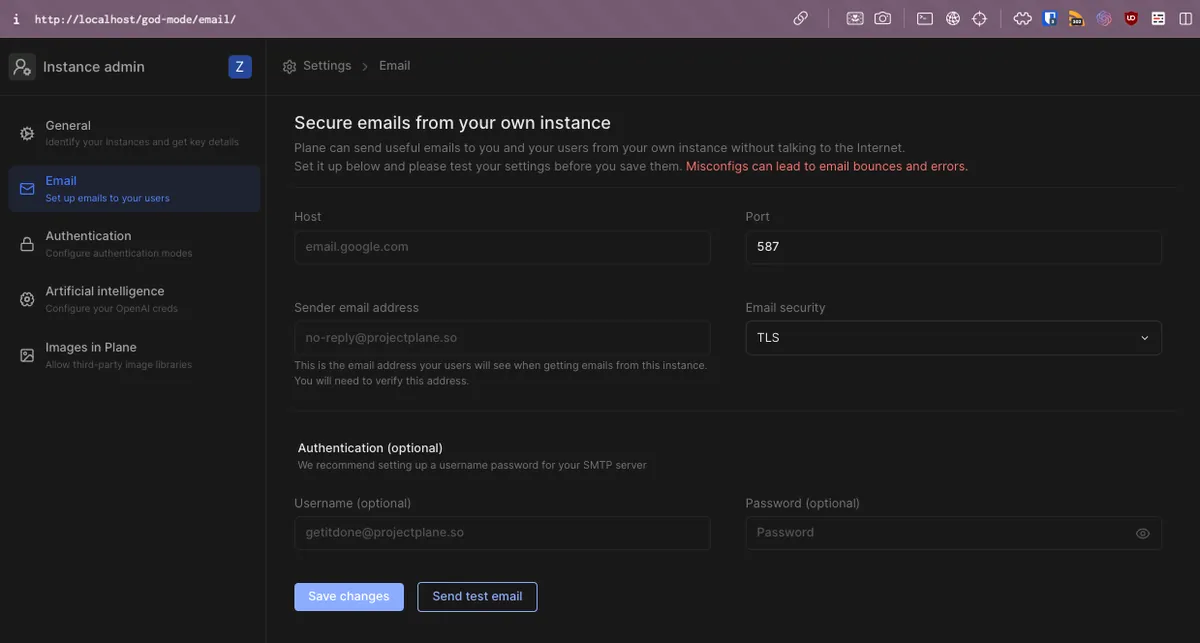
- Email Notification SMTP Settings
If you don’t want to set up your own SMTP server, you can use GMAIL SMTP directly to send emails:
-
Host:
smtp.gmail.com -
Port:
465 -
Sender email address: The email shown in the message e.g.
[email protected] -
Username: Your Gmail account
-
Password: Your Gmail password, if you have two-factor authentication enabled, use an app password.
-
If there is no response after configuration, please check the Port and Email Security settings (TLS/STARTTLS: use port 587, SSL: use port 465).
Another idea is that since Plane currently does not support Slack notifications, you can set up an SMTP server to receive email notifications and use a Python script to convert them into Slack notifications.
Authentication
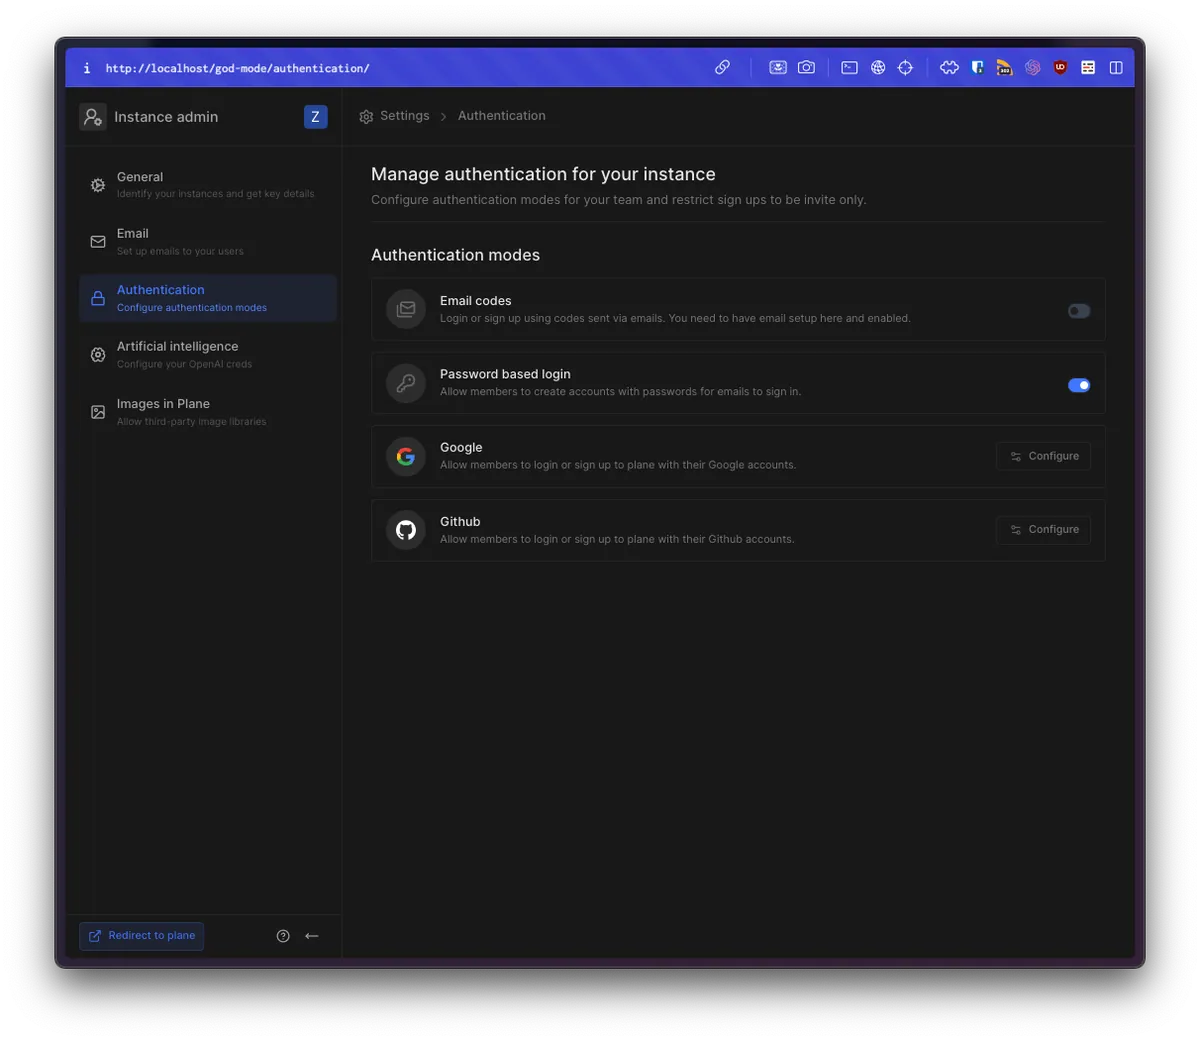
Plane service login uses authentication methods. To restrict access to only Google organization email accounts, you can disable “Password based login” and enable only the “Google” login option. Then, generate a login app from the Google login side that limits usage to accounts within the organization.
Artificial Intelligence
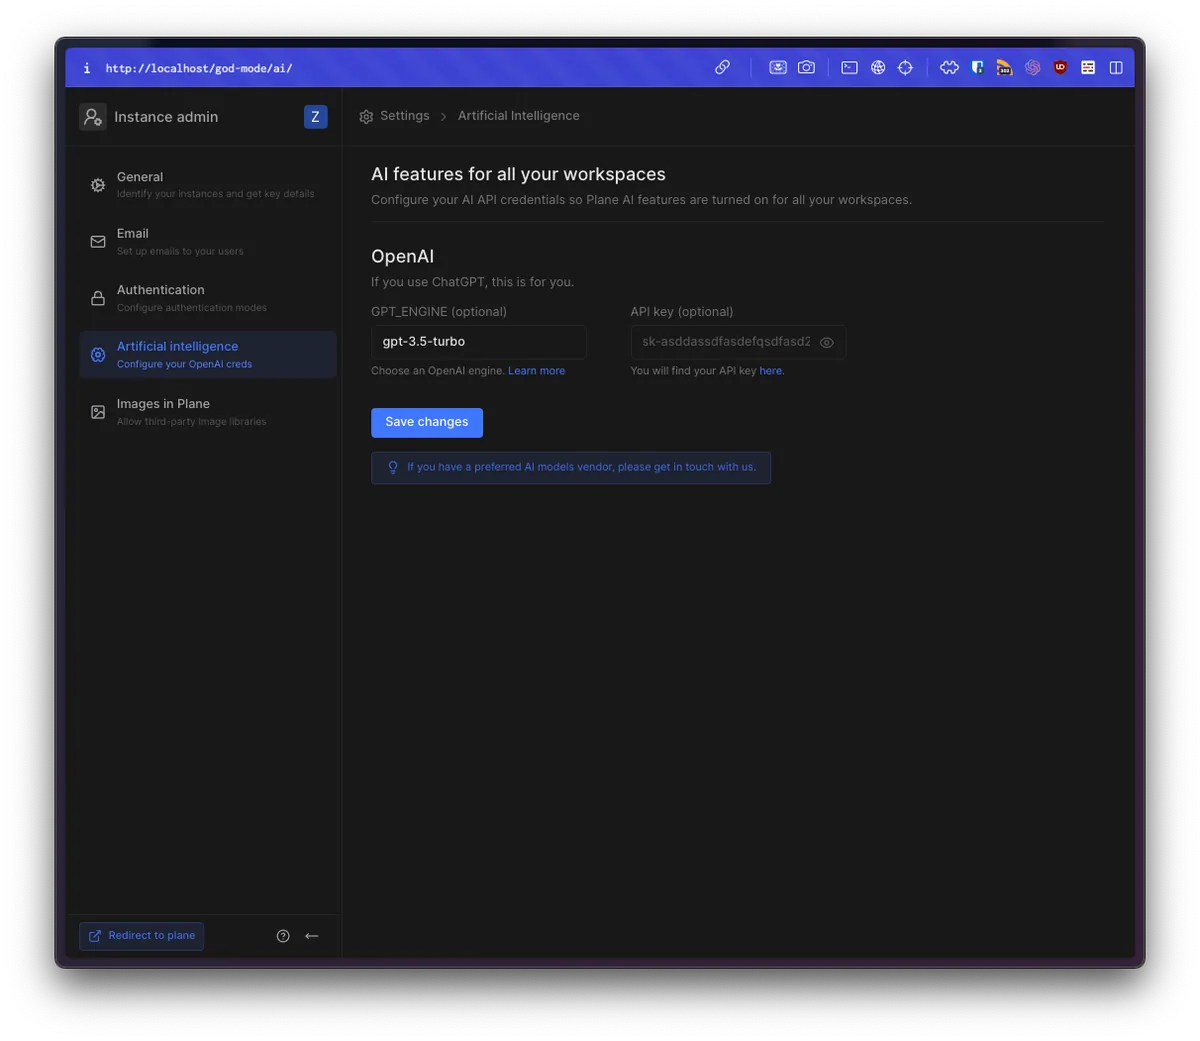
AI-related settings currently have limited functionality. With a key configured, AI can assist in writing Issue Descriptions.
Image in Plane
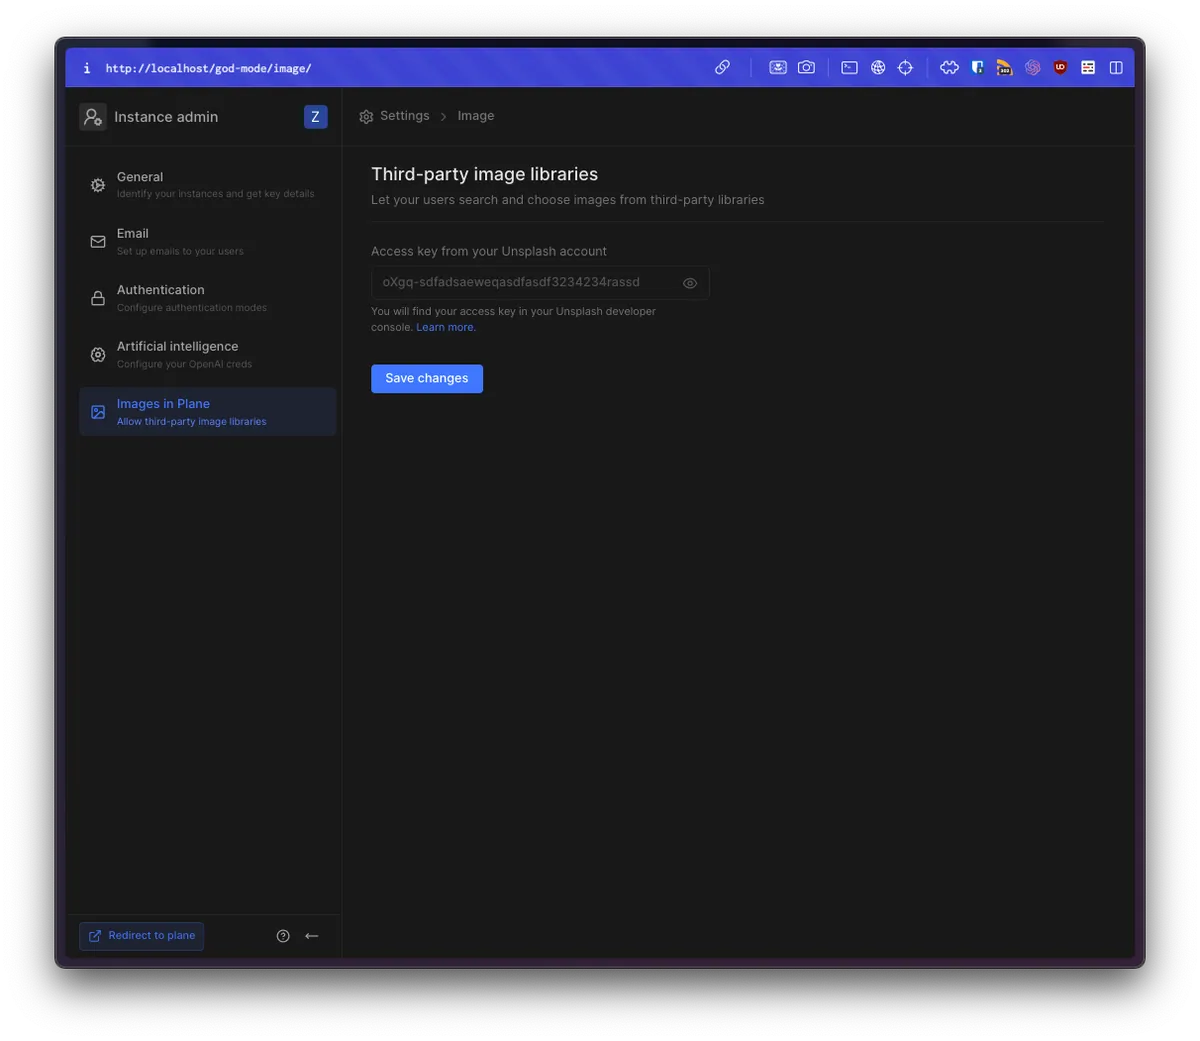
Currently, this feature is not very useful. By adding an Unsplash Key, you can fetch images through the Unsplash API when selecting a project cover image and apply them.
⚠️⚠️Disclaimer⚠️⚠️
The above is the usage introduction for version v0.20-Dev dated 2024-05-25. The official team is actively developing new features and improving the user experience. Please refer to the latest version for the most up-to-date settings.
Once God/Admin Mode is set up, you can use it almost the same way as the Cloud version.
For detailed usage instructions and development workflow, please refer to the previous article “Plane.so Free Open-Source and Self-Hosted Asana/Jira-like Project Management Tool”.
Plane @ Docker Upgrade
As mentioned earlier, Plane is still in development, with new versions released every two to three weeks and potentially significant changes. It is recommended to carefully read the Release Note for changes and required configuration adjustments before upgrading.
⚠️ Always back up before upgrading! ⚠️ After upgrading, make sure to verify that the scheduled backup scripts still function correctly.
⚠️ Always back up before upgrading! ⚠️ After upgrading, make sure to verify that the scheduled backup scripts still function correctly.
⚠️ Always back up before upgrading! ⚠️ After upgrading, make sure to verify that the scheduled backup scripts still function correctly.
Since Plane is still in the development stage and unstable, there is no guarantee that upgrades will not cause data loss. Therefore, it is strongly recommended to back up before performing any operations. Backup methods will be explained below.
Upgrade Method:
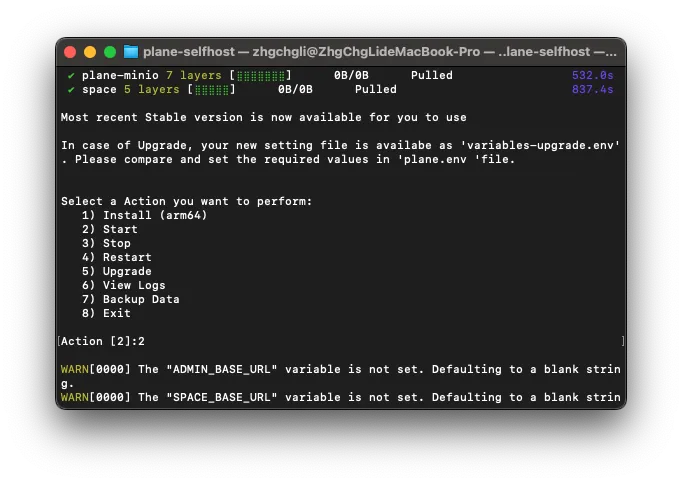
- Run ./setup.sh again
-
Enter
5to upgrade Plane (which basically just pulls the new images and restarts) -
After images are pulled, you can restart the service.
-
The .env file may change after an upgrade. Please refer to the Release Note for adjustments.
Plane @ Docker Backup
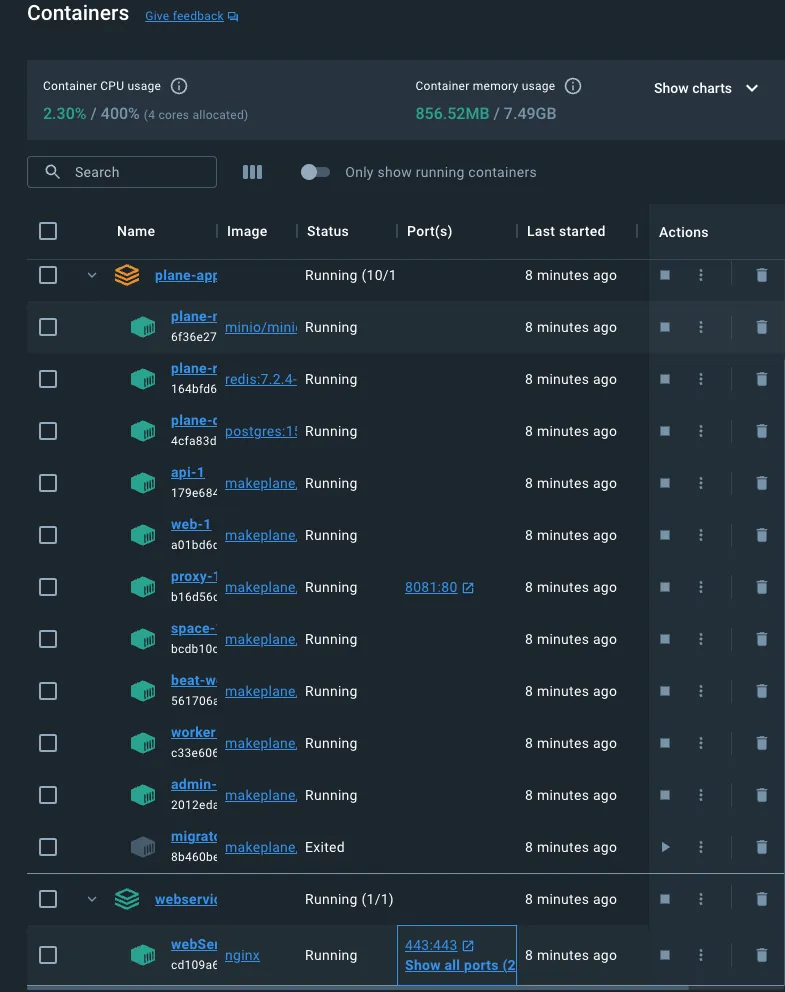
Starting from 0.20-dev, ./setup.sh added a Backup Data command. However, the official manual only explains how to restore Backup Data to their One paid service. Therefore, here I still use my own homemade method to back up upload files, Redis, and the Postgresql Docker container.
Backup Script
./plane-backup.sh :
#!/bin/bash
# Backup Plane data
# Author: zhgchgli (https://zhgchg.li)
##### Usage
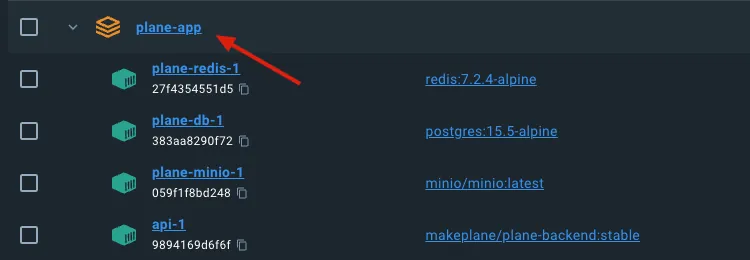
# ./plane-backup.sh [target backup folder path] [Plane Docker project name] [max number of backups to keep, oldest will be deleted if exceeded]
# e.g. ./plane-backup.sh /backup/plane plane-app 14
###### Settings
# Target backup folder
backup_dir=${1:-.}
# Plane Docker project name
docker_project_name=${2:-"plane-app"}
# Max number of backup files to keep, delete oldest if exceeded
keep_count=${3:-7}
######
# Check if directory exists
if [ ! -d "$backup_dir" ]; then
echo "Backup failed, directory does not exist: $backup_dir"
exit;
fi
# Remove oldest
count=$(find "$backup_dir" -mindepth 1 -type d \\| wc -l)
while [ "$count" -ge $keep_count ]; do
oldest_dir=$(find "$backup_dir" -mindepth 1 -maxdepth 1 -type d \\| while read dir; do
# Use stat command to get modification time
if [[ "$OSTYPE" == "darwin"* ]]; then
# macOS system
echo "$(stat -f %m "$dir") $dir"
else
# Linux system
echo "$(stat -c %Y "$dir") $dir"
fi
done \\| sort -n \\| head -n 1 \\| cut -d ' ' -f 2-)
echo "Remove oldest backup: $oldest_dir"
rm -rf "$oldest_dir"
count=$(find "$backup_dir" -mindepth 1 -type d \\| wc -l)
done
#
# Backup new
date_dir=$(date "+%Y_%m_%d_%H_%M_%S")
target_dir="$backup_dir/$date_dir"
mkdir -p "$target_dir"
echo "Backing up to: $target_dir"
# Plane's Postgresql .SQL dump
docker exec -i $docker_project_name-plane-db-1 pg_dump --dbname=postgresql://plane:plane@plane-db/plane -c > $target_dir/dump.sql
# Plane's redis
docker run --rm -v $docker_project_name-redis-1:/volume -v $target_dir:/backup ubuntu tar cvf /backup/plane-app_redis.tar /volume > /dev/null 2>&1
# Plane's uploaded files
docker run --rm -v ${docker_project_name}_uploads:/volume -v $target_dir:/backup ubuntu tar cvf /backup/plane-app_uploads.tar /volume > /dev/null 2>&1
echo "Backup Success!"
Remember to run chmod +x ./plane-backup.sh the first time you create the script file.
Execution Method:
./plane-backup.sh [target backup folder path] [Plane Docker project name] [maximum number of Plane backup files to keep, oldest backups will be deleted if exceeded]
-
Backup to target folder path: e.g
/backup/plane/or./ -
Plane Docker project name: Plane Docker Compose Project name
- Maximum number of Plane backup files to keep; older backups will be deleted when exceeded: default is 7 files
Example Execution:
./plane-backup.sh /backup/plane plane-app 14
![]()
- Make sure Plane is running during execution.
Simply add the above command to Crontab to enable scheduled automatic backups of Plane.
If you encounter execution errors or cannot find the container, please verify the Plane Docker Compose project name or check the script and Docker container names (the official names might have changed).
Restore Script
./plane-restore.sh :
#!/bin/bash

# Restore Plane backup data
# Author: zhgchgli (https://zhgchg.li)

##### How to run
# ./plane-restore.sh

#
inputBackupDir() {
    read -p "Folder of the Plane backup to restore (e.g. /backup/plane/2024_05_25_19_14_12): " backup_dir
}
inputBackupDir

if [[ -z $backup_dir ]]; then
    echo "Please provide the backup folder (e.g. sh /backup/docker/plane/2024_04_09_17_46_39)"
    exit;
fi

inputDockerProjectName() {
    read -p "Docker project name for Plane (leave empty to use default plane-app): " input_docker_project_name
}
inputDockerProjectName

docker_project_name=${input_docker_project_name:-"plane-app"}

confirm() {
    read -p "Are you sure you want to restore Plane.so data? [y/N] " response

    # Check the response
    case "$response" in
        [yY][eE][sS]\\|[yY])
            true
            ;;
        *)
            false
            ;;
    esac
}

if ! confirm; then
    echo "Action cancelled."
    exit
fi

# Restore

echo "Restoring..."

docker cp $backup_dir/dump.sql $docker_project_name-plane-db-1:/dump.sql && docker exec -i $docker_project_name-plane-db-1 psql postgresql://plane:plane@plane-db/plane -f /dump.sql

# Restore Redis
docker run --rm -v ${docker_project_name}-redis-1:/volume -v $backup_dir:/backup alpine tar xf /backup/plane-app_redis.tar --strip-component=1 -C /volume

# Restore uploaded files
docker run --rm -v ${docker_project_name}_uploads:/volume -v $backup_dir:/backup alpine tar xf /backup/plane-app_uploads.tar --strip-component=1 -C /volume

echo "Restore Success!"
Remember to run chmod +x ./plane-restore.sh the first time you create the script file.
Execution Method:
 ./plane-restore.sh
Input: The Plane backup folder to restore (e.g. /backup/plane/2024_05_25_19_14_12)
Input: The Docker project name for Plane (leave empty to use default plane-app)
Input: Are you sure you want to restore Plane.so data? [y/N] y

After seeing Restore Success!, you need to restart Plane for the changes to take effect.
Use Plane ./setup.sh and enter 4 Restart:
Return to the website, refresh, and log in to the Workspace to check if the restoration was successful:
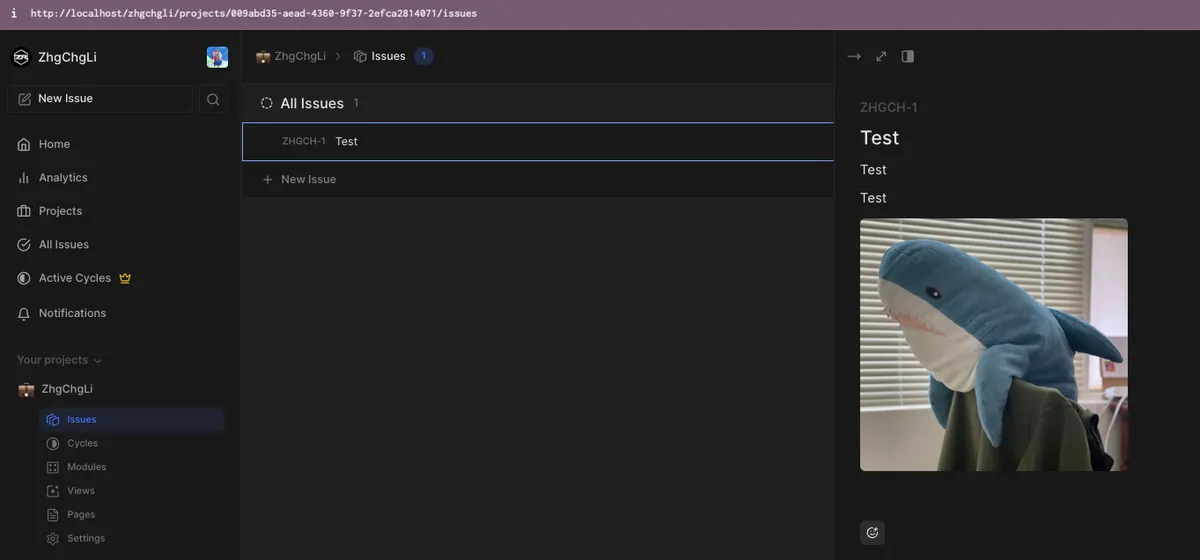
Done!
⚠️ 建議定期測試備份與還原流程,以確保在緊急情況下備份可用。
Plane @ Docker Upgrade
As mentioned earlier, Plane is still in development, with new versions released every two to three weeks and potentially significant changes. It is recommended to carefully read the Release Note for changes and required configuration adjustments before upgrading.
⚠️ Always back up before upgrading! ⚠️ After upgrading, make sure to verify that the scheduled backup scripts still function correctly.
⚠️ Always back up before upgrading! ⚠️ After upgrading, make sure to verify that the scheduled backup scripts still function correctly.
⚠️ Always back up before upgrading! ⚠️ After upgrading, make sure to verify that the scheduled backup scripts still function correctly.
由於 Plane 正處於開發階段且不穩定,升級可能導致資料遺失。因此,強烈建議在進行任何操作前先備份資料。
Upgrade Method:
- Run ./setup.sh again
-
Enter
5to upgrade Plane (which basically just pulls the new images and restarts) -
After images are pulled, you can restart the service.
-
The .env file may change after an upgrade. Please refer to the release notes for adjustments.
-
After upgrading, be sure to check if the scheduled backup script still works properly.
-
If the container name changes, you need to update the backup, restore, and the Nginx reverse proxy scripts introduced below.
Using Nginx + Plane for Reverse Proxy
Since we may have multiple web services to provide simultaneously, such as Self-Hosted LibreChat (ChatGPT), Self-Hosted Wiki.js, Self-Hosted Bitwarden, etc., each service defaults to port 80. If we don’t want to specify the port in the URL when using them, we can start a Docker Nginx as a reverse proxy for the web services.
The effect is as follows:
chat.zhgchg.li -> LibreChat :8082
wiki.zhgchg.li -> Wiki.js :8083
pwd.zhgchg.li -> Bitwarden :8084

plane.zhgchg.li -> Plane.so :8081
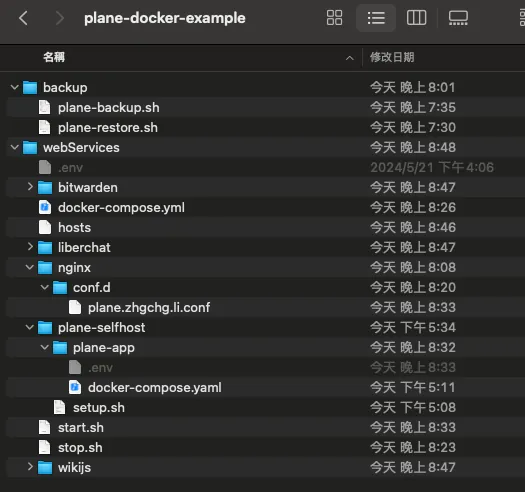
To achieve the above effect, first move the ./plane-selfhost directory into a unified directory, here named webServices.
Final Directory Structure Preview:
Adjust the webServices/plane-selfhost/plane-app/.env environment configuration file:
APP_RELEASE=stable

WEB_REPLICAS=1
SPACE_REPLICAS=1
ADMIN_REPLICAS=1
API_REPLICAS=1

NGINX_PORT=8081
WEB_URL=http://plane.zhgchg.li
DEBUG=0
SENTRY_DSN=
SENTRY_ENVIRONMENT=production
CORS_ALLOWED_ORIGINS=http://plane.zhgchg.li

# DB SETTINGS
PGHOST=plane-db
PGDATABASE=plane
POSTGRES_USER=plane
POSTGRES_PASSWORD=plane
POSTGRES_DB=plane
POSTGRES_PORT=5432
PGDATA=/var/lib/postgresql/data
DATABASE_URL=

# REDIS SETTINGS
REDIS_HOST=plane-redis
REDIS_PORT=6379
REDIS_URL=

# Secret Key
SECRET_KEY=60gp0byfz2dvffa45cxl20p1scy9xbpf6d8c5y0geejgkyp1b5

# DATA STORE SETTINGS
USE_MINIO=1
AWS_REGION=
AWS_ACCESS_KEY_ID=access-key
AWS_SECRET_ACCESS_KEY=secret-key
AWS_S3_ENDPOINT_URL=http://plane-minio:9000
AWS_S3_BUCKET_NAME=uploads
MINIO_ROOT_USER=access-key
MINIO_ROOT_PASSWORD=secret-key
BUCKET_NAME=uploads
FILE_SIZE_LIMIT=5242880

# Gunicorn Workers
GUNICORN_WORKERS=1

# UNCOMMENT `DOCKER_PLATFORM` IF YOU ARE ON `ARM64` AND DOCKER IMAGE IS NOT AVAILABLE FOR RESPECTIVE `APP_RELEASE`
# DOCKER_PLATFORM=linux/amd64
-
Replace the URL with the one you want, for example,
plane.zhgchg.li -
Change NGINX_PORT to
8081and keep the original80for the reverse proxy Nginx.
Create a docker-compose.yml file under webServices/ to host Nginx:
version: '3.8'

services:
  webServices-nginx:
    image: nginx
    restart: unless-stopped
    volumes:
      - ./nginx/conf.d/plane.zhgchg.li.conf:/etc/nginx/conf.d/plane.zhgchg.li.conf

    ports:
      - 80:80
      - 443:443

    networks:
      - plane-app_default # Network used by Plane
networks:
  plane-app_default:
    external: true
- We need to add the Plane app network to Nginx.
Create the /conf.d directory and the plane.zhgchg.li.conf file under webServices/:
# For plane.zhgchg.li

# http example:
server {
    listen 80;
    server_name plane.zhgchg.li;

    client_max_body_size 0;

    location / {
        proxy_pass http://plane-app-proxy-1; # plane proxy-1 service name
        proxy_set_header Host $host;
        proxy_set_header X-Real-IP $remote_addr;
        proxy_set_header X-Forwarded-For $proxy_add_x_forwarded_for;
        proxy_set_header X-Forwarded-Proto $scheme;
    }
}


# https & http example:
# server {
#     listen 443 ssl;
#     server_name plane.zhgchg.li;

#     #ssl
#     ssl_certificate             /etc/nginx/conf/ssl/zhgchgli.crt; # Replace with your domain's crt & remember to add the key to docker-compose.yml volumes mount into Docker
#     ssl_certificate_key         /etc/nginx/conf/ssl/zhgchgli.key; # Replace with your domain's key & remember to add the key to docker-compose.yml volumes mount into Docker
#     ssl_prefer_server_ciphers   on;
#     ssl_protocols               TLSv1.1 TLSv1.2;
#     ssl_ciphers                 "EECDH+ECDSA+AESGCM EECDH+aRSA+AESGCM EECDH+ECDSA+SHA384 EECDH+ECDSA+SHA256 EECDH+aRSA+SHA384 EECDH+aRSA+SHA256 EECDH+aRSA+RC4 EECDH EDH+aRSA RC4 !aNULL !eNULL !LOW !3DES !MD5 !EXP !PSK !SRP !DSS !RC4";
#     ssl_ecdh_curve              secp384r1; # Requires nginx >= 1.1.0
#     ssl_session_timeout         10m;
#     ssl_session_cache           shared:SSL:10m;
#     add_header                  Strict-Transport-Security "max-age=63072000; includeSubDomains; preload";

#     client_max_body_size 0;

#     location / {
#         proxy_pass http://plane-app-proxy-1; # plane proxy-1 service name
#         proxy_set_header Host $host;
#         proxy_set_header X-Real-IP $remote_addr;
#         proxy_set_header X-Forwarded-For $proxy_add_x_forwarded_for;
#         proxy_set_header X-Forwarded-Proto $scheme;
#     }
# }

# server {
#     listen 80;
#     server_name plane.zhgchg.li;
#     return 301 https://plane.zhgchg.li$request_uri;
# }
-
proxy_pass inputs the service entry point in the Plane network
-
Here, only HTTP is used as an example. For HTTPS support, you can refer to the method for self-signed certificates.
Since there are multiple docker-compose.yml files that need to be started individually before launching the Nginx reverse proxy, we can put all the startup scripts into a single Shell Script.
Create the /start.sh file under webServices/:
#!/bin/sh

# Startup script wrapper

# Start Plane and other services first
docker compose -f ./plane-selfhost/plane-app/docker-compose.yaml --env-file ./plane-selfhost/plane-app/.env up -d


# Start Nginx last
docker compose -f ./docker-compose.yml --env-file ./.env up -d
Remember to run chmod +x ./start.sh the first time you create the script file.
To stop the service, you can also create a script by making a /stop.sh file under webServices/:
#!/bin/sh

# Stop script wrapper

docker compose -f ./plane-selfhost/plane-app/docker-compose.yaml --env-file ./plane-selfhost/plane-app/.env down

docker compose -f ./docker-compose.yml --env-file ./.env down
Remember to run chmod +x ./stop.sh the first time you create the script file.
Startup
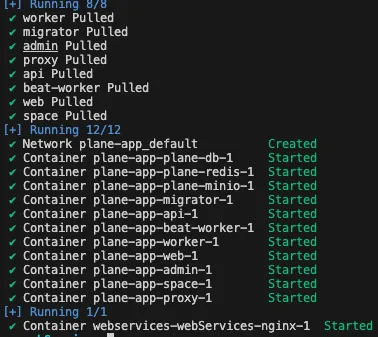
- After packaging Nginx reverse proxy + Plane service + others, you can start all services directly by running
./start.sh
./start.sh
DNS Settings
For deployment on a local intranet, please ask the IT department to add a DNS record in the internal DNS pointing plane.zhgchg.li to the server’s IP address.
plane.zhgchg.li server IP address
If you are testing locally on your computer, you can add the following to the /private/etc/hosts file:
127.0.0.1 plane.zhgchg.li
After completing the DNS setup, you can access Plane at plane.zhgchg.li!
Frequently Asked Questions
-
Nginx fails to start and keeps restarting. Checking the logs shows
nginx: [emerg] host not found in upstream.
This means the Nginx reverse proxy service cannot find the Plane service. Verify if the namehttp://plane-app-proxy-1is correct and check if the network settings in the Nginx docker-compose.yml are properly configured. -
502 Bad Gateway appears
The startup order is incorrect (make sure Nginx reverse proxy starts last) or the Plane process has restarted. Try restarting to resolve the issue. -
If the Nginx default homepage
welcome to nginx!appears, you will no longer be able to access Plane via the original IP:80 when using reverse proxy. You must use the domain name instead. -
The URL cannot be resolved, and the host cannot be found. Please check if the DNS network settings are correct.
⚠️⚠️ Security Issues ⚠️⚠️
Since the Plane project is still under development and open source, it is uncertain whether there are serious system vulnerabilities that could potentially become entry points for attacks. Therefore, it is not recommended to host Plane.so Self-Hosted on a public network. It is better to add an extra layer of security authentication (Tunnel, certificate, or VPN) before allowing access. If deployed on an internal network, it should also be properly isolated.
As this project is still in development, bugs, experience issues, and security concerns are inevitable. Please be patient with the Plane.so team; if you encounter any problems, feel free to report them below:
-
Issue Reporting: https://github.com/makeplane/plane/issues
-
Official Discord: https://discord.com/invite/A92xrEGCge


Comments