
Handling Push Notification Permission Status from iOS 9 to iOS 12 (Swift)
Solution for Handling Notification Permission Status and Requests Compatible with iOS 9 to iOS 12
What does it do?
Continuing from the previous article “What? iOS 12 Can Send Push Notifications Without User Authorization (Swift)” about optimizing the push notification permission process, after the improvements made in the previous Murmur section, a new requirement has arisen:
-
If the user disables notifications, we can prompt them on specific feature pages to go to Settings and enable them.
-
After navigating to the Settings page, if the user enables or disables notifications, returning to the app should update the status accordingly.
-
If push notification permission has never been requested, ask for permission; if it has been requested but denied, show a prompt; if it has been requested and allowed, proceed with the operation.
-
Support for iOS 9 to iOS 12
1 to 3 are fine. Using the UserNotifications framework from iOS 10 onward can handle most cases well. The tricky part is item 4: supporting iOS 9. Handling iOS 9 requires using the old registerUserNotificationSettings method, which is not easy. Let’s take it step by step!
Approach and Structure:
First, declare a global notificationStatus object to store the notification permission status, and add property observation on the pages where handling is needed (here I use Observable to subscribe to property changes; you can choose suitable KVO or use Rx, ReactiveCocoa).
Handle checking the push notification permission status and update the notificationStatus value in appDelegate methods: didFinishLaunchingWithOptions (when the app initially launches), applicationDidBecomeActive (when returning from background), and didRegisterUserNotificationSettings (for push notification requests on ≤ iOS 9).
Pages that need to respond will trigger corresponding actions (e.g., showing an alert if notifications are disabled).
1. First, declare a global notificationStatus object
enum NotificationStatusType {
     case authorized
     case denied
     case notDetermined
}
var notificationStatus: Observable<NotificationStatusType?> = Observable(nil)
The four states of notificationStatus/NotificationStatusType correspond to:
-
nil = Object initializing… checking…
-
notDetermined = The user has not been asked whether to receive notifications
-
authorized = The user has been asked about receiving notifications and tapped “Allow”
-
denied = The user has been asked whether to receive notifications and selected “Don’t Allow”
2. Build a method to check notification permission status:
func checkNotificationPermissionStatus() {
    if #available(iOS 10.0, *) {
        UNUserNotificationCenter.current().getNotificationSettings { (settings) in
            DispatchQueue.main.async {
                // Note! Switch back to the main thread
                if settings.authorizationStatus == .authorized {
                    // Allowed
                    notificationStatus.value = NotificationStatusType.authorized
                } else if settings.authorizationStatus == .denied {
                    // Denied
                    notificationStatus.value = NotificationStatusType.denied
                } else {
                    // Not asked yet
                    notificationStatus.value = NotificationStatusType.notDetermined
                }
            }
        }
    } else {
        if UIApplication.shared.currentUserNotificationSettings?.types == []  {
            if let iOS9NotificationIsDetermined = UserDefaults.standard.object(forKey: "iOS9NotificationIsDetermined") as? Bool,iOS9NotificationIsDetermined == true {
                // Not asked yet
                notificationStatus.value = NotificationStatusType.notDetermined
            } else {
                // Denied
                notificationStatus.value = NotificationStatusType.denied
            }
        } else {
            // Allowed
            notificationStatus.value = NotificationStatusType.authorized
        }
    }
}
Not finished yet!
Sharp-eyed readers might have noticed the custom UserDefaults key “iOS9NotificationIsDetermined” in the ≤ iOS 9 check. So, what is it used for?
The main reason is that in iOS 9 and below, the method to check push notification permissions can only determine the current granted permissions; if it’s empty, it means no permission. However, it will also be empty if the user has never been asked before. This causes a problem: has the user never been asked, or have they been asked and denied?
Here, I used a custom UserDefaults key iOS9NotificationIsDetermined as a flag, and added the following in appDelegate’s didRegisterUserNotificationSettings:
//appdelegate.swift:
func application(_ application: UIApplication, didRegister notificationSettings: UIUserNotificationSettings) {
    // For iOS 9 and below, this method is triggered after the permission alert is shown and the user taps Allow or Don't Allow
    UserDefaults.standard.set("iOS9NotificationIsDetermined", true)
    checkNotificationPermissionStatus()
}
After setting up the notification permission status object and detection methods, we also need to add the following in appDelegate…
//appdelegate.swift
func application(_ application: UIApplication, didFinishLaunchingWithOptions launchOptions: [UIApplicationLaunchOptionsKey: Any]?) -> Bool {
  checkNotificationPermissionStatus()
  return true
}
func applicationDidBecomeActive(_ application: UIApplication) {
  checkNotificationPermissionStatus()
}
How to check the push notification status again when the app launches or returns from the background?
That covers the detection part. Next, let’s see how to handle requesting notification permission if it has not been asked yet.
3. Request Notification Permission:
func requestNotificationPermission() {
    if #available(iOS 10.0, *) {
        let permissiones:UNAuthorizationOptions = [.badge, .alert, .sound]
        UNUserNotificationCenter.current().requestAuthorization(options: permissiones) { (granted, error) in
            DispatchQueue.main.async {
                checkNotificationPermissionStatus()
            }
        }
    } else {
        application.registerUserNotificationSettings(UIUserNotificationSettings(types: [.alert, .badge, .sound], categories: nil))
        // The previous appdelegate.swift's didRegisterUserNotificationSettings will handle the subsequent callback
    }
}
Both detection and request are done. Let’s see how to apply them.
4. Application (Static)
if notificationStatus.value == NotificationStatusType.authorized {
//OK!
} else if notificationStatus.value == NotificationStatusType.denied {
//Not allowed
//This example shows an UIAlertController prompt that, when tapped, can navigate to the settings page
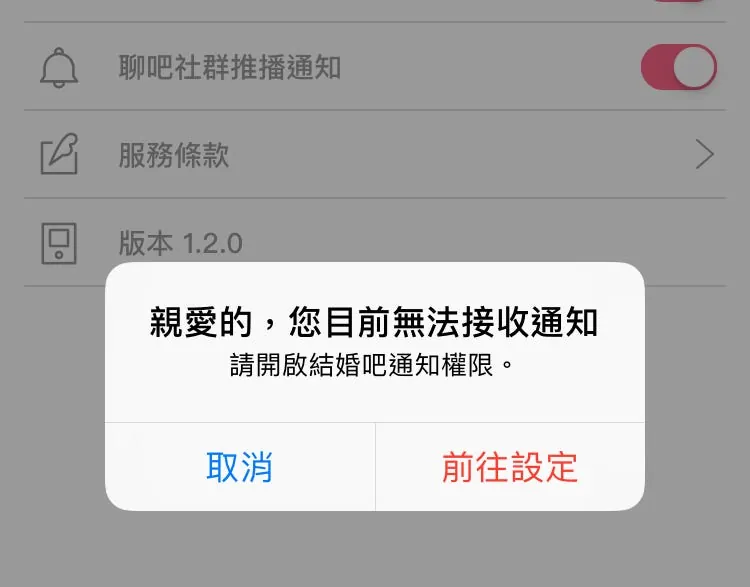
let alertController = UIAlertController(
title: "Dear user, you currently cannot receive notifications",
message: "Please enable notification permissions for the app.",
preferredStyle: .alert)
let settingAction = UIAlertAction(
title: "Go to Settings",
style: .destructive,
handler: {
(action: UIAlertAction!) -> Void in
if let bundleID = Bundle.main.bundleIdentifier,let url = URL(string:UIApplicationOpenSettingsURLString + bundleID) {
UIApplication.shared.openURL(url)
}
})
let okAction = UIAlertAction(
title: "Cancel",
style: .default,
handler: {
(action: UIAlertAction!) -> Void in
//well....
})
alertController.addAction(okAction)
alertController.addAction(settingAction)
self.present(alertController, animated: true) {
}
} else if notificationStatus.value == NotificationStatusType.notDetermined {
//Not asked yet
requestNotificationPermission()
}
Please Note!! Do NOT use when navigating to the APP’s “Settings” page
UIApplication.shared.openURL(URL(string:”App-Prefs:root=(bundleID)”))
Using this method to redirect will cause app rejection! Will cause app rejection! Will cause app rejection! (Personal experience)
This is a Private API
5. Application (Dynamic)
For dynamically changing the status, since the notificationStatus object we use is Observable, we can add an observer in the viewDidLoad where we need to monitor the status constantly:
override func viewDidLoad() {
   super.viewDidLoad()
   notificationStatus.afterChange += { oldStatus,newStatus in
      if newStatus == NotificationStatusType.authorized {
       //print("❤️Thank you for enabling notifications")
      } else if newStatus == NotificationStatusType.denied {
       //print("😭Oh no")
      }
   }
}
The above is just sample code; actual use and triggers can be adjusted as needed.
*When using Observable with notificationStatus, pay attention to memory management: release when necessary (to prevent memory leaks) and retain when needed (to avoid losing observation).
Complete Demo Project Included:
Since our project supports iOS 9 to iOS 12, iOS 8 has not been tested and its support level is uncertain


Comments