
Perfect Implementation of One-Time Offers or Trials on iOS (Swift)
iOS DeviceCheck Goes With You to the Ends of the Earth
While writing the previous Call Directory Extension, I accidentally discovered this lesser-known API. Although it’s not new (announced at WWDC 2017 / supported on iOS ≥11) and quite simple to implement, I still did a small study and test, and compiled this article as a record.
What Can DeviceCheck Do?
Allow developers to identify and mark users’ devices
Since iOS ≥ 6, developers can no longer access the device’s unique identifier (UUID). A workaround is to use IDFV combined with KeyChain (see this article for details), but the UUID will still reset when switching iCloud accounts or resetting the device. This cannot guarantee device uniqueness. If used for business logic storage and validation, such as first-time free trials, users may exploit this by frequently switching accounts or resetting the device to repeatedly access unlimited trials.
Although DeviceCheck does not guarantee an unchangeable UUID, it provides a storage function. Apple offers 2 bits of cloud storage per device, allowing read/write of those 2 bits by sending a temporary device-generated token to Apple.
2 bits? What can be stored?
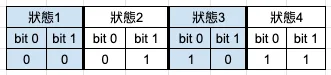
Only four states can be combined, so the available functions are limited.
Comparison with the original storage method:

✓ indicates the data is still available
p.s. I personally tested this on my own phone, and the results matched; even after logging out and switching iCloud accounts, deleting all data, resetting all settings, and restoring to factory defaults, reinstalling the app still retrieved the value.
The main workflow is as follows:

The iOS APP generates a temporary device identification token using the DeviceCheck API and sends it to the backend. The backend then combines the developer’s private key and developer information to create a JWT, which is sent to Apple’s server. After receiving the response from Apple, the backend processes the data and returns it to the iOS APP.
DeviceCheck Usage
Attached is a screenshot of DeviceCheck from WWDC2017:
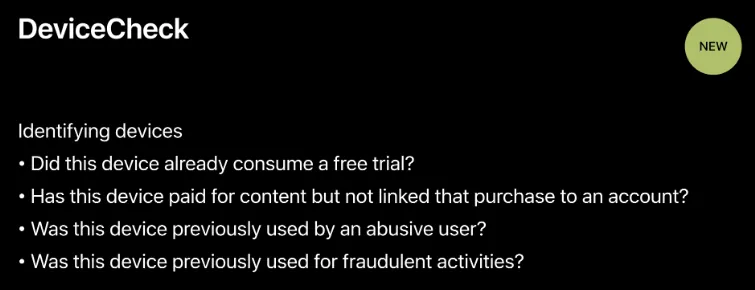
Since each device can only store 2 bits of information, the possible uses are limited to what the official documentation mentions, such as whether the device has been used for a trial, has made a payment, or is a blocked user, etc.; and only one item can be implemented.
Support: iOS ≥ 11
Getting Started!
After understanding the basics, let’s get started!
iOS APP side:
import DeviceCheck
//....
//
DCDevice.current.generateToken { dataOrNil, errorOrNil in
  guard let data = dataOrNil else { return }
  let deviceToken = data.base64EncodedString()

   //...
   //POST deviceToken to the backend, ask the backend to query Apple's server, then return the result to the APP for processing
}
As described in the process, the only thing the APP needs to do is obtain a temporary identification Token (deviceToken)!
Next, send the deviceToken to our own backend API for processing.
Backend:
The key part is handled on the backend.
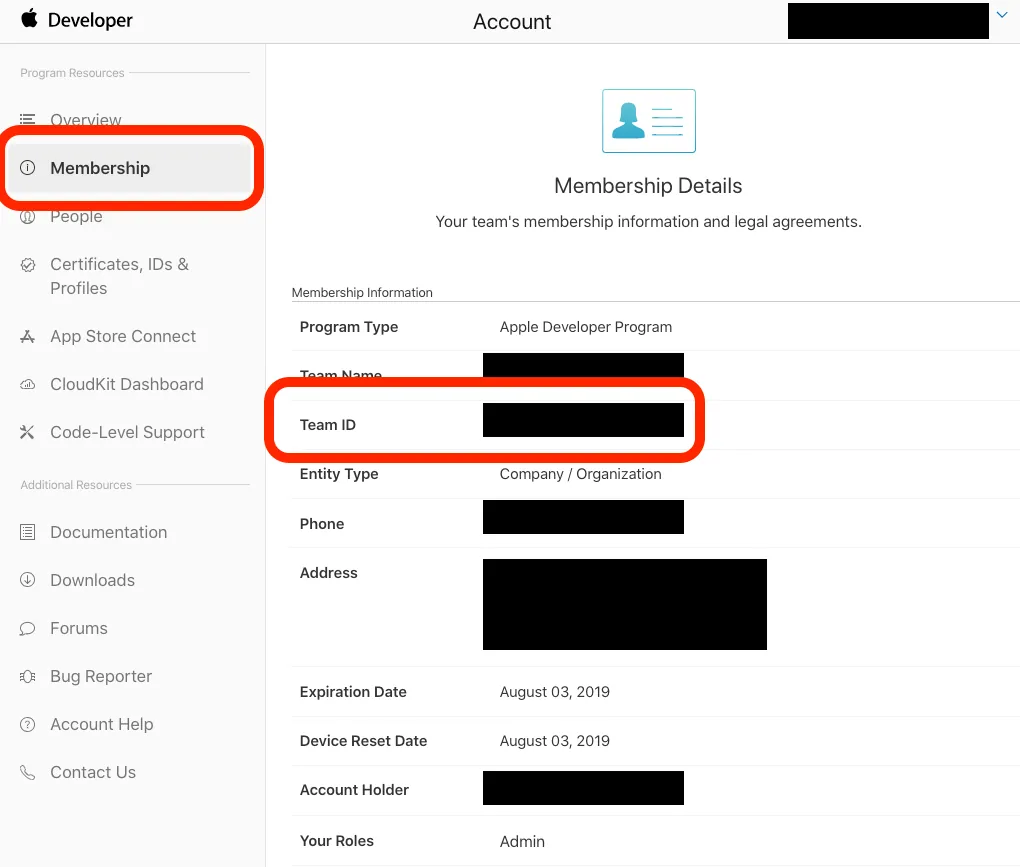
1. First, log in to the Developer Portal and note your Team ID
2. Then click the sidebar’s Certificates, IDs & Profiles to go to the certificate management platform
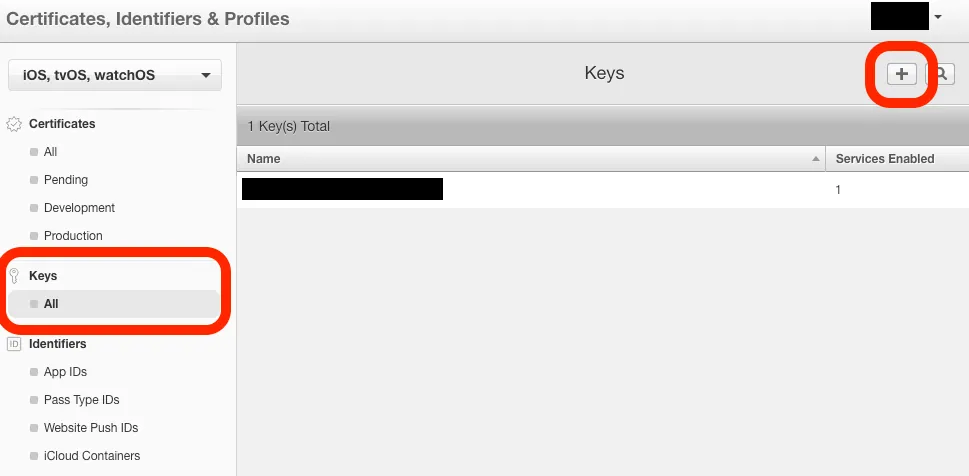
Select “Keys” -> “All” -> “+” at the top right to add a new one
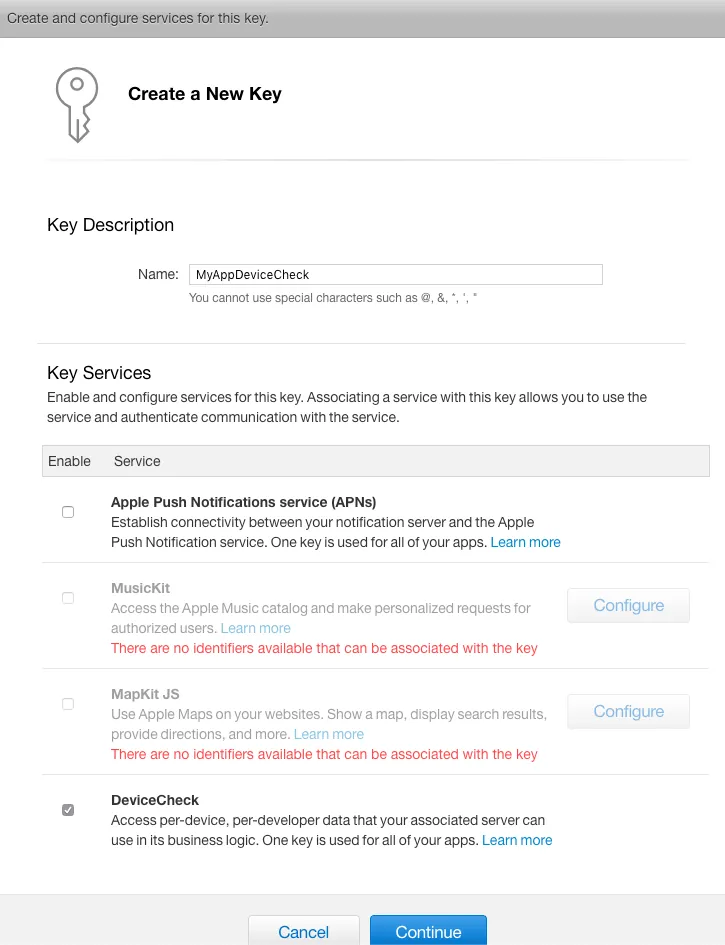
Step 1. Create a new Key and check “DeviceCheck”
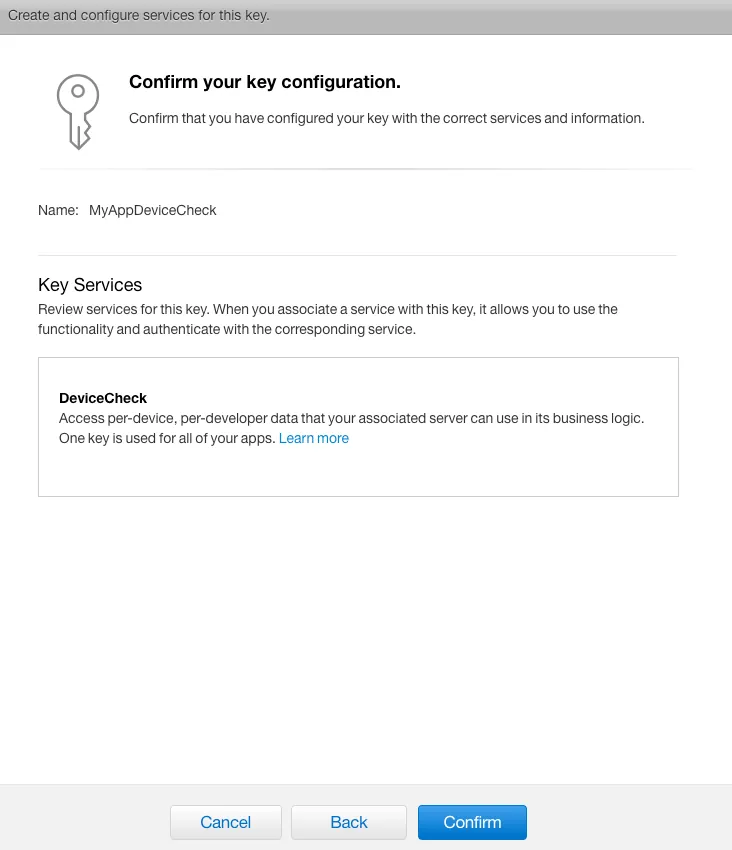
Step 2. “Confirm” Confirmation
Understood. Please provide the Markdown paragraphs you want me to translate into English.
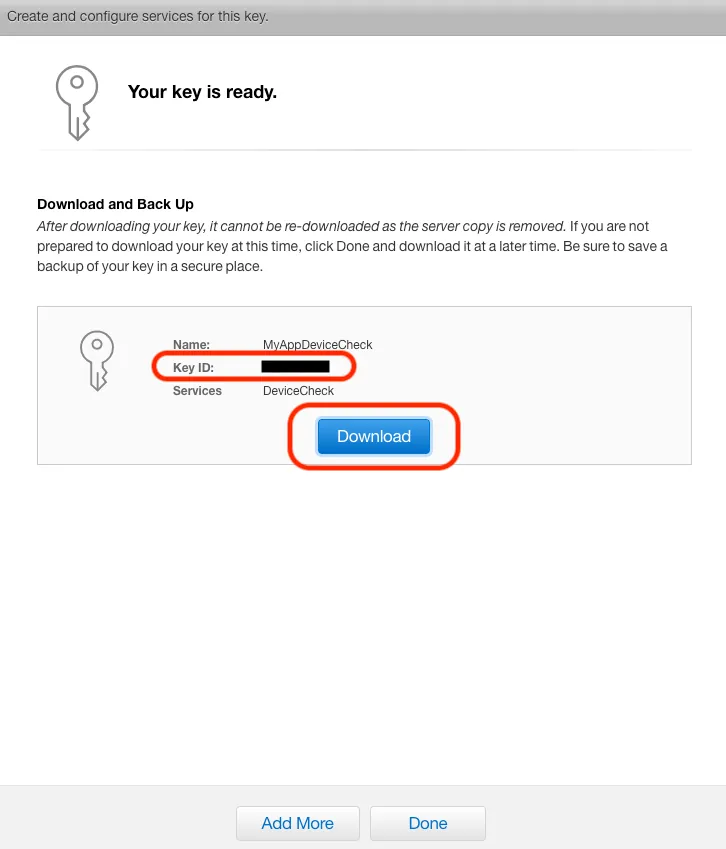
After completing the final step, note the Key ID and click “Download” to save the privateKey.p8 private key file.
At this point, you have prepared all the data needed for the push notification:
-
Team ID
-
Key ID
-
privateKey.p8
3. Assemble the JWT (JSON Web Token) format according to Apple’s specifications
Algorithm: ES256
//HEADER:
{
  "alg": "ES256",
  "kid": Key ID
}
//PAYLOAD:
{
  "iss": Team ID,
  "iat": Request timestamp (Unix Timestamp, EX: 1556549164),
  "exp": Expiration timestamp (Unix Timestamp, EX: 1557000000)
}
//Timestamps must be in integer format!
Get the combined JWT string: xxxxxx.xxxxxx.xxxxxx
4. Send Data to Apple Server & Receive Response Results
Like APNS push notifications, there are separate development and production environments:
- Development environment: api.development.devicecheck.apple.com (For some reason, my requests in the development environment always fail)
- Production environment: api.devicecheck.apple.com
DeviceCheck API offers two operations: 1. Query stored data: https://api.devicecheck.apple.com/v1/query_two_bits
//Headers:
Authorization: Bearer xxxxxx.xxxxxx.xxxxxx (The composed JWT string)

//Content:
device_token:deviceToken (The device token to query)
transaction_id:UUID().uuidString (Query identifier, here using UUID as an example)
timestamp: Request timestamp (in milliseconds), note! This is in milliseconds (EX: 1556549164000)
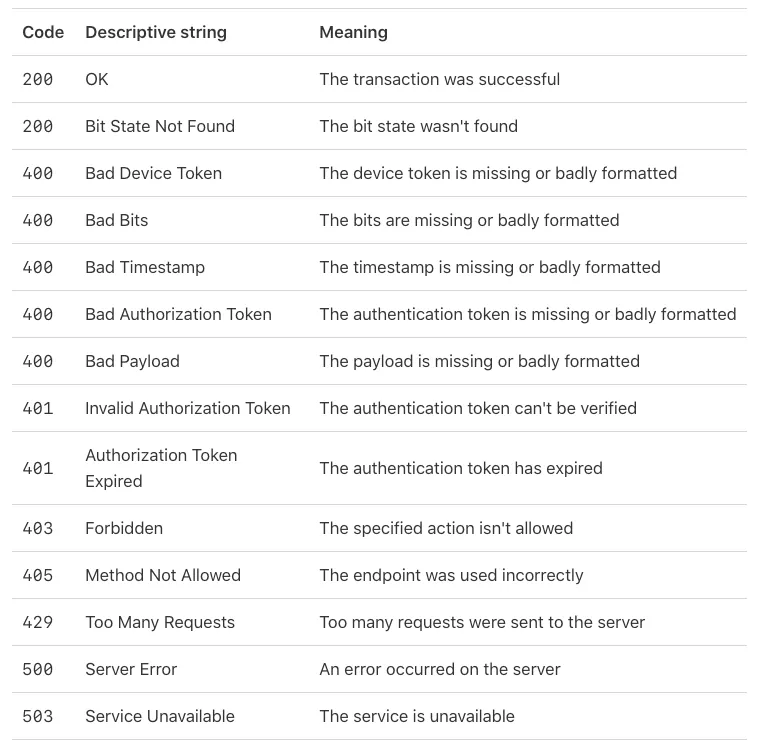
Return Status:
Response Content:
{
  "bit0": Int: The first bit of the 2 bits data: 0 or 1,
  "bit1": Int: The second bit of the 2 bits data: 0 or 1,
  "last_update_time": String: "Last update time YYYY-MM"
}
p.s. You read it right, the last modified time can only show up to year-month
2. Write Stored Data: https://api.devicecheck.apple.com/v1/update_two_bits
//Headers:
Authorization: Bearer xxxxxx.xxxxxx.xxxxxx (The composed JWT string)

//Content:
device_token:deviceToken (The device token to query)
transaction_id:UUID().uuidString (Query identifier, here represented by a UUID)
timestamp: Request timestamp (in milliseconds), note! This is in milliseconds (e.g., 1556549164000)
bit0: The first bit of the 2 bits data: 0 or 1
bit1: The second bit of the 2 bits data: 0 or 1
5. Get the Response from Apple Server
Return Status:
Response content: None, a 200 status code indicates a successful write!
6. Backend API Returns Result to the APP
The app responds accordingly to the respective status, and it’s done!
Backend Supplement:
I haven’t worked with PHP for a long time. If you’re interested, please refer to the requestToken.php section in the article iOS11で追加されたDeviceCheckについて.
Swift Demo Example:
Since I cannot provide backend implementation and not everyone knows PHP, here is a pure iOS (Swift) example that handles the backend tasks (JWT creation, sending data to Apple) directly within the app for your reference!
You can simulate and execute all content without writing any backend code.
⚠ Please note This is for testing demonstration only and is not recommended for production use ⚠
Here, I want to thank Ethan Huang for his great CupertinoJWT library that supports generating JWT format content within iOS apps!
Main Demo Code and Interface:
import UIKit
import DeviceCheck
import CupertinoJWT

extension String {
    var queryEncode:String {
        return self.addingPercentEncoding(withAllowedCharacters: .whitespacesAndNewlines)?.replacingOccurrences(of: "+", with: "%2B") ?? ""
    }
}
class ViewController: UIViewController {


    @IBOutlet weak var getBtn: UIButton!
    @IBOutlet weak var statusBtn: UIButton!
    @IBAction func getBtnClick(_ sender: Any) {
        DCDevice.current.generateToken { dataOrNil, errorOrNil in
            guard let data = dataOrNil else { return }

            let deviceToken = data.base64EncodedString()

            // In production:
            // POST deviceToken to backend, let backend query Apple server, then return result to APP


            //!!!!!! The following is for testing and demonstration only, not recommended for production!!!!!!
            //!!!!!!      Do not expose your PRIVATE KEY casually    !!!!!!
                let p8 = """
                    -----BEGIN PRIVATE KEY-----
                    -----END PRIVATE KEY-----
                    """
                let keyID = "" // Your KEY ID
                let teamID = "" // Your Developer Team ID :https://developer.apple.com/account/#/membership

                let jwt = JWT(keyID: keyID, teamID: teamID, issueDate: Date(), expireDuration: 60 * 60)

                do {
                    let token = try jwt.sign(with: p8)
                    var request = URLRequest(url: URL(string: "https://api.devicecheck.apple.com/v1/update_two_bits")!)
                    request.httpMethod = "POST"
                    request.addValue("Bearer \(token)", forHTTPHeaderField: "Authorization")
                    request.addValue("application/x-www-form-urlencoded", forHTTPHeaderField: "Content-Type")
                    let json:[String : Any] = ["device_token":deviceToken,"transaction_id":UUID().uuidString,"timestamp":Int(Date().timeIntervalSince1970.rounded()) * 1000,"bit0":true,"bit1":false]
                    request.httpBody = try? JSONSerialization.data(withJSONObject: json)

                    let task = URLSession.shared.dataTask(with: request) { (data, response, error) in
                        guard let data = data else {
                            return
                        }
                        print(String(data:data, encoding: String.Encoding.utf8))
                        DispatchQueue.main.async {
                            self.getBtn.isHidden = true
                            self.statusBtn.isSelected = true
                        }
                    }
                    task.resume()
                } catch {
                    // Handle error
                }
            //!!!!!! The above is for testing and demonstration only, not recommended for production!!!!!!
            //

        }

    }

    override func viewDidLoad() {
        super.viewDidLoad()

        DCDevice.current.generateToken { dataOrNil, errorOrNil in
            guard let data = dataOrNil else { return }

            let deviceToken = data.base64EncodedString()

            // In production:
                // POST deviceToken to backend, let backend query Apple server, then return result to APP


            //!!!!!! The following is for testing and demonstration only, not recommended for production!!!!!!
            //!!!!!!      Do not expose your PRIVATE KEY casually    !!!!!!
                let p8 = """
                -----BEGIN PRIVATE KEY-----

                -----END PRIVATE KEY-----
                """
                let keyID = "" // Your KEY ID
                let teamID = "" // Your Developer Team ID :https://developer.apple.com/account/#/membership

                let jwt = JWT(keyID: keyID, teamID: teamID, issueDate: Date(), expireDuration: 60 * 60)

                do {
                    let token = try jwt.sign(with: p8)
                    var request = URLRequest(url: URL(string: "https://api.devicecheck.apple.com/v1/query_two_bits")!)
                    request.httpMethod = "POST"
                    request.addValue("Bearer \(token)", forHTTPHeaderField: "Authorization")
                    request.addValue("application/x-www-form-urlencoded", forHTTPHeaderField: "Content-Type")
                    let json:[String : Any] = ["device_token":deviceToken,"transaction_id":UUID().uuidString,"timestamp":Int(Date().timeIntervalSince1970.rounded()) * 1000]
                    request.httpBody = try? JSONSerialization.data(withJSONObject: json)

                    let task = URLSession.shared.dataTask(with: request) { (data, response, error) in
                        guard let data = data,let json = try? JSONSerialization.jsonObject(with: data, options: .mutableContainers) as? [String:Any],let stauts = json["bit0"] as? Int else {
                            return
                        }
                        print(json)

                        if stauts == 1 {
                            DispatchQueue.main.async {
                                self.getBtn.isHidden = true
                                self.statusBtn.isSelected = true
                            }
                        }
                    }
                    task.resume()
                } catch {
                    // Handle error
                }
            //!!!!!! The above is for testing and demonstration only, not recommended for production!!!!!!
            //

        }
        // Do any additional setup after loading the view.
    }


}
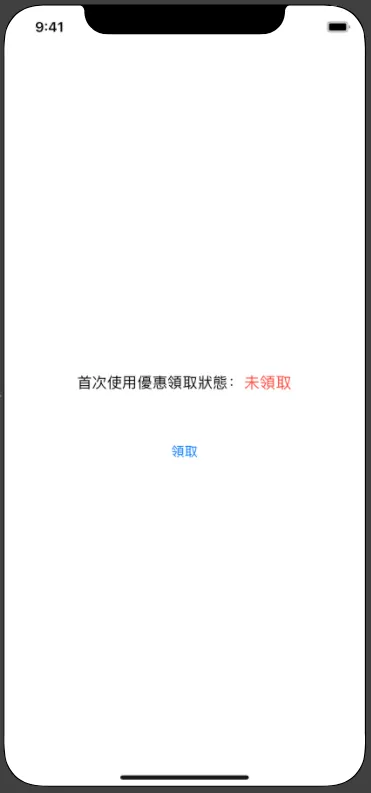
Screenshot
This implements a one-time offer redemption; each device can only redeem once!
Comments