iOS UIViewController Transitions|Master Pull-Down Close, Pull-Up Present & Full-Page Swipe Back
Discover how to implement seamless UIViewController transitions in iOS, including pull-down to close, pull-up to present, and full-page right-swipe back gestures, enhancing user interaction and navigation flow efficiently.
This post was translated with AI assistance — let me know if anything sounds off!
Table of Contents
iOS UIViewController Transition Essentials
Complete Guide to Pull Down to Close / Pull Up to Show / Full-Page Right Swipe Back Effects in UIViewController
Preface
I have always been curious about how popular apps like Facebook, Line, Spotify, etc., implement effects such as “pull down to dismiss a presented UIViewController,” “slide up to fade in a UIViewController,” and “full-screen swipe right to go back.”
Because these effects are not built-in, the pull-down-to-close feature is only supported with the system card style starting from iOS ≥ 13.
The Path of Exploration
Not sure if it’s due to poor keyword choices or the scarcity of data, but I can’t find practical implementations of this feature. The information I found is vague and scattered, forcing me to piece it together from various sources.
At first, when researching on my own, I found the UIPresentationController API. Without digging deeper, I used this method combined with UIPanGestureRecognizer in a crude way to achieve the pull-down-to-close effect; I always felt something was off and thought there must be a better way.
Until recently, when working on a new project, I read this great article and broadened my perspective, discovering other APIs that offer more elegant and flexible approaches.
This article serves as both a personal record and a guide for friends who share the same confusion.
The content is a bit long. If it’s too much trouble, you can scroll down to see the example or directly download the Github project to study!
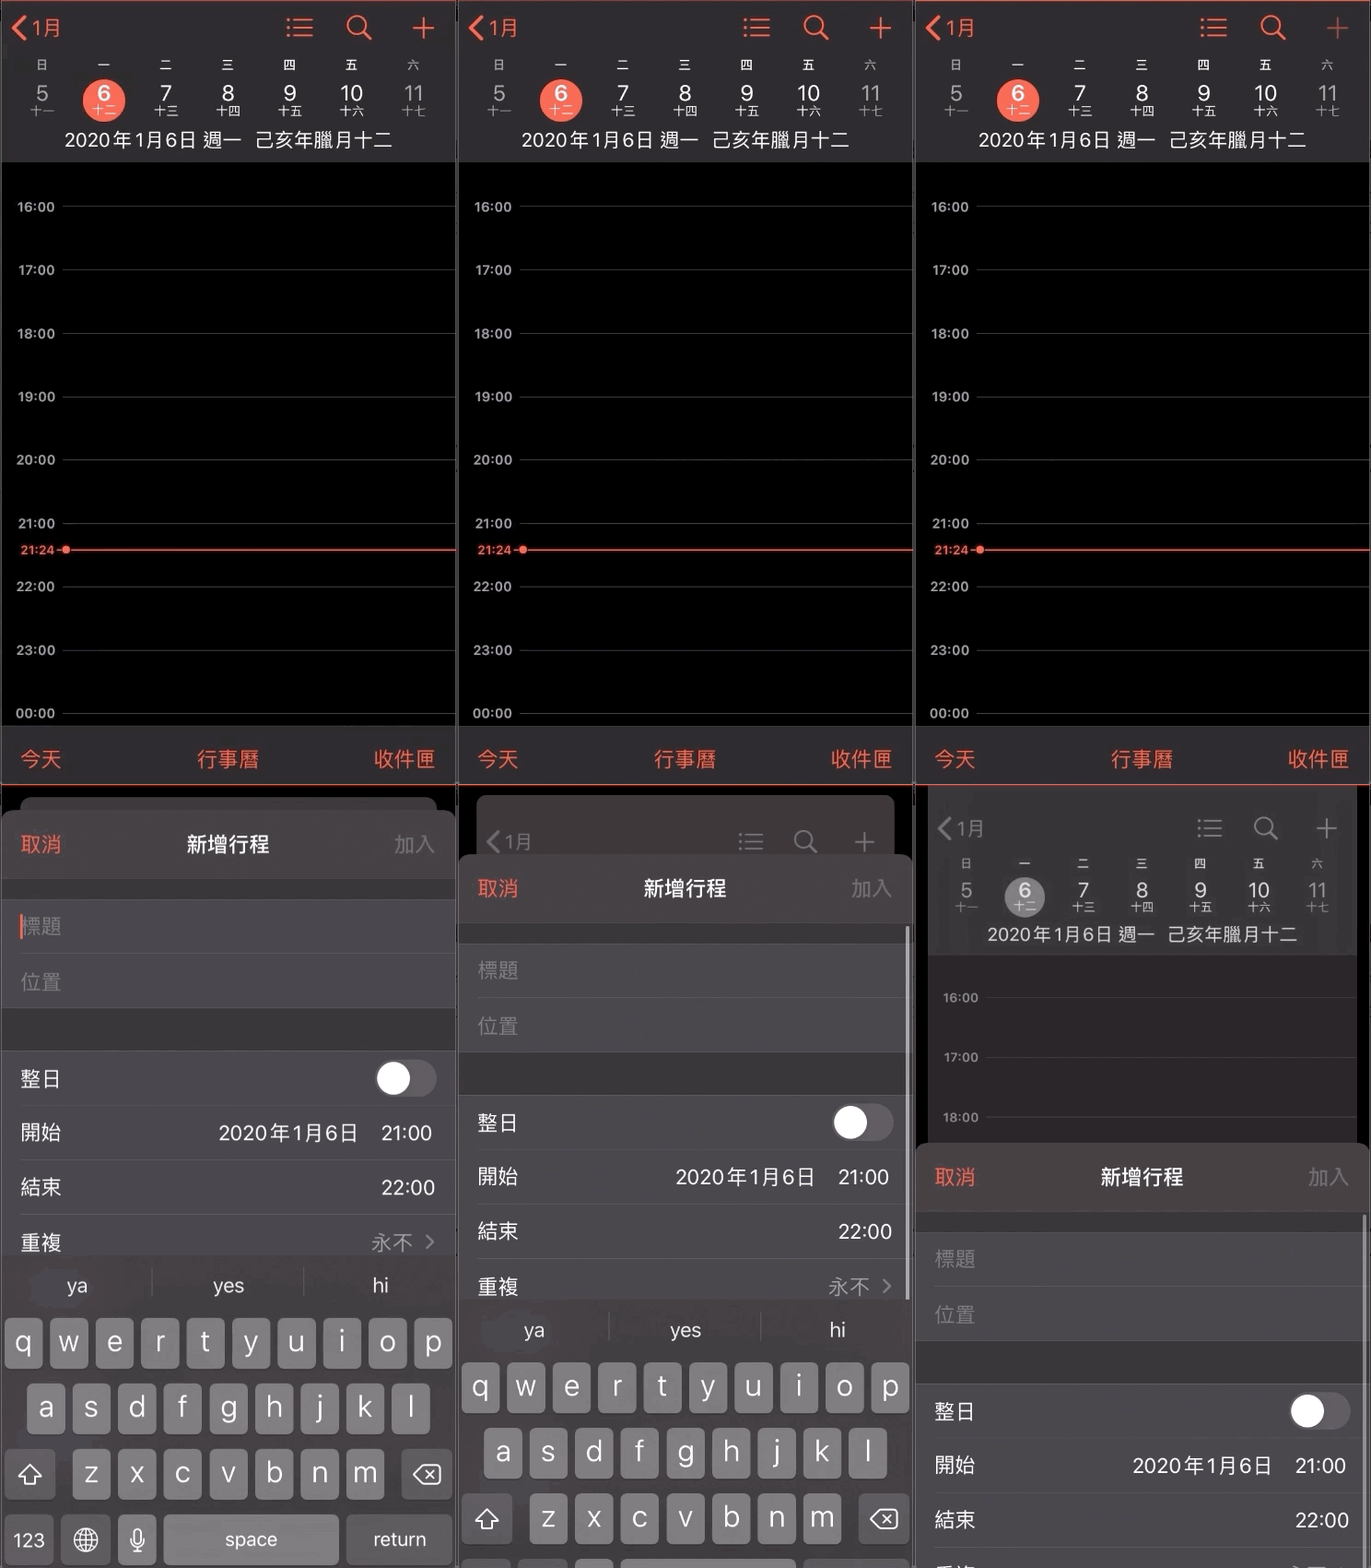
iOS 13 Card Style Presentation Page
First, let’s talk about the latest system built-in effects
For iOS ≥ 13, UIViewController.present(_:animated:completion:)
The default modalPresentationStyle is UIModalPresentationAutomatic, which presents the page in a card style. To keep the previous full-screen presentation, you need to explicitly set it back to UIModalPresentationFullScreen.
Built-in Calendar Add Event Effect
How to Disable Pull-Down to Close? Close Confirmation?
A better user experience should check for any entered data when triggering the dropdown to close. If there is data, the user should be prompted whether to discard changes and leave.
Apple has already thought this through for us; we just need to implement the methods in UIAdaptivePresentationControllerDelegate.
1
2
3
4
5
6
7
8
9
10
11
12
13
14
15
16
17
18
19
20
21
22
23
24
25
26
27
28
29
30
31
32
33
34
35
36
37
38
39
40
import UIKit

class DetailViewController: UIViewController {
    private var onEdit:Bool = true;
    override func viewDidLoad() {
        super.viewDidLoad()

        // Set delegate
        self.presentationController?.delegate = self
        // if UIViewController is embedded in navigationController:
        // self.navigationController?.presentationController?.delegate = self

        // Disable swipe down to dismiss (1):
        self.isModalInPresentation = true;

    }

}

// Delegate implementation
extension DetailViewController: UIAdaptivePresentationControllerDelegate {
    // Disable swipe down to dismiss (2):
    func presentationControllerShouldDismiss(_ presentationController: UIPresentationController) -> Bool {
        return false;
    }

    // Swipe down gesture triggered when dismissal is cancelled
    func presentationControllerDidAttemptToDismiss(_ presentationController: UIPresentationController) {
        if (onEdit) {
          let alert = UIAlertController(title: "Data not saved", message: nil, preferredStyle: .actionSheet)
          alert.addAction(UIAlertAction(title: "Discard and leave", style: .default) { _ in
              self.dismiss(animated: true)
          })
          alert.addAction(UIAlertAction(title: "Continue editing", style: .cancel, handler: nil))
          self.present(alert, animated: true)
        } else {
          self.dismiss(animated: true, completion: nil)
        }
    }
}
To disable pull-down dismissal, you can either set the UIViewController variable isModalInPresentation to false or implement the UIAdaptivePresentationControllerDelegate method presentationControllerShouldDismiss and return true. Either approach works.
UIAdaptivePresentationControllerDelegate presentationControllerDidAttemptToDismiss method is only called when the pull-down dismissal is canceled.
By the way…
The card-style display page is called a Sheet in the system, and its behavior differs from FullScreen.
Assuming today
RootViewControllerisHomeViewController
In card style presentation (UIModalPresentationAutomatic):
When presentingDetailViewControllerfromHomeViewController…
viewWillDisappear/viewDidDisappearofHomeViewControllerare not triggered.
When
DetailViewControllerisDismissed…
HomeViewControllerdoes not triggerviewWillAppear/viewDidAppear.
⚠️ Since XCODE 11, iOS ≥ 13 apps packaged by default use card style for Present (UIModalPresentationAutomatic)
If you have placed some logic in viewWillAppear/viewWillDisappear/viewDidAppear/viewDidDisappear before, be extra careful and check thoroughly! ⚠️
After reviewing the system built-ins, let’s move on to the main highlight of this article! How to create these effects yourself?
Where can transition animations be made?
First, identify where window switching transition animations can be implemented.
UITabBarController/UIViewController/UINavigationController
When Switching UITabBarController
We can set the delegate in UITabBarController and implement the animationControllerForTransitionFrom method to apply custom transition effects when switching UITabBarController content.
The system defaults to no animation; the image above shows a fade-in fade-out transition effect.
1
2
3
4
5
6
7
8
9
10
11
12
13
14
15
16
17
import UIKit

class MainTabBarViewController: UITabBarController {

    override func viewDidLoad() {
        super.viewDidLoad()
        self.delegate = self

    }

}

extension MainTabBarViewController: UITabBarControllerDelegate {
    func tabBarController(_ tabBarController: UITabBarController, animationControllerForTransitionFrom fromVC: UIViewController, to toVC: UIViewController) -> UIViewControllerAnimatedTransitioning? {
        //return UIViewControllerAnimatedTransitioning
    }
}
When Presenting/Dismissing UIViewController
Naturally, when Present/Dismiss a UIViewController, you can specify the animation effect; otherwise, this article wouldn’t exist XD. However, it’s worth mentioning that if you only need a Present animation without gesture control, you can directly use UIPresentationController for convenience and speed (see references at the end).
The system default is slide up to appear and slide down to disappear! For customizations, you can add fade-in, rounded corners, position control, and other effects.
1
2
3
4
5
6
7
8
9
10
11
12
13
14
15
16
17
18
19
20
21
22
23
24
25
import UIKit

class HomeAddViewController: UIViewController {

    override func viewDidLoad() {
        super.viewDidLoad()

        self.modalPresentationStyle = .custom
        self.transitioningDelegate = self
    }

}

extension HomeAddViewController: UIViewControllerTransitioningDelegate {

    func animationController(forPresented presented: UIViewController, presenting: UIViewController, source: UIViewController) -> UIViewControllerAnimatedTransitioning? {
        // Returning nil uses the default animation
        return // UIViewControllerAnimatedTransitioning animation to apply when presenting
    }

    func animationController(forDismissed dismissed: UIViewController) -> UIViewControllerAnimatedTransitioning? {
        // Returning nil uses the default animation
        return // UIViewControllerAnimatedTransitioning animation to apply when dismissing
    }
}
Any
UIViewControllercan implementtransitioningDelegateto specifyPresent/Dismissanimations; this applies toUITabBarViewController,UINavigationController,UITableViewController, and more.
When UINavigationController Pushes/Pops
UINavigationController is probably the least likely to need animation changes because the system’s default slide-in from the left and slide-back from the right animation is already the best effect. Customizing this part might be useful for creating seamless left-right switching between UIViewControllers.
Because we want to enable full-page swipe back gestures and use a custom POP animation, we need to implement our own back animation effect.
1
2
3
4
5
6
7
8
9
10
11
12
13
14
15
16
17
18
19
20
21
22
23
24
25
import UIKit

class HomeNavigationController: UINavigationController {

    override func viewDidLoad() {
        super.viewDidLoad()

        self.delegate = self
    }

}

extension HomeNavigationController: UINavigationControllerDelegate {
    func navigationController(_ navigationController: UINavigationController, animationControllerFor operation: UINavigationController.Operation, from fromVC: UIViewController, to toVC: UIViewController) -> UIViewControllerAnimatedTransitioning? {

        if operation == .pop {
            return // UIViewControllerAnimatedTransitioning animation to apply when popping
        } else if operation == .push {
            return // UIViewControllerAnimatedTransitioning animation to apply when pushing
        }

        // Return nil to use the default animation
        return nil
    }
}
Interactive or Non-Interactive Animation?
Before discussing animation implementation and gesture control, let’s first explain what interactive and non-interactive mean.
Interactive Animation: Gesture-triggered animations, such as UIPanGestureRecognizer
Non-interactive Animation: System-triggered animations, such as self.present()
How to Implement Animation Effects?
After discussing where it can be done, let’s look at how to create animation effects.
We need to implement the UIViewControllerAnimatedTransitioning protocol and perform animations on the window within it.
Common Transition Animation: UIView.animate
Using UIView.animate directly for animation requires the UIViewControllerAnimatedTransitioning to implement two methods: transitionDuration to specify the animation duration, and animateTransition to define the animation content.
1
2
3
4
5
6
7
8
9
10
11
12
13
14
15
16
17
18
19
20
21
22
23
24
25
26
27
28
29
30
31
32
33
34
35
36
37
38
39
40
41
42
43
44
45
import UIKit

class SlideFromLeftToRightTransition: NSObject, UIViewControllerAnimatedTransitioning {

    func transitionDuration(using transitionContext: UIViewControllerContextTransitioning?) -> TimeInterval {
        return 0.4
    }

    func animateTransition(using transitionContext: UIViewControllerContextTransitioning) {

        // Available parameters:
        // Get the view of the target UIViewController to be displayed:
        let toView = transitionContext.view(forKey: .to)
        // Get the target UIViewController to be displayed:
        let toViewController = transitionContext.viewController(forKey: .to)
        // Get the initial frame info of the target UIViewController's view:
        let toInitalFrame = transitionContext.initialFrame(for: toViewController!)
        // Get the final frame info of the target UIViewController's view:
        let toFinalFrame = transitionContext.finalFrame(for: toViewController!)

        // Get the current UIViewController's view:
        let fromView = transitionContext.view(forKey: .from)
        // Get the current UIViewController:
        let fromViewController = transitionContext.viewController(forKey: .from)
        // Get the initial frame info of the current UIViewController's view:
        let fromInitalFrame = transitionContext.initialFrame(for: fromViewController!)
        // Get the final frame info of the current UIViewController's view: (Can get the final frame from the previous display animation when closing)
        let fromFinalFrame = transitionContext.finalFrame(for: fromViewController!)

        //toView.frame.origin.y = UIScreen.main.bounds.size.height

        UIView.animate(withDuration: transitionDuration(using: transitionContext), delay: 0, options: [.curveLinear], animations: {
            //toView.frame.origin.y = 0
        }) { (_) in
            if (!transitionContext.transitionWasCancelled) {
                // Animation was not cancelled
            }

            // Notify the system that the animation is complete
            transitionContext.completeTransition(!transitionContext.transitionWasCancelled)
        }

    }

}
To and From:
Assuming today
HomeViewControllerneeds toPresent/PushDetailViewController,
From = HomeViewController / To = DetailViewController
When
DetailViewControllerneeds toDismiss/Pop,
From = DetailViewController / To = HomeViewController
⚠️⚠️⚠️⚠️⚠️
It is officially recommended to get the View from
transitionContext.viewinstead of using.viewfromtransitionContext.viewController.
But here is an issue: when performing Present/Dismiss animations with
modalPresentationStyle = .custom;
Using
transitionContext.view(forKey: .from)in Present will be nil,
Using
transitionContext.view(forKey: .to)during Dismiss will also be nil ;
Still need to get values from viewController.view to use.
⚠️⚠️⚠️⚠️⚠️
transitionContext.completeTransition(!transitionContext.transitionWasCancelled)Must be called when the animation finishes, otherwise the screen will freeze ;
However, since
UIView.animatewill not callcompletionif there is no animation to perform, the aforementioned method may not be called; therefore, make sure the animation will actually run (e.g., y from 100 to 0).
ℹ️ℹ️ℹ️ℹ️ℹ️
For animations involving
ToView/FromView, if the views are complex or cause issues during animation, you can usesnapshotView(afterScreenUpdates:)to capture a snapshot for the animation. First, take a snapshot and add it to the layer withtransitionContext.containerView.addSubview(snapShotView). Then hide the originalToView/FromView(isHidden = true). At the end of the animation, remove thesnapShotViewwithsnapShotView.removeFromSuperview()and restore the originalToView/FromViewvisibility (isHidden = false).
Interruptible and Resumable Transition Animations: UIViewPropertyAnimator
You can also use the new animation classes introduced in iOS ≥ 10 to implement animation effects.
Choose based on personal preference or the level of detail needed for the animation.
Although the official recommendation is to use UIViewPropertyAnimator for interactive animations, for both interactive and non-interactive (gesture-controlled) animations, using UIView.animate is generally sufficient.
UIViewPropertyAnimator supports pausing and continuing transition animations. While I’m not sure about its practical applications, interested readers can refer to this article.
1
2
3
4
5
6
7
8
9
10
11
12
13
14
15
16
17
18
19
20
21
22
23
24
25
26
27
28
29
30
31
32
33
34
35
36
37
38
39
40
41
42
43
44
45
46
47
48
import UIKit

class FadeInFadeOutTransition: NSObject, UIViewControllerAnimatedTransitioning {

    private var animatorForCurrentTransition: UIViewImplicitlyAnimating?

    func interruptibleAnimator(using transitionContext: UIViewControllerContextTransitioning) -> UIViewImplicitlyAnimating {

        // Return the current animator if there is an ongoing transition
        if let animatorForCurrentTransition = animatorForCurrentTransition {
            return animatorForCurrentTransition
        }

        // Parameters as mentioned before

        //fromView.frame.origin.y = 100

        let animator = UIViewPropertyAnimator(duration: transitionDuration(using: transitionContext), curve: .linear)

        animator.addAnimations {
            //fromView.frame.origin.y = 0
        }

        animator.addCompletion { (position) in
            transitionContext.completeTransition(!transitionContext.transitionWasCancelled)
        }

        // Keep a reference to the animator
        self.animatorForCurrentTransition = animator
        return animator
    }

    func transitionDuration(using transitionContext: UIViewControllerContextTransitioning?) -> TimeInterval {
        return 0.4
    }

    func animateTransition(using transitionContext: UIViewControllerContextTransitioning) {
        // For non-interactive transitions, use the interruptible animator as well
        let animator = self.interruptibleAnimator(using: transitionContext)
        animator.startAnimation()
    }

    func animationEnded(_ transitionCompleted: Bool) {
        // Clear the animator when animation ends
        self.animatorForCurrentTransition = nil
    }

}
In interactive scenarios (control details will be explained later), animations use the
interruptibleAnimatormethod; for non-interactive cases, theanimateTransitionmethod is still used.
Because of its resumable and interruptible nature,
interruptibleAnimatorcan be called repeatedly; therefore, we need to use a global variable to store and access its return value.
Murmur…
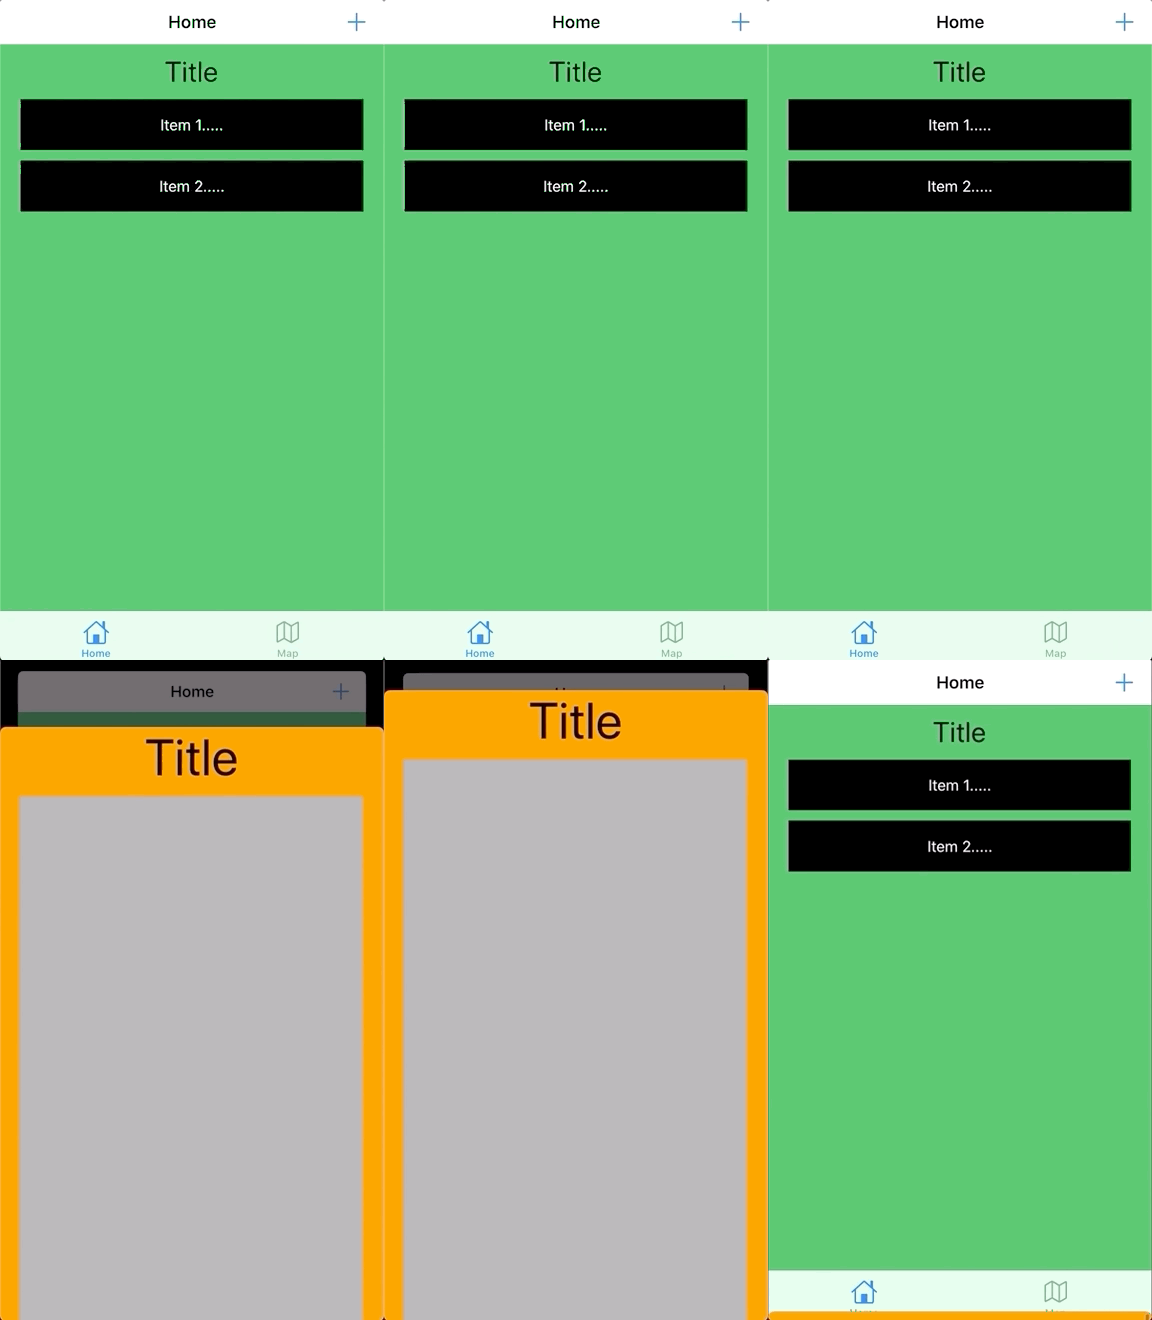
Actually, I originally wanted to switch everything to the new UIViewPropertyAnimator and recommend everyone use it, but I encountered a strange issue. When doing a full-page swipe back pop animation, if the gesture is released and the animation resets, the Navigation Bar’s items at the top flicker with a fade in and out… I couldn’t find a solution. However, this issue doesn’t occur when using UIView.animate. If I missed something, please let me know <( _ _ )>.
Problem image; + button is for the previous page
So to be safe, let’s stick with the old method!
Separate classes will be created for different animation effects. If the files feel cluttered, you can refer to the packaged solution at the end of the article; or group the same continuous (Present + Dismiss) animations together.
transitionCoordinator
If you need finer control, such as changing a specific component in the ViewController to match the transition animation, you can use transitionCoordinator within UIViewController to coordinate. I haven’t used this part myself; if interested, you can refer to this article.
How to Control Animation?
This is the “interaction” mentioned earlier, which is essentially gesture control; this is the most important section of the article because we need to link gesture operations with transition animations to achieve the pull-down close and full-page back functions.
Control Proxy Settings:
As with the previous ViewController delegate animation design, the class handling interaction also needs to inform the ViewController through the delegate.
UITabBarController: None
UINavigationController (Push/Pop):
1
2
3
4
5
6
7
8
9
10
11
12
13
14
15
16
17
18
19
20
21
22
23
24
25
26
27
28
29
30
31
32
33
34
35
36
import UIKit

class HomeNavigationController: UINavigationController {

    override func viewDidLoad() {
        super.viewDidLoad()

        self.delegate = self
    }

}

extension HomeNavigationController: UINavigationControllerDelegate {
    func navigationController(_ navigationController: UINavigationController, animationControllerFor operation: UINavigationController.Operation, from fromVC: UIViewController, to toVC: UIViewController) -> UIViewControllerAnimatedTransitioning? {

        if operation == .pop {
            return // UIViewControllerAnimatedTransitioning animation to apply when popping
        } else if operation == .push {
            return // UIViewControllerAnimatedTransitioning animation to apply when pushing
        }
        // Return nil to use the default animation
        return nil
    }

    // Add interactive delegate method:
    func navigationController(_ navigationController: UINavigationController, interactionControllerFor animationController: UIViewControllerAnimatedTransitioning) -> UIViewControllerInteractiveTransitioning? {
        // Here we cannot tell if it's Pop or Push, so we judge by the animation itself
        if animationController is push animation {
            return // UIPercentDrivenInteractiveTransition interactive control for push animation
        } else if animationController is pop animation {
            return // UIPercentDrivenInteractiveTransition interactive control for pop animation
        }
        // Return nil to disable interactive handling
        return nil
    }
}
UIViewController (Present/Dismiss):
1
2
3
4
5
6
7
8
9
10
11
12
13
14
15
16
17
18
19
20
21
22
23
24
25
26
27
28
29
30
31
32
33
34
35
36
import UIKit

class HomeAddViewController: UIViewController {

    override func viewDidLoad() {
        super.viewDidLoad()

        self.modalPresentationStyle = .custom
        self.transitioningDelegate = self
    }

}

extension HomeAddViewController: UIViewControllerTransitioningDelegate {

    func interactionControllerForDismissal(using animator: UIViewControllerAnimatedTransitioning) -> UIViewControllerInteractiveTransitioning? {
        // return nil means no interactive handling
        return // UIPercentDrivenInteractiveTransition interactive control method for Dismiss
    }

    func interactionControllerForPresentation(using animator: UIViewControllerAnimatedTransitioning) -> UIViewControllerInteractiveTransitioning? {
        // return nil means no interactive handling
        return // UIPercentDrivenInteractiveTransition interactive control method for Present
    }

    func animationController(forPresented presented: UIViewController, presenting: UIViewController, source: UIViewController) -> UIViewControllerAnimatedTransitioning? {
        // returning nil uses the default animation
        return // UIViewControllerAnimatedTransitioning animation to apply during Present
    }

    func animationController(forDismissed dismissed: UIViewController) -> UIViewControllerAnimatedTransitioning? {
        // returning nil uses the default animation
        return // UIViewControllerAnimatedTransitioning animation to apply during Dismiss
    }

}
⚠️⚠️⚠️⚠️⚠️
If you implement methods like interactionControllerFor…, these methods will be called even if the animation is non-interactive (e.g., self.present system-triggered transition); what we need to control is the
wantsInteractiveStartparameter inside (explained below).
Animation Interaction Handler Class UIPercentDrivenInteractiveTransition:
Next, let’s discuss the core implementation of UIPercentDrivenInteractiveTransition.
1
2
3
4
5
6
7
8
9
10
11
12
13
14
15
16
17
18
19
20
21
22
23
24
25
26
27
28
29
30
31
32
33
34
35
36
37
38
39
40
41
42
43
44
45
46
47
48
49
50
51
52
53
54
55
56
57
58
59
60
61
62
63
64
65
66
67
68
69
70
71
72
73
74
75
76
77
78
79
80
81
82
83
84
85
86
87
88
89
90
91
92
93
94
95
96
97
98
import UIKit

class PullToDismissInteractive: UIPercentDrivenInteractiveTransition {

    // The UIView to add gesture control for interaction
    private var interactiveView: UIView!
    // The current UIViewController
    private var presented: UIViewController!
    // The threshold percentage to complete the transition, otherwise revert
    private let thredhold: CGFloat = 0.4

    // Different transition effects may need different info, customizable
    convenience init(_ presented: UIViewController, _ interactiveView: UIView) {
        self.init()
        self.interactiveView = interactiveView
        self.presented = presented
        setupPanGesture()

        // Default value, informs the system that this is not an interactive animation initially
        wantsInteractiveStart = false
    }

    private func setupPanGesture() {
        let panGesture = UIPanGestureRecognizer(target: self, action: #selector(handlePan(_:)))
        panGesture.maximumNumberOfTouches = 1
        panGesture.delegate = self
        interactiveView.addGestureRecognizer(panGesture)
    }

    @objc func handlePan(_ sender: UIPanGestureRecognizer) {
        switch sender.state {
        case .began:
            // Reset gesture position
            sender.setTranslation(.zero, in: interactiveView)
            // Inform the system that an interactive animation triggered by gesture is starting
            wantsInteractiveStart = true

            // When gesture begins, call the transition effect (won't execute immediately, system will catch it)
            // Then if the transition has a corresponding animation, it will jump to UIViewControllerAnimatedTransitioning to handle
            // animated must be true, otherwise no animation

            // Dismiss:
            self.presented.dismiss(animated: true, completion: nil)
            // Present:
            //self.present(presenting,animated: true)
            // Push:
            //self.navigationController.push(presenting)
            // Pop:
            //self.navigationController.pop(animated: true)

        case .changed:
            // Calculate the gesture sliding position corresponding to animation completion percentage 0~1
            // Actual calculation varies by animation type
            let translation = sender.translation(in: interactiveView)
            guard translation.y >= 0 else {
                sender.setTranslation(.zero, in: interactiveView)
                return
            }
            let percentage = abs(translation.y / interactiveView.bounds.height)

            // Update UIViewControllerAnimatedTransitioning animation percentage
            update(percentage)
        case .ended:
            // When gesture ends, check if completion exceeds threshold
            wantsInteractiveStart = false
            if percentComplete >= thredhold {
              // Yes, inform animation to finish
              finish()
            } else {
              // No, inform animation to revert
              cancel()
            }
        case .cancelled, .failed:
          // On cancel or failure
          wantsInteractiveStart = false
          cancel()
        default:
          wantsInteractiveStart = false
          return
        }
    }
}

// When UIViewController contains UIScrollView components (UITableView/UICollectionView/WKWebView...), prevent gesture conflicts
// Enable interactive transition gesture only when the internal UIScrollView is scrolled to the top
extension PullToDismissInteractive: UIGestureRecognizerDelegate {
    func gestureRecognizer(_ gestureRecognizer: UIGestureRecognizer, shouldRecognizeSimultaneouslyWith otherGestureRecognizer: UIGestureRecognizer) -> Bool {
        if let scrollView = otherGestureRecognizer.view as? UIScrollView {
            if scrollView.contentOffset.y <= 0 {
                return true
            } else {
                return false
            }
        }
        return true
    }

}
*Additional point about why sender.setTranslation(.zero, in: interactiveView) is needed<
We need to implement different classes based on the effects of various gesture operations; if the operations are part of the same sequence (Present + Dismiss), they can be grouped together.
⚠️⚠️⚠️⚠️⚠️
wantsInteractiveStartmust be in the correct state; settingwantsInteractiveStart = falseduring interactive animations can also cause screen freezes;
You need to exit and reopen the app to restore normal function.
⚠️⚠️⚠️⚠️⚠️
interactiveView must also have isUserInteractionEnabled = true
You can add more settings to ensure it!
Combination
After setting up the Delegate here and creating the Class, we can achieve the desired functionality.
Next, without further ado, here is the complete example.
Custom Dropdown Close Page Effect
The advantage of a custom pull-down is that it supports all iOS versions on the market, allows control over the overlay percentage, controls the trigger close position, and customizes animation effects.
Click the + Present button at the top right corner of the page
This is an example of HomeViewController presenting HomeAddViewController and HomeAddViewController dismissing itself.
1
2
3
4
5
6
7
8
9
10
11
12
13
14
15
16
17
18
19
20
21
22
23
24
25
26
27
28
29
30
31
32
33
34
35
36
37
38
39
40
41
42
43
44
45
46
47
48
49
50
51
52
53
54
55
56
57
58
59
60
61
62
63
64
65
66
67
68
69
70
71
72
73
74
75
76
77
78
79
80
81
82
83
84
85
86
87
88
89
90
91
92
93
94
95
96
97
98
99
100
101
102
103
104
105
106
107
108
109
110
111
112
113
114
115
116
117
118
119
120
121
122
import UIKit

class HomeViewController: UIViewController {

    @IBAction func addButtonTapped(_ sender: Any) {
        guard let homeAddViewController = UIStoryboard(name: "Main", bundle: nil).instantiateViewController(identifier: "HomeAddViewController") as? HomeAddViewController else {
            return
        }

        //transitioningDelegate can be assigned to the target ViewController or the current ViewController
        homeAddViewController.transitioningDelegate = homeAddViewController
        homeAddViewController.modalPresentationStyle = .custom
        self.present(homeAddViewController, animated: true, completion: nil)
    }

}
import UIKit

class HomeAddViewController: UIViewController {

    private var pullToDismissInteractive:PullToDismissInteractive!

    override func viewDidLoad() {
        super.viewDidLoad()

        //Bind transition interaction info
        self.pullToDismissInteractive = PullToDismissInteractive(self, self.view)
    }

}

extension HomeAddViewController: UIViewControllerTransitioningDelegate {

    func interactionControllerForDismissal(using animator: UIViewControllerAnimatedTransitioning) -> UIViewControllerInteractiveTransitioning? {
        return pullToDismissInteractive
    }

    func animationController(forPresented presented: UIViewController, presenting: UIViewController, source: UIViewController) -> UIViewControllerAnimatedTransitioning? {
        return PresentAndDismissTransition(false)
    }

    func animationController(forDismissed dismissed: UIViewController) -> UIViewControllerAnimatedTransitioning? {
        return PresentAndDismissTransition(true)
    }

    func interactionControllerForPresentation(using animator: UIViewControllerAnimatedTransitioning) -> UIViewControllerInteractiveTransitioning? {
        //No present gesture here
        return nil
    }
}
import UIKit

class PullToDismissInteractive: UIPercentDrivenInteractiveTransition {

    private var interactiveView: UIView!
    private var presented: UIViewController!
    private var completion:(() -> Void)?
    private let thredhold: CGFloat = 0.4

    convenience init(_ presented: UIViewController, _ interactiveView: UIView,_ completion:(() -> Void)? = nil) {
        self.init()
        self.interactiveView = interactiveView
        self.completion = completion
        self.presented = presented
        setupPanGesture()

        wantsInteractiveStart = false
    }

    private func setupPanGesture() {
        let panGesture = UIPanGestureRecognizer(target: self, action: #selector(handlePan(_:)))
        panGesture.maximumNumberOfTouches = 1
        panGesture.delegate = self
        interactiveView.addGestureRecognizer(panGesture)
    }

    @objc func handlePan(_ sender: UIPanGestureRecognizer) {
        switch sender.state {
        case .began:
            sender.setTranslation(.zero, in: interactiveView)
            wantsInteractiveStart = true

            self.presented.dismiss(animated: true, completion: self.completion)
        case .changed:
            let translation = sender.translation(in: interactiveView)
            guard translation.y >= 0 else {
                sender.setTranslation(.zero, in: interactiveView)
                return
            }

            let percentage = abs(translation.y / interactiveView.bounds.height)
            update(percentage)
        case .ended:
            if percentComplete >= thredhold {
                finish()
            } else {
                wantsInteractiveStart = false
                cancel()
            }
        case .cancelled, .failed:
            wantsInteractiveStart = false
            cancel()
        default:
            wantsInteractiveStart = false
            return
        }
    }
}

extension PullToDismissInteractive: UIGestureRecognizerDelegate {
    func gestureRecognizer(_ gestureRecognizer: UIGestureRecognizer, shouldRecognizeSimultaneouslyWith otherGestureRecognizer: UIGestureRecognizer) -> Bool {
        if let scrollView = otherGestureRecognizer.view as? UIScrollView {
            if scrollView.contentOffset.y <= 0 {
                return true
            } else {
                return false
            }
        }
        return true
    }

}
The above achieves the effect shown in the image. Since this is a tutorial demonstration, I didn’t want to make the path too complicated, so the code is messy and has plenty of room for optimization and integration.
It is worth mentioning…
iOS ≥ 13, if a View contains a UITextView, during the pull-down close animation, the text inside the UITextView will appear blank; this causes a flickering experience (video example) …
The solution here is to use
snapshotView(afterScreenUpdates:)to capture a snapshot instead of the original view layer during animation.
Full-page right swipe to go back
When looking for a solution to enable full-screen right-swipe back gesture, I found a tricky method:
Add a UIPanGestureRecognizer directly to the view, then set both the target and action to the native interactivePopGestureRecognizer with action:handleNavigationTransition.
*Click here for detailed method<
That’s right! It definitely looks like a Private API, so it might be rejected during review; also, it’s uncertain if Swift can use it, as it likely relies on Objective-C runtime features.
Let’s stick to the official way:
Using the same approach as in this article, we handle the navigationController POP ourselves; just add a full-page right swipe gesture controller combined with a custom right swipe animation!
Other parts omitted, only key animation and interaction handling classes are shown:
1
2
3
4
5
6
7
8
9
10
11
12
13
14
15
16
17
18
19
20
21
22
23
24
25
26
27
28
29
30
31
32
33
34
35
36
37
38
39
40
41
42
43
44
45
46
47
48
49
50
51
52
53
54
55
56
57
58
import UIKit

class SwipeBackInteractive: UIPercentDrivenInteractiveTransition {

    private var interactiveView: UIView!
    private var navigationController: UINavigationController!

    private let thredhold: CGFloat = 0.4

    convenience init(_ navigationController: UINavigationController, _ interactiveView: UIView) {
        self.init()
        self.interactiveView = interactiveView

        self.navigationController = navigationController
        setupPanGesture()

        wantsInteractiveStart = false
    }

    private func setupPanGesture() {
        let panGesture = UIPanGestureRecognizer(target: self, action: #selector(handlePan(_:)))
        panGesture.maximumNumberOfTouches = 1
        interactiveView.addGestureRecognizer(panGesture)
    }

    @objc func handlePan(_ sender: UIPanGestureRecognizer) {

        switch sender.state {
        case .began:
            sender.setTranslation(.zero, in: interactiveView)
            wantsInteractiveStart = true

            self.navigationController.popViewController(animated: true)
        case .changed:
            let translation = sender.translation(in: interactiveView)
            guard translation.x >= 0 else {
                sender.setTranslation(.zero, in: interactiveView)
                return
            }

            let percentage = abs(translation.x / interactiveView.bounds.width)
            update(percentage)
        case .ended:
            if percentComplete >= thredhold {
                finish()
            } else {
                wantsInteractiveStart = false
                cancel()
            }
        case .cancelled, .failed:
            wantsInteractiveStart = false
            cancel()
        default:
            wantsInteractiveStart = false
            return
        }
    }
}
Pull-up Fade-in UIViewController
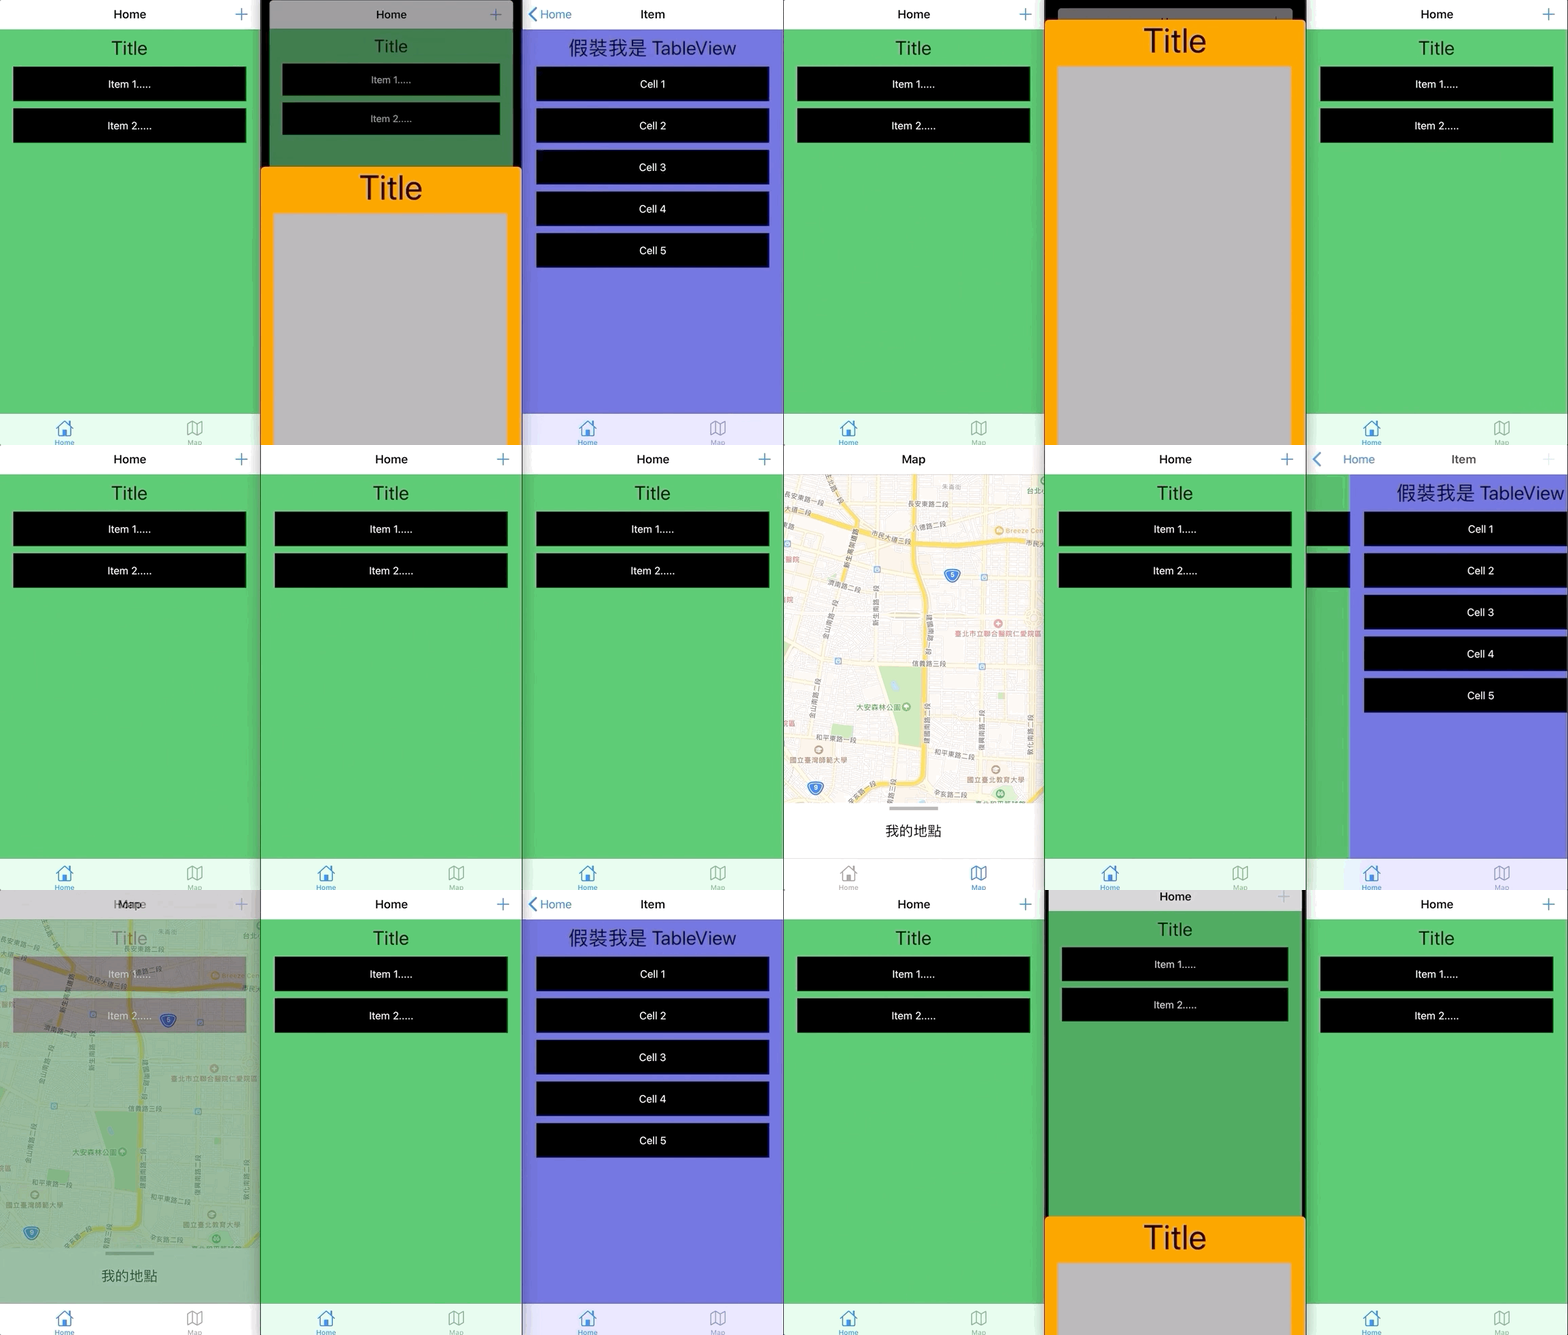
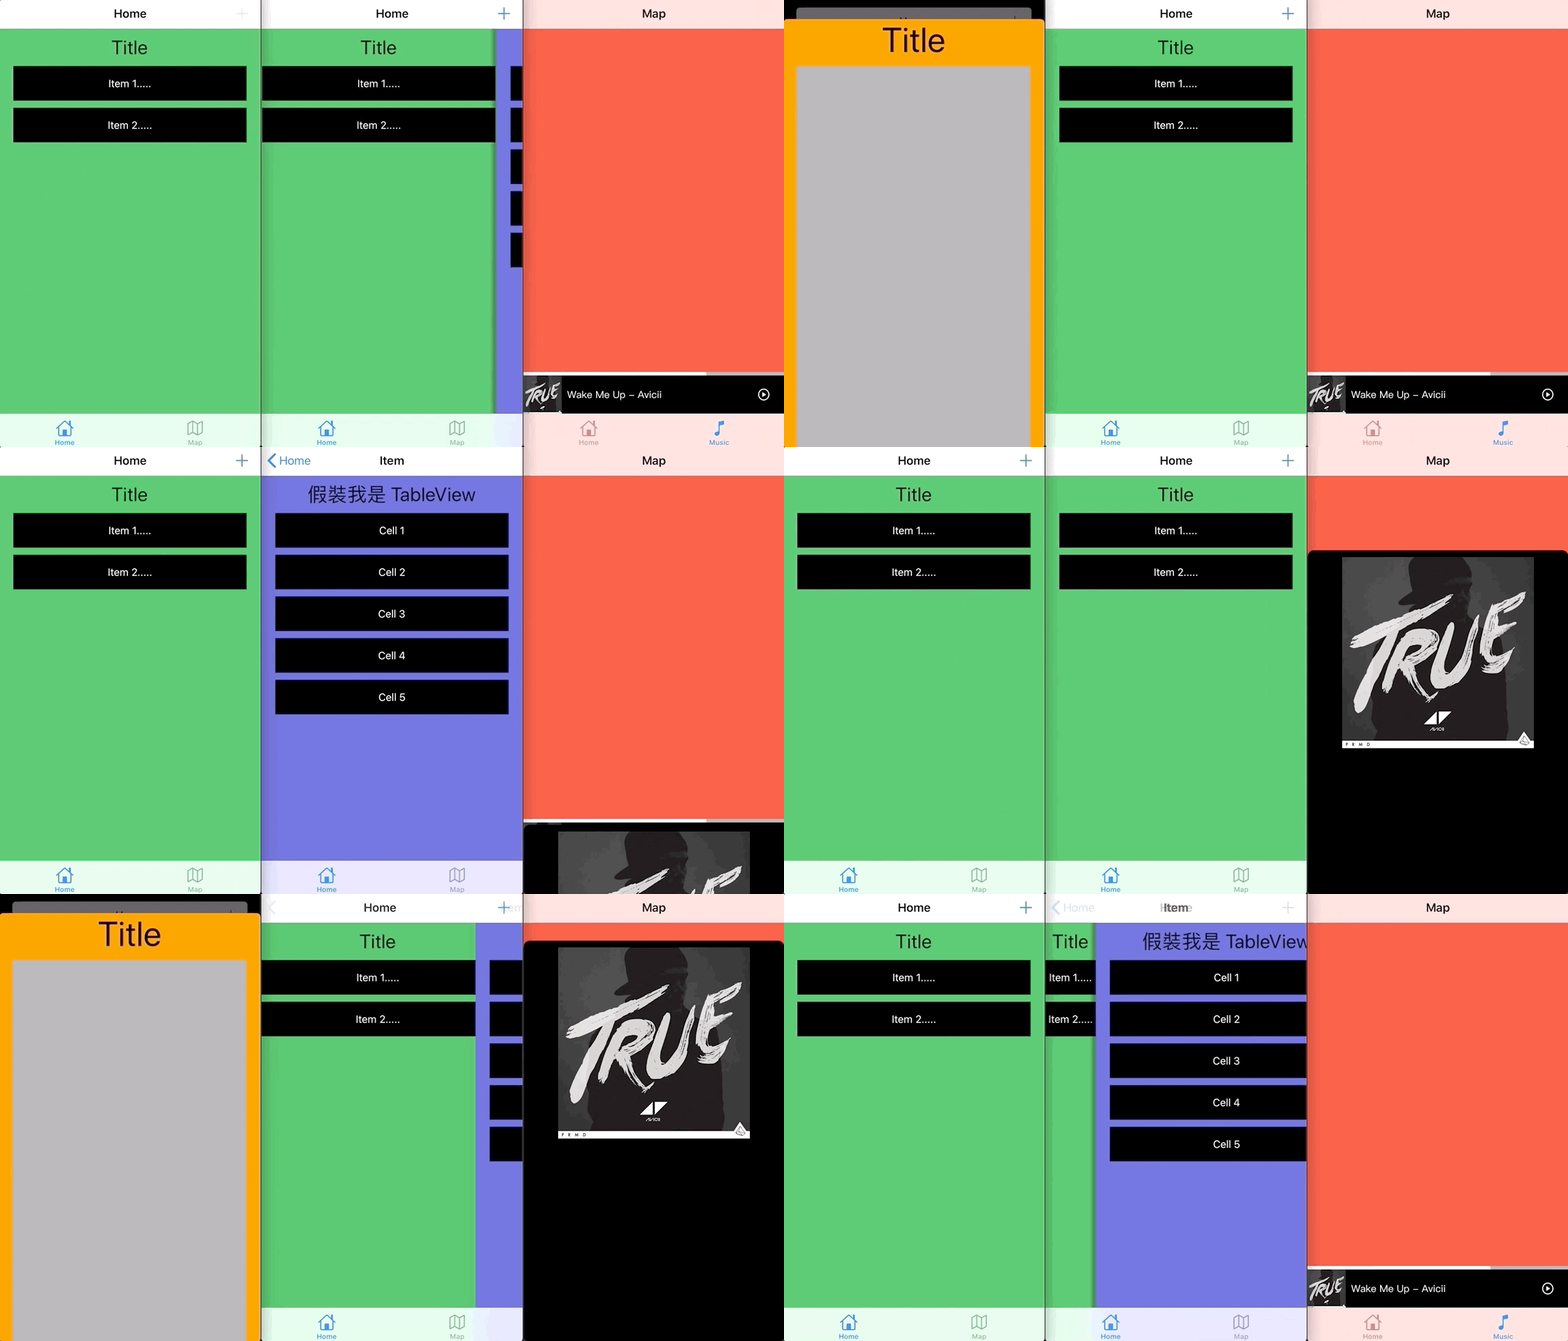
Pulling up on the view to fade in + pulling down to close creates a transition effect similar to Spotify’s player!
This part is more complicated, but the principle is the same. It will not be posted here. Interested readers can refer to the GitHub example.
The main point to note is when pulling up for fade-in, the animation must use “.curveLinear linear”; otherwise, the pull-up will feel unresponsive. The pulling distance and the display position will not be proportional.
Done!
Completed Diagram
This article is very long and took me a lot of time to organize and create. Thank you for your patience in reading.
Download the full GitHub examples:
Reference:
Systematic Learning of iOS Animations Part 4: View Controller Transition Animations
Systematic Learning of iOS Animations Part 5: Using UIViewPropertyAnimator
Use UIPresentationController to create a simple and elegant bottom popup control (If you only want the Present animation effect, you can use this directly)
For reference to elegant code encapsulation usage:
If you have any questions or feedback, feel free to contact me.
This post was originally published on Medium (View original post), and automatically converted and synced by ZMediumToMarkdown.
